Pots and Pans – Fresh Pineapple and Cheese Casserole with a TWIST.

IMG_1248

Pineapple on sale…only $1.99 apiece. Terrific! Only problem is I don’t like eating pineapple by itself…hmmm…grandchildren over for dinner, how best would they like to eat the pineapple? I decided on baked pineapple casserole. When I looked for a recipe on the Internet all I found were recipes for canned pineapple. Not an option when you have a gigantic pineapple waiting to be eaten. Finally on the site Big Oven, I found a recipe for a fresh pineapple casserole. You can find that recipe here: Fresh Pineapple and Cheese Casserole

I cut the pineapple up into small chunks as instructed, and began putting the casserole together, only to discover I did not have the proper ingredients. I had no Ritz crackers, and my shredded cheese was flavored for Tacos. RATS! What to do with all the pineapple I had cut? I decided to use what I had on hand. Soda crackers and the Taco flavored cheese would have to stand in for the proper ingredients. I also chose to add a bit of brown sugar to the recipe to mimic the richness of the Ritz Crackers.

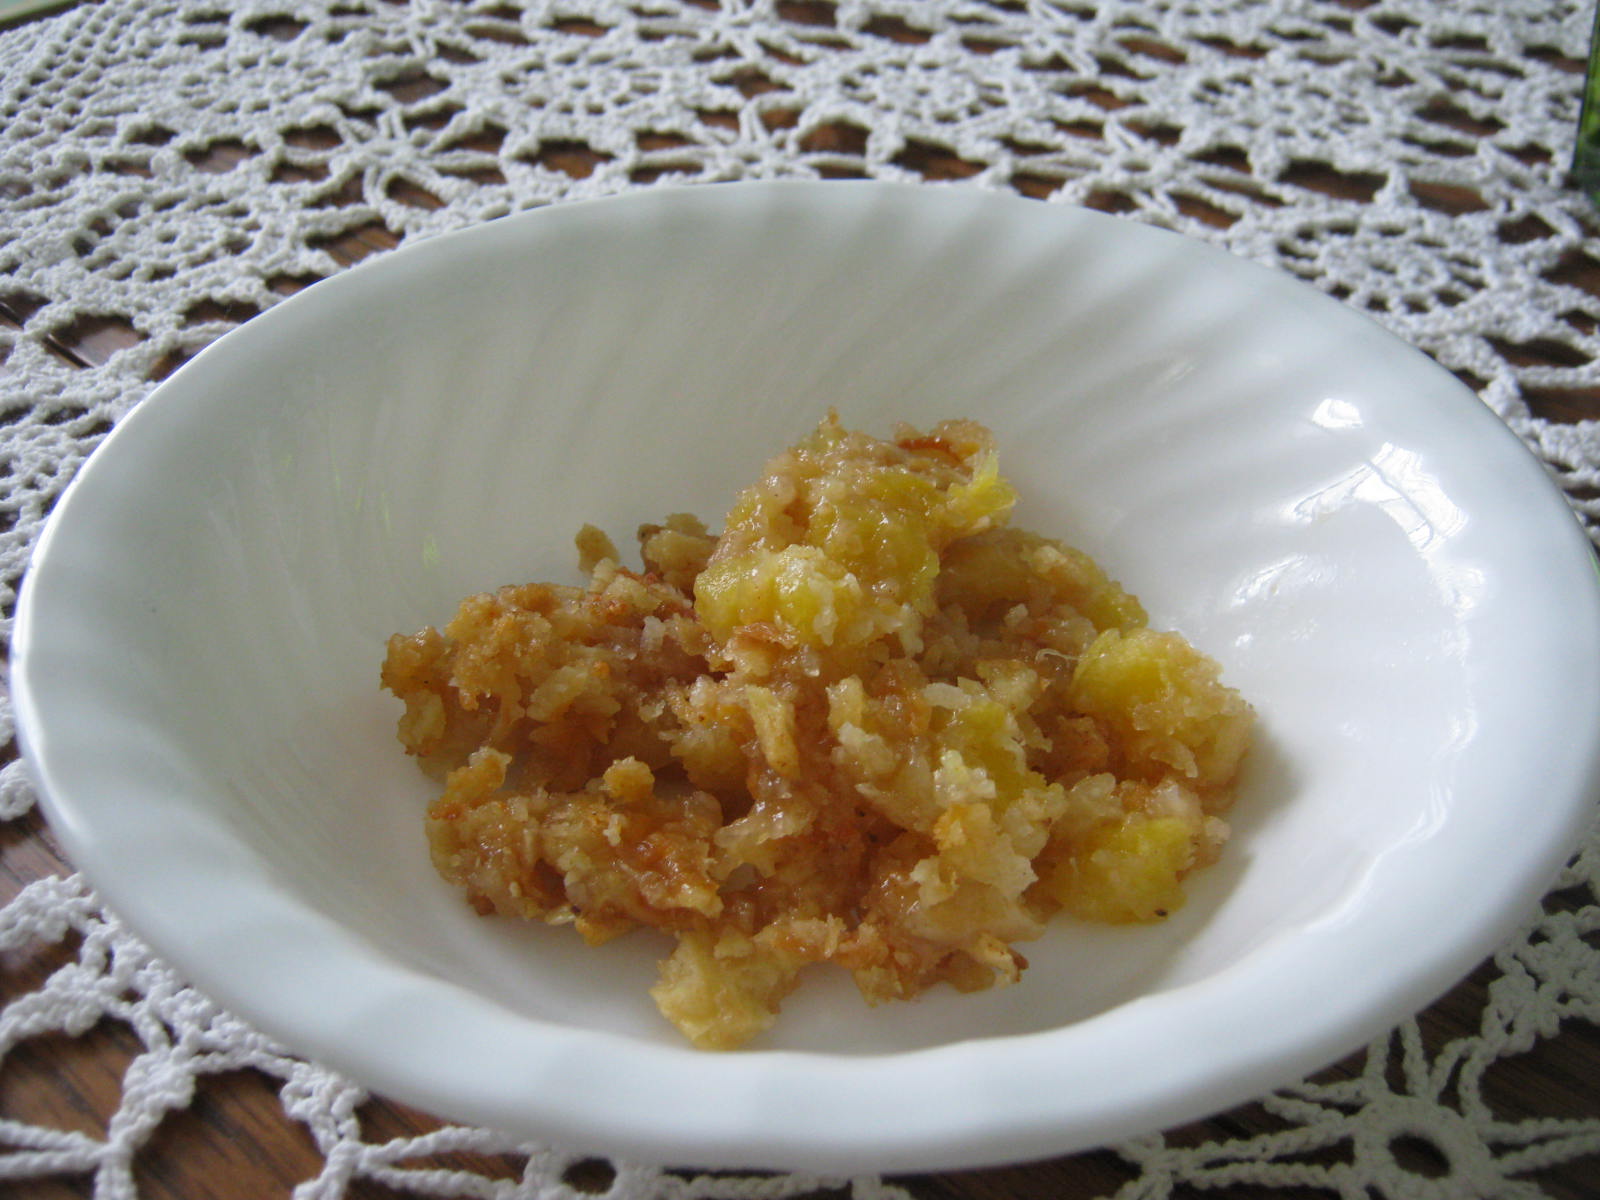
Oh MY! The casserole was delicious. Everyone from young to well, hmmm…older, enjoyed the pineapple cheese casserole and asked for more. Here is my altered recipe. I am sure Big Oven’s recipe is terrific too since most of the ingredients listed were also in my casserole.

1/2 c Sugar
1/2 c Butter (melted)
1 c Fresh pineapple; chunks ( make the chunks smaller rather than larger, a few of mine stayed a little hard)
3 tbs Flour
1 1/4 Cups soda crackers; crushed into small and large crumbs
1 Cup shredded Taco seasoned cheddar cheese
2 TBS brown sugar

Preheat oven to 350 degrees and grease a 13 x 9 baking pan or dish. Mix sugar and flour together. Stir pineapple into the flour and sugar. Pour into a greased baking dish. (I like glass for this recipe, you can also use a large round casserole dish) Sprinkle with taco cheese in an even layer on top. Add 1/2 cracker crumbs dry, spaced evenly. Drizzle with half the melted butter. Mix remaining crackers and butter in small bowl. Sprinkle this evenly over top of casserole. Sprinkle 2tbs brown sugar evenly over the top of casserole. Bake at 350 degrees for 35 minutes until the topping is crispy and slightly golden brown with bubbly edges. Remove and cool till set. (10-20 minutes) The casserole can be served hot or at room temperature. This recipe reheats easily in microwave or stovetop. You also could bake it a bit, but it might dry out.

Pots and Pans – Cabbage & Kale Casserole

IMG_9909

Grocery stores are full of cabbage and kale this week. The gorgeous green colors of both these superfoods enticed me to purchase them. I wanted to find a recipe that would combine them. I found a good choice in the Fix-It and Forget-It Cookbook,  contributed by Edwina Stolzfus of Narvon, PA. I was sure I could tweak the recipe a bit to include kale. This casserole is created for cooking in a crockpot. The ingredients could easily be adapted to bake in a 350 degree oven for about 45- 60 minutes.

Here is my version of the recipe. I added kale and mustard and a touch less cheese than the original. This recipe is a perfect choice for St. Patrick’s Day.

CABBAGE CASSEROLE
1 medium head cabbage, chopped
1/2 bunch of kale, torn away
from stem in bite-sized pieces

Boil cabbage and kale in salted water
for about five minutes.
The pan will be full,
but as the cabbage and kale cook and
soften they will reduce in size. Drain.

1/3 cup butter
1/4 cup flour
1/2 – 1 tsp salt
1/4 tsp pepper
1 1/3 cups milk
1/2  8 oz. block of cheddar cheese,
shredded, about one cup
1/2 to 1 tbsp gourmet mustard
(I used champagne dill mustard, it is a
very delicate mustard, if your mustard
choice is strong in flavor use a bit less)

In a saucepan, gently melt the butter, do not
allow to burn. Stir in flour, salt and pepper.
Whisk until they thicken a bit. Add milk,
stirring constantly. Cook until the mixture
thickens. Remove from heat. Stir in cheese and
mustard. Pour sauce over cabbage and kale.
Place in crockpot. Cook on low 4-5 hours.

Delicious! Even my seven year old grandson loved it!

Pots & Pans – Valentine Goodies

heart tarts

I found a terrific idea for Valentine Tarts in Sunday’s Parade Magazine. For those who aren’t familiar with Parade, the magazine is an insert in many papers in the U.S.A. I doubled the recipe and used four sheets of pie dough. Do not double the filling recipe below as it makes a large amount.

You can find the recipe here: Parade Magazine Homemade Valentine Heart Tarts

The basic instructions and recipe are on this site, along with some filling ideas. I searched around the Internet and found a cream cheese and raspberry filling recipe that I adapted for my tarts. A step by step photo tutorial is pictured below that will show you how I put my tarts together. I also added any little quirks or tips I thought might be helpful.

Filling:

8-ounce package cream cheese, softened
1/2 cup sugar
1 teaspoon vanilla
1 large egg, beaten lightly
1 tablespoon all-purpose flour

Beat these ingredients together.

Heat jam on stovetop until smooth. A wire whisk works well.
1/2 cup seedless raspberry jam

IMG_9624

I was able to get eight to nine tarts out of two pie sheets.

IMG_9625

IMG_9630

Just a little filling, less than a tablespoon, was plenty. I realized I had made WAY  too much filling early on.

IMG_9629

IMG_9631

If possible leave some wiggle room around each heart, especially near the edges of the pan, my crimping with a fork was very cramped!

IMG_9634

The egg wash did add a nice finish to the top of the tarts.

IMG_9635

Oh my! I definitely overfilled. The filling bubbled out. The raspberry baked like glue onto the pan. I had to soak them and work at the burnt areas with a teflon safe spatula.

IMG_9638

The burnt raspberry jam turns rock hard in moments. Remove the tarts to a cooling rack immediately upon completion of baking.

IMG_9642

Let the tarts completely cool before frosting. I should have made a double batch of the frosting. I forgot I had doubled the amount of tarts I had baked.

IMG_9644

I had so much filling left over, I crushed some vanilla shortbread, added some butter, and made some small cheesecakes. They turned out terrific.

IMG_9639

Although it is a bit expensive to make this special dessert. I will definitely make them again. The tarts are a departure from the normal cookies, large pies, and cakes.

Follow Me on Pinterest

Pots and Pans – Chocolate-dipped Pretzels


Chocolate-covered pretzels are a perfect project for children primary-aged or older. Yesterday, my grandsons and I covered pretzels with Ghirardelli Chocolate and some rainbow sprinkles.

The supplies we used were: chocolate melting pot, 1/2 a bag of Ghirardelli baking chips, Herr’s sour dough pretzels, and candy sprinkles. It’s a good idea to place several layers of newspaper or other protection in your work area.

IMG_9548

My first step was plugging in the chocolate fondue pot and adding the half bag of chips. I bought the fondue pot several years ago for about ten dollars. I have been very happy with the results it produces. Anyone who has ever heated chocolate with microwave, double-boiler or stovetop pot has also probably heated it to a temperature that is too high. The resulting mass of hardened, rocky chocolate is beyond saving. This small pot melts the chocolate perfectly…although a bit slowly. I begin melting chocolate about a half hour before I want to dip the pretzels.

IMG_9552

Herr’s makes a delicious, large and sturdy sour-dough pretzel. The pretzel holds up to dipping without breaking, but is not too hard or brittle for youngsters to enjoy.

We set aside the pretzels we intended to dip, poured the sprinkles onto plates, covered cookie sheets with parchment and began dipping. The pot is made for dipping so I didn’t worry about anyone being burned.

IMG_9547

The weather is chilly here, so instead of placing the cookie sheets in the fridge for a quick set, we put them on the back porch. Within a half hour the pretzels were ready to eat. This project was enjoyed by my grandsons. Happy dipping!


Follow Me on Pinterest

Pots & Pans – Repeat Post/Penguin Appetizers

These turned out so cute for me! With all the parties and gathering going on for New Year’s Eve and Day, it’s a good time to repost.

022

These adorable penguin appetizers were a big hit at Christmas dinner yesterday. Peel and cut carrots into medallions, cut a notch out of each medallion for the feet which automatically creates a beak to place in the large end of a small pitted black olive. Using a large pitted black olive, cut a small slit in the front, open and place about a quarter teaspoon of cream cheese inside. (I used the already softened variety of cream cheese in a tub) It helps if you shape the cream cheese a bit on a plate or wax paper before you place it inside the olive. Take a toothpick, insert through head, into the larger cream cheese body and into the feet with the notch pointing frontwards. So easy, not expensive, and so much fun!!!

I found this idea on Pinterest. Click here to visit Pinterest

I wish I had taken a photograph of my little flock, but in the busyness of the day became distracted and forgot. They are even cuter when you have a dozen or more standing at attention on a serving plate.

Follow Me on Pinterest

Pots and Pans – Frozen Banana Bites

These are surprisingly good and very easy to make…a perfect candidate for re-blogging.

Oh my…oh my…oh my! Once in awhile I come upon a perfect recipe. I found a recipe for Frozen Banana Bites on Pinterest, pinned there from the blog of “(Never Home) Maker.” The recipe on her blog post was for Vegan Frozen Banana Bites. Since I’m not a vegan I adapted my banana bites in my own way. Here is my adaptation:

Frozen Banana Bites

2 whole ripe bananas

1/3 C peanut butter

1/3 cup chocolate chips (I used Ghiardelli 60% cocoa)

Pecans for garnish chopped fine

The recipe is so EASY!!! Cut ripe banana into about 8 – 9 pieces. Set aside in a bowl. Melt the peanut butter and chocolate chips 20 seconds at a time in the microwave. It only took me 40 seconds in all to melt the chocolate. Don’t heat the chocolate too much or it will seize up on you and turn into a big lumpy ball of useless junk. Stir the peanut butter and chocolate until they are mixed and smooth. Place parchment paper on cookie sheet, dab a bit of chocolate on parchment, top with a banana slice. Spoon chocolate over each banana slice until they are coated. Don’t worry if the chocolate puddles out a bit…this makes an interesting shape and delicious chocolate bite. Top with chopped pecans or leave plain. You can also use coconut or rainbow jimmies. Freeze for several hours. Take off of parchment paper and eat or put in a bowl and pop back in the freezer for a later date.

Don’t feel guilty as you enjoy this treat. The bananas are loaded with potassium and other good things. The chocolate is full of antioxidants and facilitates good moods, the peanut butter is loaded with protein, and the nuts are full of vitamin E and protein too.

I have a grandson who has a peanut allergy. I am going to try and make these with marshmallow fluff in place of the peanut butter and use jimmies as the topper. I hope they work. I’ll update with a blog post when I try them out. Check out Pinterest on the internet, so many good ideas!

Here is (Never Home) Maker’s Vegan Recipe:

FROZEN BANANA BITES

What you’ll need . . .
•2 large bananas
•1/4 to 1/3 cup vegan chocolate chips
•1/4 to 1/3 cup natural peanut butter
•Unsweetened coconut flakes

Here is a link to her outstanding blog: (Never Home) Maker

Follow Me on Pinterest

Pots & Pans – Banana Bread

Did I mention in my first posting of this recipe that banana bread smells heavenly while baking? Yes, I see that I did…but it bears repeating, just as this recipe deserves a second time around on the blog.

Hmmm…What to do with overripe bananas?

Delicious. The aroma as it bakes is mouthwatering. An added bonus…it’s good for you.


Banana Nut Bread


3 Bananas, pureed or well mashed

2 eggs, lightly beaten

3/4 C sugar

2 C flour

1 tsp salt

1 tsp baking soda

1/2 C walnuts, chopped (optional)


Puree the bananas, add two lightly beaten eggs. Stir in sugar.

Sift flour with salt and baking soda.

Add to banana mixture. Mix until all ingredients are moistened. Do not over mix.

Pour into greased and floured bread pan.

Bake in a preheated 350 degree oven for 50 -60 minutes

Remove from pan after 15 minutes.

Cool…or if you can’t wait…eat it hot!!!


Pots & Pans – Quaker Oats Oatmeal Cookies

I’ll be making these for my Christmas Cookie Tray.

I’ve loved Quaker Oats oatmeal all my life. I often stir up a batch of it in the morning, dollop it with butter, brown sugar and a teaspoon of Polaner All Fruit Jelly, and enjoy.

I also love Oatmeal Raisin Cookies. The recipe for these delicious treats can be found on the bottom of the box lid. They are very easy to make.

If you want to make the cookies and don’t have the box lid you can find the recipe here. Quaker Oats Vanishing Oatmeal Raisin Cookies

Pots & Pans – Homemade Brown Sugar

This is still one of my favorite posts, and also one of the tips I use most in my cooking. Just this week I mixed up some brown sugar for a batch of Chocolate Chip Cookies. One way we use homemade brown sugar is on baked sweet potatoes. A little dab of butter, a sprinkling of brown sugar, maybe a touch of cinnamon…oh goodness…heavenly!

Nothing is worse than running out of an essential ingredient when you are in the middle of baking or cooking. Last week I was whipping up a batch of oatmeal cookies and realized I was out of brown sugar. No problem. I mixed up my own.

Add 1 tablespoon molasses to 1 cup of white sugar. Stir together…you have light brown sugar. Do you need dark brown sugar instead? Add 2 tablespoons of molasses to the sugar and mix.

After I tried this I realized I found the taste is heartier and much better than the store bought brown sugar. I’m hooked on making my own now.

Tip: Use your food processor for even faster results.

Pots and Pans – Salt and Vinegar Roasted Potatoes

Here is another post definitely worth posting again. My family loves these potatoes. My grandsons enjoy helping me flatten them out after they are boiled. The oldest grandson can’t get enough of these…neither can I. A really yummy and satisfying side dish. Give them a try!

Oh my goodness! This was one of those recipes where you take a taste, and say, “Not bad,” and then suddenly…you become ravenous for more, More, MORE! These are scrumptious…a perfect side dish to just about anything. And…so very easy to make. Hooray!

I found the recipe in Martha Stewart’s Everyday Food Magazine.

It can be adapted to larger red potatoes, just cut the potatoes in quarters before smashing.

Salt and Vinegar Roasted Potatoes:

1 1/2 lbs small red skin potatoes (fingerling size) unpeeled and scrubbed

coarse salt

2 tbs extra-virgin olive oil

1/4 cup malt vinegar or apple cider vinegar (I used the apple cider variety)

Boil whole potatoes in gently rolling water until you can easily pierce them through with fork or barbecue skewer. (20 minutes)

Cool long enough to handle. For larger potatoes this is the time to cut them into quarters. The smaller potatoes are left whole. Place potatoes between a clean, non-fuzzy towel, or use a zip-lock bag (this was my choice) Only do a few at a time.

Next is the Fun part. Using the flat of your hand, or side of fist, punch the potato flat to about a 1/2 inch thickness. Don’t smash so hard that the potato separates, you want it to stay whole and intact, but flattened out. Do this with all the potatoes.

Preheat oven to 450 degrees. Brush rimmed cookie sheet with 1 tbs olive oil. Place potatoes on sheet and brush tops with remaining oil. Bake until crisp and golden. Halfway through baking time take out of oven and turn. When finished baking, toss with the vinegar and season lightly with the salt.

Pots and Pans – Pumpkin Cookies

I’m re-blogging this great recipe for pumpkin cookies because it is simply one of the best bites at this time of year. Also…the cookies are healthier than many others because of the pumpkin included in the recipe. Enjoy.

My Grandmother Broadwell always baked these amazing pumpkin cookies for family and friends. I can’t bite into one without thinking of her. Every year, especially around the holidays, I bake up a batch or two. They are scrumptious, and best of all pumpkin is loaded with vitamins.

Pumpkin Cookies

Sift together:

2 Cups flour

1 teaspoon baking powder

1 teaspoon baking soda

1 teaspoon cinnamon

1/2 teaspoon salt

Cream together:

1 Cup shortening (I use butter)

1 Cup sugar

1 Cup pumpkin (canned)

1 egg

1 teaspoon vanilla

Optional:

1/2 Cup nuts, and/or 1/2 Cup raisins

Mix together. Add nuts or raisins if desired. Bake in a preheated oven at 350 degrees for 10 – 12 minutes.

While the cookies are baking make up your frosting.

3 Tablespoons butter

4 Tablespoons milk (2% is okay)

1/2 Cup brown sugar

Heat this and bring to a boil. Stirring constantly, cook for 2 minutes taking care not to burn. Cool. Add 1 Cup powdered sugar (add more if needed, icing should not be thick, but rather runny) Add 3/4 teaspoon of vanilla and spoon over cookies.

Follow Me on Pinterest

Pots and Pans – The Perfect Bite/Rollo Pretzel Bites

This remains one of my favorite recipes for a treat. Everyone loves the delicious bits of pretzel, chocolate and pecan. Try them…they are super-easy!

Rollo Pretzel Bites are a great recipe for the absolute perfect bite. There are only three ingredients involved: Square waffle type pretzels called “Snaps.”

Rollo candies, a bag or a roll. A bonus with the roll type is you do not have to unwrap each piece of candy.

The third ingredient is pecan halves.

I used my toaster oven set on a very low temperature, around 275. I arranged the pretzels on the pan.

A Rollo candy is placed on top of each pretzel…

Then I put the pan in the toaster oven and watched until the bottom of the Rollo began to spread out and melt. It only took a few minutes.

To finish them off I laid one pecan half on the top, smooshed it down gently, and there I had it…in just a few minutes…the perfect bite. Yum!

They are a bit pricey to make since pecans are so expensive right now, but definitely worth it.

Pot’s and Pans – Rita’s Coffeecake

Here’s another pass at a post about an absolutely delicious coffeecake. Don’t judge it by the plain appearance in the picture. If you want to serve it for a special occasion a bit of powdered sugar on top would dress it up a bit. I like it plain. It is truly one of the moistest cakes I’ve ever eaten. I bake it over and over again, and it is a favorite of everyone in the family.

It might be a “Plain Jane” kind of cake, but the taste and moistness cannot be beat. It is super-easy since it uses a cake mix as its base. Add a box of instant pudding, a few extra ingredients and you have one of the best coffeecakes ever. A bonus: it freezes perfectly. The coffeecake can also be dolled up a bit with a simple powdered sugar and milk drip icing, but I prefer it plain. As with many baked items, it is better the second day. Enjoy!

Rita’s Coffeecake

1 pkg yellow cake mix (not butter)

1/2 Cup oil

1 Cup water

4 eggs

1 pkg INSTANT vanilla pudding

1/2 tsp baking powder

1 tsp vanilla (I’ve forgotten this and it tastes just fine)

Topping:

4 tsp sugar

2 tsp Cinnamon

1 Cup chopped nuts (optional)

Preheat oven to 350 degrees. Grease and flour sides of bundt or tube pan, or use Pam. Sprinkle 1/3 of topping in bottom of pan. Add half of the batter. Sprinkle on the remaining topping and then finish with adding the rest of the batter. Bake 50 – 60 minutes.

Pot and Pans & Problem-Solving – Avoiding the Fat

IMG_8962

This jar contains broth/pan drippings I gathered from the last roast chicken I baked. Many people use these drippings for gravy. To do so while they are still hot makes it impossible to remove the fat that you can see gathered at the top of the jar. To save my family’s health, I always use the previous chicken/turkey’s broth and pan drippings in my cooking, enabling me to remove most of the dangerous fat. Refrigeration causes the broth and fat to separate making it very easy to lift the hardened fat away from the broth.

Today, knowing that the Thanksgiving turkey is going to need a lot of gravy, I purchased three turkey legs. Tomorrow I will cook these down in the crockpot with several cups of water. I’ll add celery, onions and garlic for richer flavor, and have a luscious broth to use for a healthy gravy on Thanksgiving Day. I’ll refrigerate the broth after it cooks down, skim off the hardened fat, and freeze the broth for a couple of days. I’ll leave myself a big note on the chalkboard on Wednesday, reminding myself to take it out of the freezer for the big turkey day. It’s good to think ahead when it comes to sauces and gravies and take a few moments to create a healthier alternative to using the fatty and heart clogging drippings straight out of the pan.

Pots and Pans – Norma’s Muffins in Red, White and Blue

Let’s keep our patriotic spirit going all weekend-long! 🙂

blog 002

Years ago, many, many years ago, when I was a new bride, my cousin Norma hand-copied dozens of her favorite recipes and put them in a binder as a wedding gift. I have cooked up many of these recipes, but my all-time favorite remains her muffin recipe. It is a very basic recipe that makes about 18 muffins. I have added all kinds of fruits and without fail the muffins turn out. Once in a while, when I am feeling in the need of cooking even healthier, I will use half wheat flour in place of the white. These muffins are good for using the harder strawberries the supermarkets often sell at a great price. The berries soften and the flavor is intensified when they bake. I’ve included Norma’s recipe at the  bottom of the post. Happy Baking!

blog 004

Tempting Tip: Always slice a muffin vertically rather than horizontally. That way you get a bit of the muffin top in every bite. Delish! These muffins taste even better when lightly toasted and buttered.

blog 005

Norma’s Muffins   (I think I have shared these in a previous post but the recipe is worth repeating)

3 Cups flour ( you can substitute half wheat flour, makes a heartier tasting muffin)

1 Cup sugar

4 tsp baking powder

1 tsp salt

2 beaten eggs

1 Cup milk ( can be 2%)

1/2 Cup salad oil

Mix all ingredients together. Do not over-mix. (causes toughness) The batter will be a bit lumpy. Bake at 400 degrees for twenty minutes. Makes about 18 muffins. The recipe can also easily be halved or doubled.

Pots and Pans – Frozen Banana Bites

I am reblogging this post…why…well it’s buried in a July 2012 post, and oh my…these quick and easy banana bites are scrumptious.

Timelesslady's avatarMINDING MY P'S WITH Q

Oh my…oh my…oh my! Once in awhile I come upon a perfect recipe. I found a recipe for Frozen Banana Bites on Pinterest, pinned there from the blog of “(Never Home) Maker.” The recipe on her blog post was for Vegan Frozen Banana Bites. Since I’m not a vegan I adapted my banana bites in my own way. Here is my adaptation:

Frozen Banana Bites

2 whole ripe bananas

1/3 C peanut butter

1/3 cup chocolate chips (I used Ghiardelli 60% cocoa)

Pecans for garnish chopped fine

The recipe is so EASY!!! Cut ripe banana into about 8 – 9 pieces. Set aside in a bowl. Melt the peanut butter and chocolate chips 20 seconds at a time in the microwave. It only took me 40 seconds in all to melt the chocolate. Don’t heat the chocolate too much or it will seize up on you and turn into a…

View original post 253 more words

Quirkiness, Pots and Pans – Fried Cream of Wheat

Blog April 019

I love Cream of Wheat and have for years and years. It’s absolutely scrumptious with fresh or frozen fruit in the morning. I have a decadent secret though…what’s even better than Cream of Wheat…why it’s fried Cream of Wheat of course!

A quick how-to for you.

Make two to four servings of cream of wheat according to the directions. Cook the cereal until it is rather thick.

Pour it into a buttered loaf pan of some kind. Use a miniature pan for two servings, a larger size for four servings.

Cover and refrigerate overnight.

The next morning, upturn the pan on a cutting board and cut the Cream of Wheat into 1/2 to 3/4 inch pieces. (Optional: Dredge lightly in flour)

Fry in a buttered pan.

Slather on some butter, maple syrup, fruit…anything your heart desires.

Oh Yum! It sounds a bit odd, but my oh my, it is DELICIOUS!

Pots and Pans – Freezing Citrus Zest and Juice

Blog April 011

If I am using the zest of any citrus fruit in a recipe I make sure I use an organic piece of fruit.

Insecticides on Citrus Fruits

Often a single piece of organic citrus fruit is expensive. I’ve found it much more cost effective to buy bags of fruit. When I am lucky enough to come upon one of these good deals, I sometimes can’t use all the fruit before it begins to spot and go bad. A good alternative to wasting the money is to grate and freeze the citrus peel. After grating, I have found a good way to freeze the peel is in cupcake liners. Each peel yields about a tablespoon of zest, sometimes a bit more for a larger piece of fruit.

Blog April 012

After the zest freezes, I fold over the sides of the liner, tape in the middle, label and store in a container or ziplock bag in the freezer.

Blog April 010

I also freeze the juice from the fruit in ice cube trays. Each cube is about two tablespoons of fresh juice. Pop out when frozen and store in ziplock bags or freezerproof container.

Follow Me on Pinterest

Pots and Pans – Quick Tip/Golden Chicken Broth Naturally

blog 001

I love to make homemade chicken broth out of whole stewing chickens or turkey carcasses left over from Thanksgiving or other special meals. I put the chicken, or the bones into a big pot, add varying amounts of celery, garlic cloves, salt, pepper, carrots, parsley and any other herbs that take my fancy that day. I don’t really measure these ingredients, it is usually what I have on hand. Onions are one ingredient I always add to my stockpot. I am very careful to use every scrap of onion skin that is free from discoloration. I wash this carefully and add it to my stock pot. The onion skins help to add that golden sparkle to chicken stock.

blog 002

A little dash of tumeric is another good choice for giving my chicken stock rich color. Tumeric is not only a colorful addition, it is also full of antioxidants and other benefits. You will find tumeric listed as an ingredient in many brightly colored foods.

Tumeric as a Coloring Agent

Pots and Pans with Plants – Pickled Eggs with Microgreen Garnish

blog 040

Last night we had homemade potpie, the Amish type, not the pie crust variety. One of these days I will remember to take pictures start to finish and post the recipe to the blog. Potpie is delicious, but rather heavy, and can be a bit bland, I like to add a side dish with a little pop. Last night I decided to serve pickled eggs alongside the potpie. Red beet pickled eggs are another Pennsylvania Dutch delicacy. They are so much more appetizing in appearance than plain pickled eggs. The history of pickled eggs can be found here: Red Beet Eggs. Garnishing my pickled eggs are tiny pea sprouts called “Microgreens.” I love the appearance and taste of my pea sprouts. They add a taste of springtime to a winter meal.

Microgreen Blog Links can be found here:

Microgreens Part I
Microgreens Part II
Microgreens Part III

I am including my recipe for pickled eggs. Try not to use a brand new carton of fresh eggs. Peeling the shells off of very fresh eggs can be frustrating. To best boil eggs for pickling, place eggs that are a week or two old in a saucepan of cold water, add a dash of salt or vinegar to the water, bring to a rolling boil. As soon as the water reaches a full boil, cover the pan with a tightly fitting lid. Leave eggs in covered pan until the water cools to room temperature. Peel eggs. I’ve found the best way is to lightly crack the shell against the cabinet top on all sides, top and bottom too. I then gently roll the egg between my palms and the shell usually separates and slips off. (It is a good idea make sure the thin membrane that sometimes sticks to a boiled eggs is removed. This membrane will mar the surface of the pickled egg if left in place.)

RED BEET EGGS

1 14 -15 oz can sliced beets (Second can on hand for adding color later in week)

1 Cup vinegar (1/4 cup extra on hand for adding later in week)

1/3 Cup sugar

1/2 Cup water

Sliced Onions

Peppercorns if desired (I use plain old pepper out of the shaker, as much as you like)

Bring to a boil and let sit for an hour or gently simmer all ingredients together for one hour.  Strain.

I find a large mason jar works great for making my pickled eggs. I put about 8-10 eggs, more if they will fit, into the jar. I then pour the strained juice into the jar. Make sure all surfaces of the eggs are covered. Put a lid on jar, cool down, and place in the fridge. You can use any type of container, but I like glass, plastic has too chemicals that can leach into your finished eggs.

In about two days I check the color of the eggs. Often, I decide they are too pale, and I pour about two inches of the original liquid out and add fresh beet juice right out of the can, and an inch or two of fresh vinegar. This seems to boost the color absorption of the eggs.

In a week the eggs are ready.  Cut in half or slice in thin wedges as a garnish. For those who love vinegar, do as some in our family do, pop out the yolk, fill the empty space with vinegar and pop in your mouth. ZING go the taste buds! This technique isn’t for the faint of heart or appetite.

blog 003

Microgreens growing in winter.