I subscribe to Food Network’s The Kitchen and hope to watch all the shows over the next few months. The goal is daunting. The show has aired since 2014. I started with Season 1, Episode 1, and had to immediately pause and try out the very first recipe, Creamed Kale and Eggs.
The recipe turned out well, no, it was excellent.
What I did right: I used shallots instead of leeks. Shallots are inexpensive and easier to clean. I also was able to easily cut the recipe in half for one person.
What I did wrong: I should have bought a bunch of kale instead of pre-cut pieces in a bag. Although the pieces were organic, cutting away the tough stem in each without losing my mind was impossible. I could have easily cut the center stems away if I had bought a bunch of large, uncut leaves.
Would I recommend this recipe: Oh Yes!
Here is a link to the recipe on Food Network: Creamy Kale and Eggs / There is a video link on the page for step-by-step instructions.
All I can say about this dessert/breakfast is, oh my. Oh my, it is so easy! Oh my, it is so scrumptious! Oh my, it is gone in under five minutes!
You can easily make it too. I’ve included step-by-step photographs and a few quick words.
Ingredients: 1 pack of Instant Oatmeal, 2 Apples, 1 pat of butter
Peel (or if you love eating apple peel, try leaving it on) two apples. If they are on the small side, I sometimes use three. I chose Granny Smith apples. Green apples are firm, slightly sour, and bake up perfectly. Place evenly in a large, greased pie pan. A square pan would work too, but you might need more apples.
Mash one large pat of butter into the instant oatmeal until combined, don’t overmix.
It should look like the photo after mixing.
Sprinkle evenly on peeled apples. Cover with foil. Bake in a preheated 350-degree oven.
Oh, the joy of this apple crisp. The caramelized bits around the edges are the best, don’t leave them in the pan, sprinkle these bits on top. Enjoy!
A note: My sister suggested using organic instant oatmeal to make the dessert even healthier. Quaker Oatmeal comes in four flavor variety packs. I’ve tried all four flavors, and all are delicious in the apple crisp.
I still make these every year. The only ‘percolated’ change is I lowered the temperature for mine to 225 degrees and make them on cookie sheets in the oven. They work exactly the same at the lower temperature in the full-sized oven. Delicious!
Rollo Pretzel Bites are a great recipe for the absolute perfect bite. There are only three ingredients involved: Square waffle type pretzels called “Snaps.”
Rollo candies, a bag or a roll. A bonus with the roll type is you do not have to unwrap each piece of candy.
The third ingredient is pecan halves.
I used my toaster oven set on a very low temperature, around 275 degrees. I arranged the pretzels on the pan.
A Rollo candy is placed on top of each pretzel…
I put the pan in the toaster oven and watched until the bottom of the Rollo began to spread out and melt. It only took a few minutes.
To finish them off I laid one pecan half on the top, smooshed it down gently, and there I had it…in just a few minutes…the perfect bite. Yum!
They are a bit pricey to make since pecans are so expensive right now, but definitely worth it.
When we vacation in Jamaica I adore having meringue cookies for dessert. They are always available at the lunchtime buffet in the Cornwall Hotel.
I rarely find meringue cookies in my area, but then, do I really look hard enough? Recently, I came upon Ina Garten’s recipe for Salted Pistachio Meringue cookies and my craving for them would not be denied.
Ina Garten’s recipe made a large cookie and appeared time-consuming. The meringue needed to be whipped for 10 minutes, but I loved the idea of pistachios and salt on the top. I had some pistachios in the pantry and felt it was a perfect opportunity to use them.
I found another Food Network Star’s recipe for meringues. The Pioneer Woman’s recipe was super-simple, prettier, called for no special ingredients, and was very easy to make. I added Ina Garten’s topping and had the perfect cookie.
The cookies are not for everyone, I think they are a bit of an acquired taste. I know I probably would have turned my nose up at them when I was a child. My husband doesn’t care for them. I, on the other hand, have to stop myself from eating a dozen at a time.
They keep very well. Mine are about four days old and still light and crisp, stored in an air-tight mason jar. Delicious!
I love chicken tetrazzini. Yesterday it was my planned dinner before I stopped by the new Lidl store in our town. Inside the freezer case my eyes fell upon a bag of frozen cheese tortellini. I had to have that tortellini for dinner too, but already had a pasta ingredient in my tetrazzini menu. I decided to combine the pastas. I halved the spaghetti amount, added in about half the bag of tortellini when the spaghetti was in it’s final minute of boiling, and mixed up all the tetrazzini ingredients. Oh my! I doubt I will ever go back to the old way of making this dish. The cheese tortellini complemented the grated asiago cheese in the recipe. I can’t wait to eat the leftovers as a side dish tonight. Give this a try if you like tortellini.
Ginger is full of nutrients. Ginger beefs up your immunity and helps your body function well. I love soaking a fresh piece of ginger in boiling water to make a tea. I recently found organic ginger and it was a good price. I decided it was time to make candied ginger, but…before I go on with that part of my post, let me explain a bit about preserving the good.
In the November 15, 2020, In Touch devotional, I read great words about preserving what is good. Lately, evil not only seems to be at the door, it seems to be using a battering ram to destroy everything of worth. I am going to take the advice of these wise words and try to preserve what is good in any way I can. It can be by words, by deeds, or by a blog post containing a good tip or something beautiful.
Finally, brothers and sisters, whatever is true, whatever is noble, whatever is right, whatever is pure, whatever is lovely, whatever is admirable–if anything is excellent or praiseworthy–think about such things. ~Philippians 4:8
Today I actually preserved ginger by an easy candying process, no thermometers were needed. I’m including an outstanding youtube demonstration of the process I used. The only difference for me was to finish my ginger off in my dehydrator on a low setting. I couldn’t resist tasting it before it was completely dried and it is SO good. I also saved the syrup in ice cube trays, about a 1/2 tbs in each, to use for tea or upset stomach. If you like ginger, give this easy technique a try.
Sometimes having a bit of insomnia is a good thing…especially if you find a perfect recipe.
It’s a great video, but the music drove me crazy, too perky for the middle of the night. I loved the ingredient list and the ease of putting the chowder together; I made a pot of it within a week of viewing the video.
I changed a few things (I always do) to use what I had on hand. I used fresh basil and substituted 1 tsp. dried Italian herbs and 1 tsp dried parsley for the thyme. I also rarely use heavy cream in recipes if I can substitute whole milk with a little butter.
I splurged on some organic red new potatoes; I wanted the peels to be free of chemicals of all kinds. I cooked the soup in the slow cooker on the high setting for 4 hours, and only blended a ladle or two of potatoes and corn at the end of the cooking time, leaving the chicken entirely out of that step. (Something about chicken in a blender revolts me. 😒 Ugh!) I also halved the recipe since it only needed to serve two people. This recipe is easy, delicious, and nutritious.
I had no intention reblogging this recipe yet again, but then I whipped up a batch for after Thanksgiving game playing. Oh MY!!! They are fabulous and everyone loves them…and they are so easy.
Rollo Pretzel Bites are a great recipe for the absolute perfect bite. There are only three ingredients involved: Square waffle type pretzels called “Snaps.”
Rollo candies, a bag or several rolls.
The third ingredient is pecan halves.
I use my toaster oven set on a very low temperature, around 275. I arrange the pretzels on the pan. (This year my toaster oven was broken so I used the large oven…works great too! I think the large oven is a bit faster)
Place one rollo candy on top of each pretzel…
Place the pan in the toaster oven and watch closely until the bottom of the Rollo begins to spread out and melt. It only takes a minute or two.
To finish them off lay one pecan half on the top, smoosh it down gently. Ah…the perfect bite in just minutes.
They are a bit pricey to make since pecans are so expensive right now, but definitely worth it. Your guests will love them.
Some ideas are worth reblogging every year. As I write this post I have cranberries sorted and washed, waiting to be heated, dried, sugared, frozen and dried in the oven. Give this a try while cranberries are on sale for the holiday. It appears to be a lot of steps, and it is, but each step is very easy and quick. The craisins turn out lovely.
Cranberries are available again in the produce section. I love to use dried cranberries throughout the year, but I am very allergic to the sulfite preservatives sprayed on them. So…I did a little research on the Internet and dried my own.
First I sorted through the berries, keeping only those that were firm and dark red in color. I carefully washed them taking care not to bruise them. While I was doing this I boiled about two quarts of water. I placed the clean cranberries in a large bowl and poured the boiling water over them.
They started sizzling and popping right away. When it appeared that all the cranberries had at least one large crack in their skins, I drained them in the colander. I let them sit for about a half hour to dry.
I placed the cranberries on a cookie sheet covered with parchment, sprinkled them with sugar, and froze them for two hours. After their chill-down was complete, I put them into a preheated 350 degree oven for ten minutes, and turned the oven off for several hours as the directions instructed. The berries didn’t seem to be drying out though, so I turned my oven back on to the lowest temperature. It seemed to do the trick, within a few hours the cranberries had turned into craisins.
The directions I followed recommended freezing them on the same sheet and then bagging them for storage in the freezer. I can’t wait to make cookies, breads and muffins with my delicious and nutritious dried cranberries.
I was so pleased with my dried cranberry success, today I dried bananas. They were even easier, slice them, dip in citrus juice, I used lime, and dry them on parchment until they are dry. A good tip I found is store them first in a glass jar for 7 – 10 days. If condensation appears on the sides of the jar, you will know you need to dry them for a bit longer in the oven. Shake the jar every day while you are doing the moisture checking. When the time is up and the sides of the jar are dry, you can store them in plastic bags or jars in a cool dry place. They will keep for several months up to a year. I had one problem though…
Can you see all the empty spots on the parchment? That’s because I couldn’t stop taste-testing the delicious, scrumptious, delectable and tangy banana slices before they were even finished cooking. They are FABULOUS.
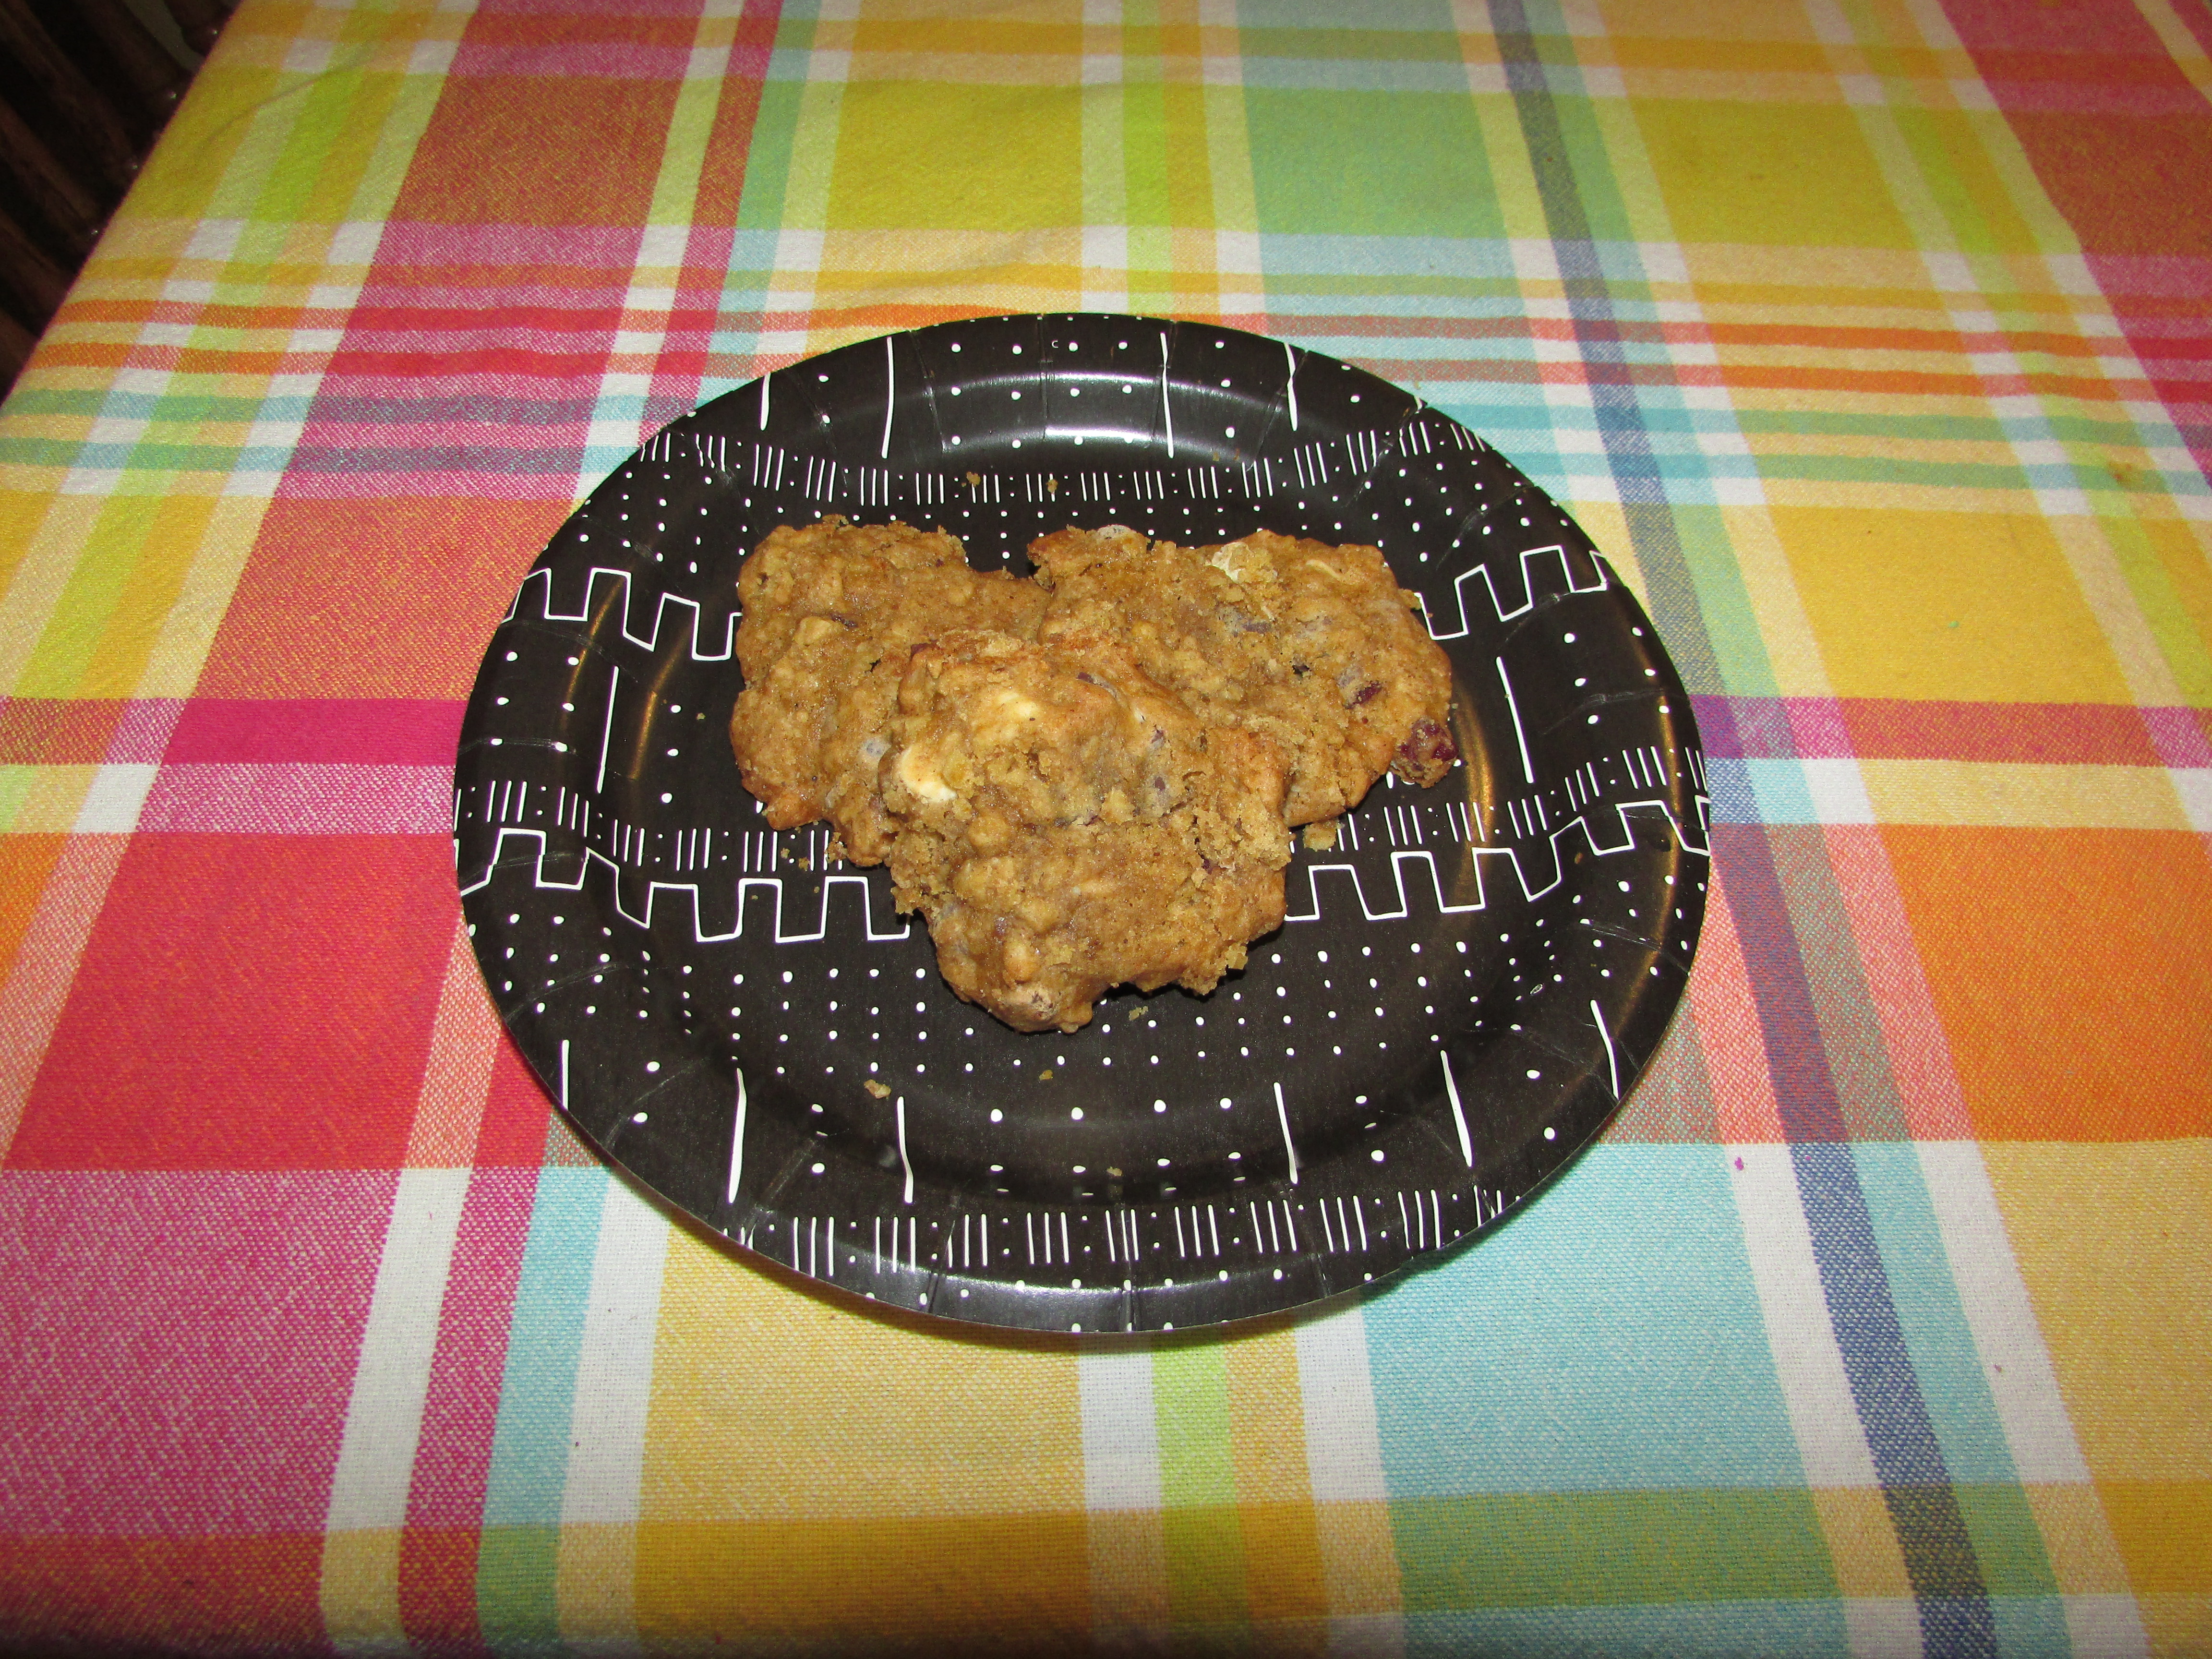
Last week I baked these delicious cookies. The recipe uses bits of leftover ingredients from Thanksgiving dinner. I mixed up the cookies before the big day so I used new cans of pumpkin pie mix and cranberry sauce. (See quick tip below) Because the recipe is copyright I can’t include it in the post, but I can give you the link. The recipe as written in ‘Taste of Home’ magazine can be found here: Day After Thanksgiving Cookies.
I made quite a few changes to the recipe. I prefer baking and eating smaller cookies. The changes I made allow for a shorter baking time.
My changes:
I will leave out the white baking chips next time. They don’t add much flavor, are not real chocolate, and don’t soften when baking. They are distracting when you bite into the soft cookie. I used mini-chocolate chips instead of large and was very happy with the result. I preheated the oven to 375 degrees instead of the 350, and dropped the cookie by teaspoons onto the baking sheet instead of by tablespoon. I prefer smaller-sized cookies. I baked them for twelve minutes.
My husband, son, and grandsons loved these cookies. Honestly, I think I must have eaten half a dozen when they came out of the oven…they are that good when warm.
I love cookies that are filled with ingredients that are good for you. These cookies are loaded with three good-for-you ingredients: pumpkin, oatmeal and cranberry sauce. I had one problem with the cookies: storage. The baked cookies are super-moist and stick together in one large clump if stored in a ziplock bag or on a plate. Next time I will freeze them individually on parchment paper before storing. The cookies thaw in minutes and this way they will last longer and stay intact. Because of their sticky exterior these cookies would not be good for a cookie sale or a Christmas exchange.
Quick Tip: Freeze the leftover pumpkin pie mix and cranberry sauce in 1/4 cup dollops on parchment paper. These can be stored in the freezer and thawed out when you need them.
I’ve been going through recipes I’ve pulled from magazines and stored in folders. Jeff Mauro, of Food Network’s ‘The Kitchen,’ shared this recipe in the September 2016 Food Network Magazine. You can find the recipe here: Jeff Mauro’s Slow-Cooker Cuban Sandwich.
The reason I can’t share a photograph of the sandwich is it was quickly consumed within minutes of being put on the table. The recipe is easy and only takes a bit of final preparation to serve. The sandwich is hearty and perfect for this time of year. My sons and daughter-in-law tailgate for the Eagle’s games in Philadelphia, and they are going to take it with them for one of the games.
Here are the changes I made to the recipe. Instead of a pork shoulder, I used three pork tenderloins. I substituted 2 tsp. garlic powder for the minced garlic. I only needed one small red onion and served that and the pickle on the side since some of the family dislike them. I put condiments on the table with the sandwich, but it was so juicy I don’t think anyone used them. I used three 12 inch torpedo rolls instead of two and still had a bit of pork left over for the next day. I used thinly sliced swiss cheese since some of the children aren’t that fond of the flavor. I buttered the sliced torpedo rolls and put them in a hot oven for a few minutes before assembling. The inner portion was moist and the edges had a nice crispiness to them. This is a fabulous recipe. Give it a try.
“Buckle or Crumble – Is a type of cake made in a single layer with berries added to the batter. It is usually made with blueberries. The topping is similar to a streusel, which gives it a buckled or crumpled appearance.” – What’s Cooking America
I’ve baked two buckles in one week. I use any overripe, juicy fruits I have on hand. My favorite combination so far has been plums and nectarines. In addition to changing the type of fruit in the recipe, I also used dark brown sugar instead of light, cinnamon in place of nutmeg. Because the recipe is protected under copyright law, I can’t include it in my post, but I can give you the link to the recipe: Food Network.com – Blueberry-Peach Buckle. The recipe is quick and easy. All who sampled the cake pronounced it delicious. It warms easily in the microwave and stores well at room temperature for a day or two. We eat it fast! If I was keeping it any longer I would store it in the refrigerator.
Company was coming, I had no dessert prepared. I knew all my guests enjoy Chocolate Chip Cookies, but I had no chips on hand, and zero inclination to run out to the store. Hmmm…what to do? I opened the pantry and my eye fell upon a snack baggie with some leftover pretzels, and another with about two dozen malted milk ball candy. I grabbed these and using the smooth side of a cooking mallet, crushed them into bits inside the plastic bags.
I mixed up some chocolate chip cookie dough and added my broken pieces of pretzel and candy, crossing my fingers as I put them in the oven. Oh MY! What a delicious experiment. The pretzels tasted just like salty nuts, and the malted milk balls were amazing. I was so pleased. Even better, the faux nut taste the pretzels created was a great treat for one grandson; he has a peanut allergy and is not able to experience the saltiness of nuts in baked good recipes. I’m wondering now what other bits and pieces I can add to my Masquerade Cookies next time. Any ideas for me???
The color is gorgeous, the aroma sublime, the taste delectable…the vegetable…the humble butternut squash. Butternut squash is available in most grocers and farm stands at this time of year. Reasonably priced, the bland exterior hides vibrant orange flesh within.
Roast the squash face down on parchment or in a lightly oiled glass cake pan.
Here’s a good recipe I blogged a while ago for Winter Squash Soup. The recipe works for most varieties of winter squash, including the Butternut.
Brown roasted areas of the squash add flavor to the soup. Scoop flesh away from the outer skin.
Butternut Squash Tip: Did you know most people choose a Butternut Squash by virtue of its round bottom, following the wisdom of the cliché: the bigger the better. This will lead you in the wrong direction when you are buying a butternut squash. The bottom is where the seeds are located. The rounder the bottom of the squash, the more seeds you are buying. Look instead for a butternut squash with a large neck area. This is where you will find the largest amount of edible vegetable.
A butternut squash can be roasted flesh-side down on oiled parchment paper, or roasted in a glass pan with a touch of water added.
Two days ago I cooked a panful of pork chops in fire-roasted tomato sauce. They were delicious. I spoke with my sister about the recipe the next day and told her it was one of my favorites. She asked me to email it to her. I told her I would, and that I thought it would be a good blog post. Since I was serving the leftovers again, I knew I would have a good photograph to include. Hmmmm…as you can see we ate the leftovers before I remembered to take that photo. So, for now, all I have to show for the recipe is an empty plate. That’s the good news though. This recipe is scrumptious and very economical.
PORK CHOPS IN FIRE-ROASTED TOMATO SAUCE
Ingredients
1 tbs butter
1- 2 tbs olive oil or vegetable oil
6 -9 Thinly sliced pork chops (The thinner the better, I use boneless)
1/2 C purple/red juice, wine, etc. (I use whatever I have on hand)
1 14.5 – 15 oz. can of fire roasted tomatoes
1 Cup tomato sauce. (I’ve used ketchup in a pinch)
1/4 C water
3 tbs chopped parsley or 1 tbs dried
2 cloves garlic (I use 1 tsp garlic powder)
1/2 tsp minced rosemary
1/2 tsp dried basil or more if you use fresh
(At this point I add anything else that I have a whim to add)
Heat butter and oil in heavy skillet. Add pork chops. Cook uncovered until sides are nicely seared. Pour off all but 1 tbs of drippings (I usually don’t have much in the way of juices in the pan and don’t pour off, especially if I’ve used olive oil.) Stir in remaining ingredients and simmer lightly for 30 – 40 minutes. Enjoy.
The recipe can be made with larger pork chops, but perhaps simmer a little longer if you do use the larger chop. I’ve also easily doubled it and cooked it in a big cast iron Dutch Oven. We like it over rice, but you can serve it over noodles too. Sprinkle with cheese if you like, but we usually don’t need the cheese. Add a touch of water if the sauce seems to thick.
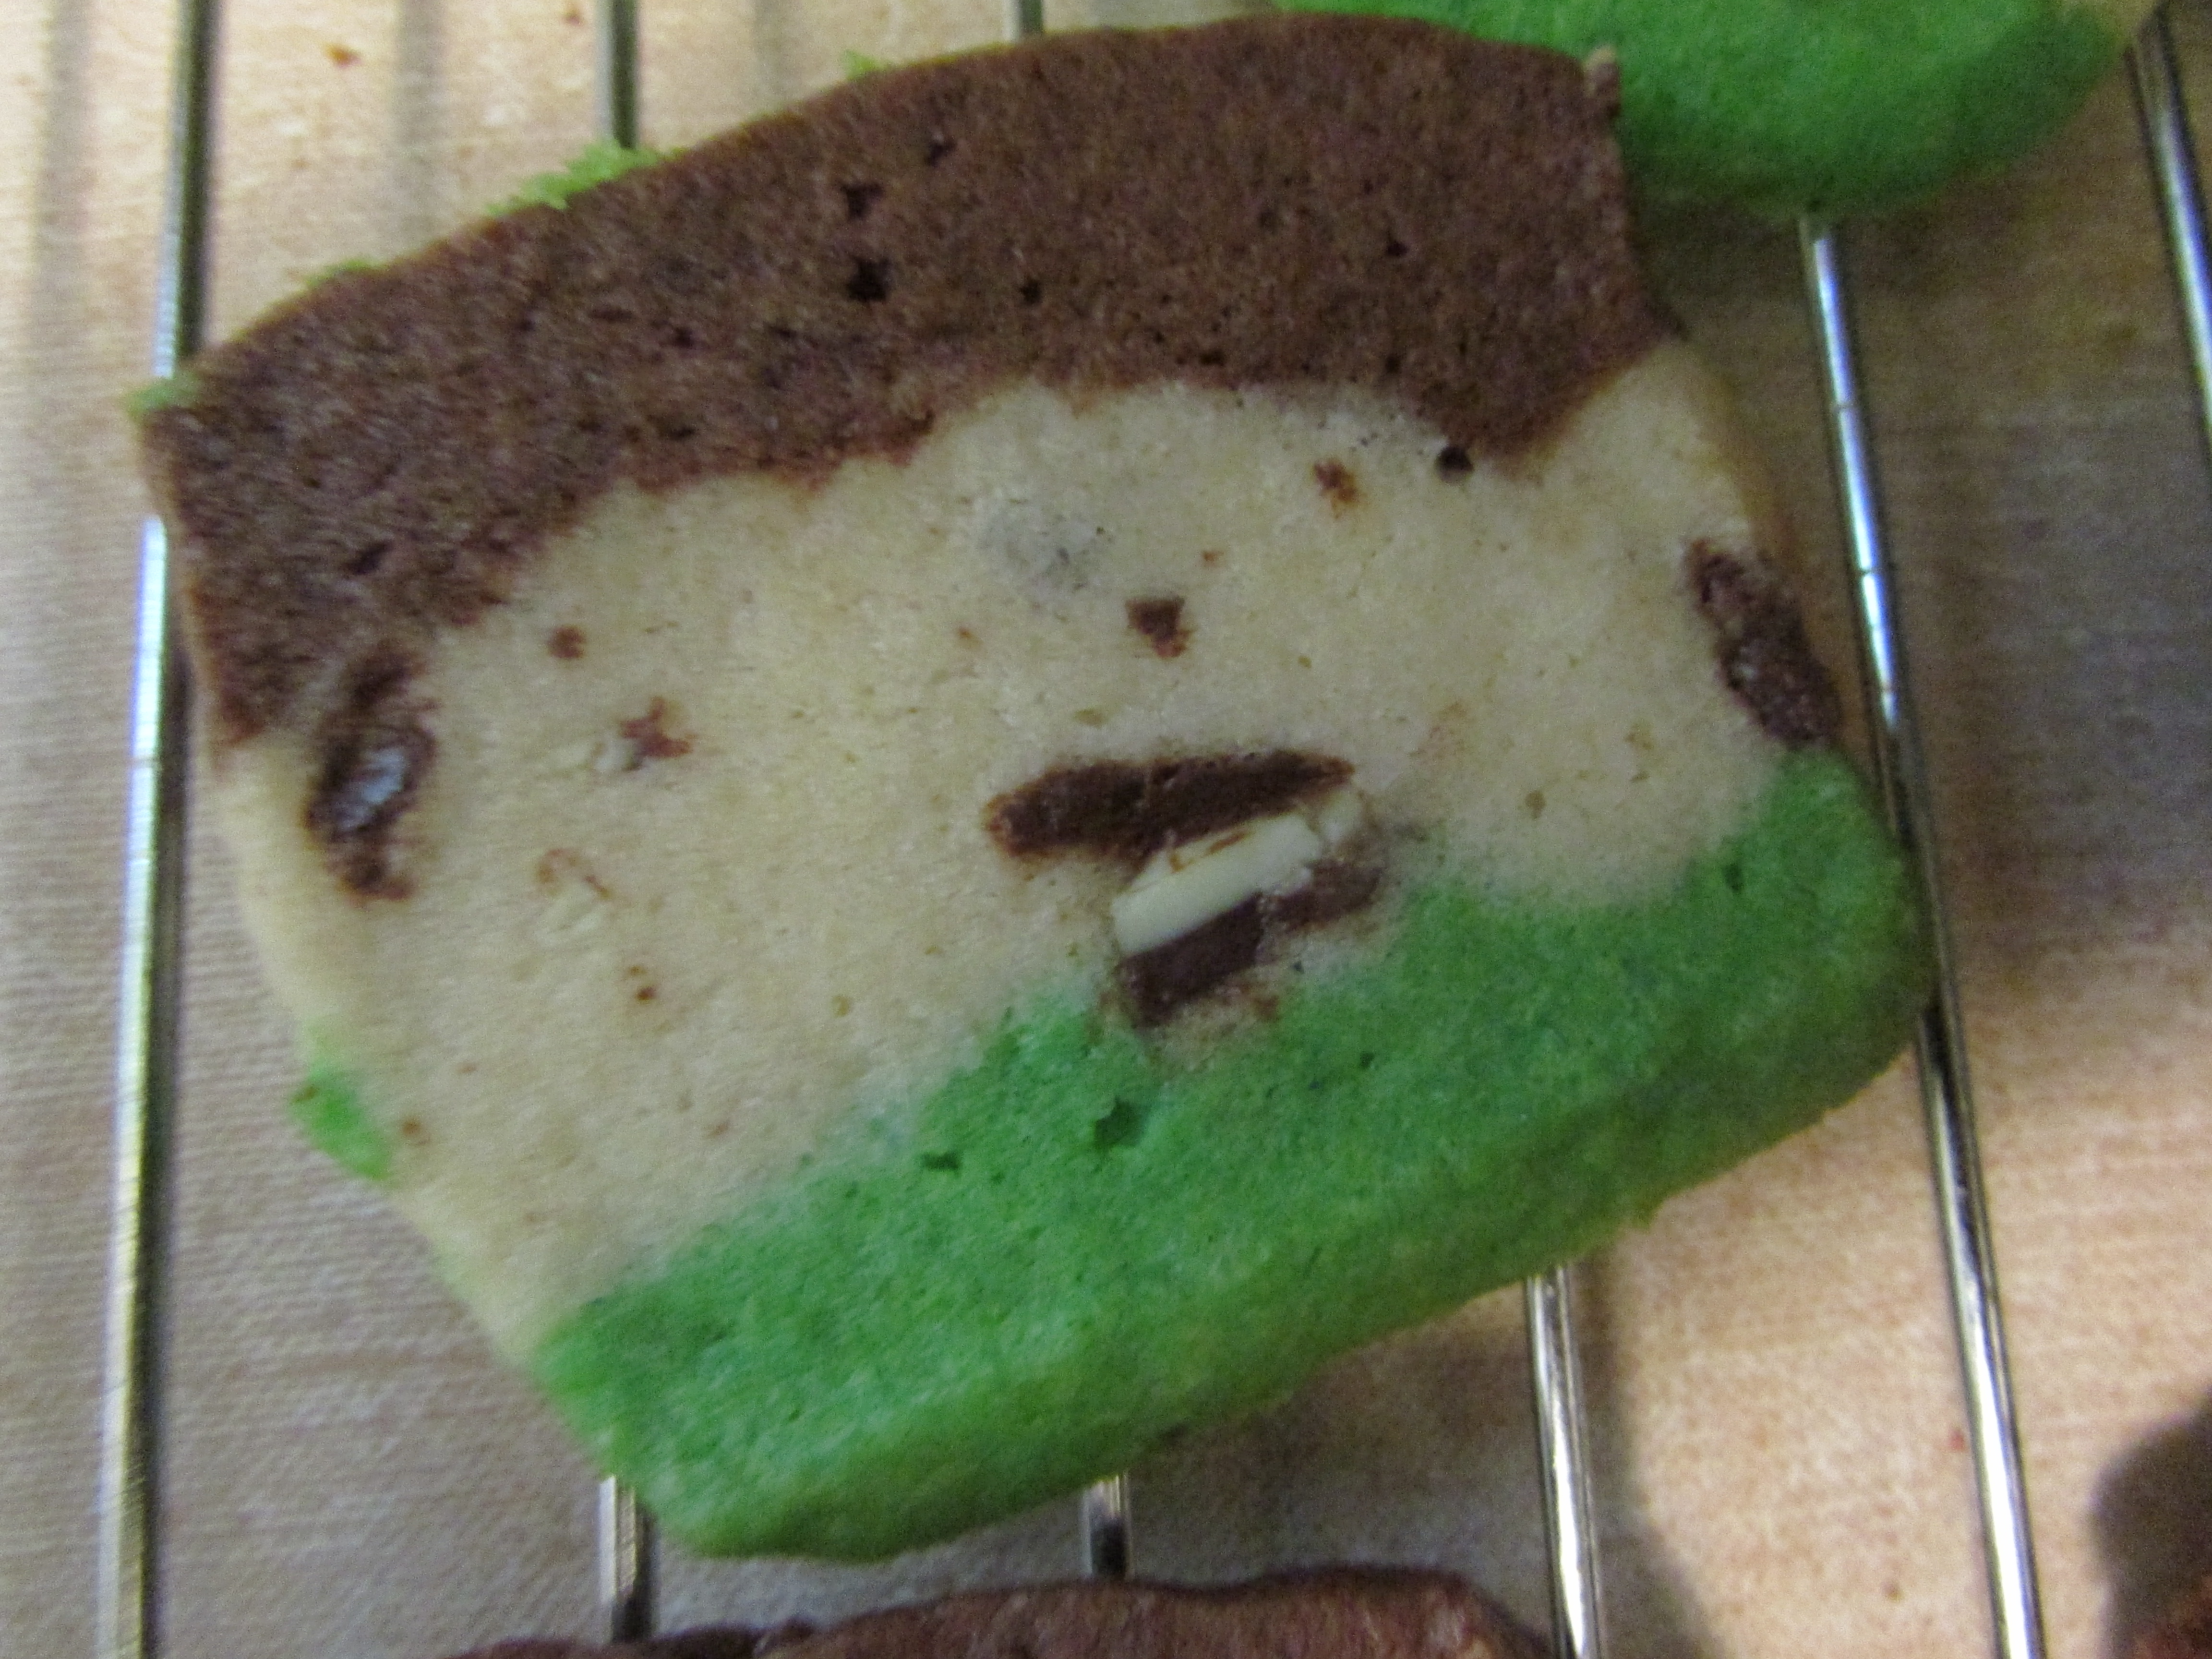
When I recently came upon a package of Andes Creme De Menthe Baking Chips, I knew I had to come up with a cookie recipe to use them in. The back of the bag had a basic recipe for a drop cookie, but I wanted to jazz the chips up a bit.
I have a recipe for a Neapolitan cookie that is popular in my family, so I adapted the recipe to incorporate the Andes Chips and green food coloring. If you can’t find Andes Baking Chips, a few Andes Mints, chopped up, will work fine too.
This recipe requires four hours chill time in the fridge. Take that into consideration before you begin. I often mix it up and leave it in the fridge overnight for the layers to meld together, then slice and bake with ease the next day. This recipe doubles up easily.
CREME DE MENTHE NEAPOLITANS
Sift together and set aside:
2 1/2 C Flour
1 1/2 tsp. Baking Powder
1/2 tsp Salt
Cream together:
1 C butter
1 1/2 C sugar
Mix in:
1 egg
1 tsp vanilla
Add dry ingredients and mix until combined.
Divide the dough into three equal portions. Mix 1 square melted & cooled unsweetened chocolate (substitution = 3 tbs unsweetened cocoa and 1 tbs soft butter or oil) into one portion, a few drops of green food coloring into one portion, and 1/8 to 1/4 cup of Andes Baking Chips into the last portion. (I use the lesser amount because I don’t like the flavor of mint to be overpowering.)
Cover a rectangular loaf pan with enough wax paper to cover the bottom and hang over all the edges.
Line the loaf pan with the layers of dough in any order that you choose. Use the back of a large spoon or spatula, and the sides of the wax paper to help smooth and flatten the dough into shape. Cover the pan with foil and chill at least four hours.
Turn the dough out on to a cutting board. Gently pull away the waxed paper. I have cut these cookies two ways. Down the middle, dividing the dough in two long rectangles, or I cut it into three long rectangles. Either way works, and they cook at the same temperature and amount of time. Two rectangles make large cookies, three rectangles make a smaller size.
Cut each rectangle into slices, about a 1/4 inch thick. They don’t spread out very far, and stay neat and orderly, so I crowd them onto the sheets.
The cookies after baking
Bake in a 350 degree preheated oven for 9-10 minutes. Take out and let them sit on the cookie sheet an extra minute to firm up. Remove to cooling tray. Enjoy! Large cookies 5-6 dozen cookies Smaller cookies 7-8 dozen cookies
Quick Tip: I slice all the cookies at one time, but any sliced cookie dough not going directly into the oven should go back into the fridge to stay cool. The unbaked bars are easy to handle when they are cool, they become soft and sticky when they begin to warm up.
These cookies freeze well and are also great for cookie sales or exchanges.
A sample of unbaked Crème De Menthe cookies alongside a batch of the original recipe. Make the basic dough the same using red food coloring in the place of green and leaving one layer plain. I’ve also made these cookies in the colors of Autumn for social gatherings.
A week or two ago I found Jerry Baker’s Giant Book of Kitchen Counter Cures at a library book sale. I snapped it up. I turned fifty-nine this month, and although I have always eaten well, I want to consider my future health when I buy and prepare food; I know I can do better.
I’ve recently been dismayed to find these words on the package ingredients of many of my favorites:
In plainer terms this usually means an ingredient in the product contains a modified food or GMO. How did these modern-day horrors slip into our food with most of the public unaware? They should have been banned.
“Unless you’ve been living “off the grid” for the past 10 years or so, you know that genetically modified organisms (GMOs) are in just about every kind of processed food on the supermarket shelves. Extensive animal testing has shown that foods containing GMOs cause health problems, ranging from gastrointestinal upsets and infertility to organ damage, immune system impairment, and accelerated aging.” ~ The Ghastly Dangers of GMO’s – Jerry Baker’s Blog
In hopes of making more food from scratch I took a look at the recipe for apricot waffles in the book, adapted the ingredients to make better use of what I had in my pantry, and made a batch of 12 -18 waffles (Amount depends on how full you fill the waffle iron.) For a quick nutrition bump-up on a day when you are in a hurry, add 1/2 can of chopped apricots to your pancake and waffle mix before cooking.
BUTTERMILK APRICOT WAFFLES
1 can of apricots/in fruit juice
Prepare apricots – Chop 1/2 the can of apricots. Puree 3-4 apricots into a smooth sauce in a food processor, or just mash them with a fork until smooth. (I ate any leftover apricots right out of the can!)
In mixing bowl combine:
2 cups flour (you can substitute 1 cup with wheat flour)
3 tablespoons sugar
3/4 teaspoon salt
1 1/2 teaspoon baking powder
1/4 teaspoon soda
In small bowl combine:
1 3/4 Cups buttermilk (*substitution at bottom)
2 tablespoons melted butter
2 eggs, lightly beaten
Pureed apricots
Add to dry ingredients and mix. Gently fold in chopped apricots. Follow directions for your waffle iron. I think this batter would probably make good pancakes too. ENJOY!
* Use the same amount of milk with a tablespoon of vinegar added. Mix these two ingredients together and let them sit for five minutes before using in the recipe.
I know, I know, canned apricots may be contaminated by ingredients leaching out of the can, enriched flour is loaded with no-no’s, and sugar is deadly…but hey, at least I am eating a food high in natural beta-carotene. I’m also trying to make inroads to finding flour, sugar and other products I cook and bake with in a more natural/organic form.
Jerry Baker’s Blog is filled with health advice, seasonal tips, recipes and garden hints. A terrific blog to visit and browse.
We celebrated four family birthdays in May. We all love ice cream cakes, so that was our dessert of choice. Store-bought ice cream cakes can be pricey, so for the last birthday in the month, and because we had repeated the same brand of cake twice; I created an ice cream cake of my own.
The cake turned out sensational. Since I buy my favorite brands of ice cream when they are on sale, the cake cost half of what I paid for the store bought cake, and fed double the people. Hooray!
Homemade Ice Cream Cake
Ingredients:
2 Cartons of Breyers Chocolate Chip Mint Ice Cream
1 pkg. Keebler Grasshopper Cookies
2 tbsp melted butter
Rainbow Sprinkles
Redi-Whip Whipped Cream in a can
These ingredient choices are easily changed to make your own custom cake. Half the ingredients will make a smaller cake. (8×8 pan)
Spray bottom of 9 x 13 pan with cooking spray. Preheat oven to 350 degrees. Process grasshoppers to crumbs. Mix half the crumbs with melted butter and press into pan. Bake for about five minutes. The chocolate on the cookies will also help the crumbs stick together. Set remaining crumbs aside.
Let cool. While cooling, take out ice cream and let it soften until it is easily spread with a spatula or back of large spoon. Before I begin to spread the ice cream, I mix it around in a bowl to be sure it is ready to spread.
When the pan is completely cool you can begin to add the ice cream. I like to space out six to eight dollops on the crumbs, and then begin to spread it. If the ice cream doesn’t spread easily at this point, wait until it softens a bit more. If you try to spread while the ice cream is still too cold, you will break up your cookie crumb crust and create a big mess.
Sprinkle half the remaining cookie crumbs evenly on the top of this layer of ice cream. Gently press into ice cream with back of a spoon or spatula.
Repeat with the second carton of softened ice cream, spread carefully until you have an even top layer.
At this point I used two large, rectangular container lids I had on hand, and laid them on the top of the pan as a guide. I created diagonal lines of sprinkles, with a line of cookie crumbs alongside each stripe of sprinkles.
Wavy strips of whipped cream added a third decorative element. A border of whipped cream around the edge of the pan created a nice finished look.
Cover and freeze your finished cake for several hours. Just like a store-bought ice cream cake, let the cake thaw for about twenty minutes before you attempt to cut and serve. Enjoy!
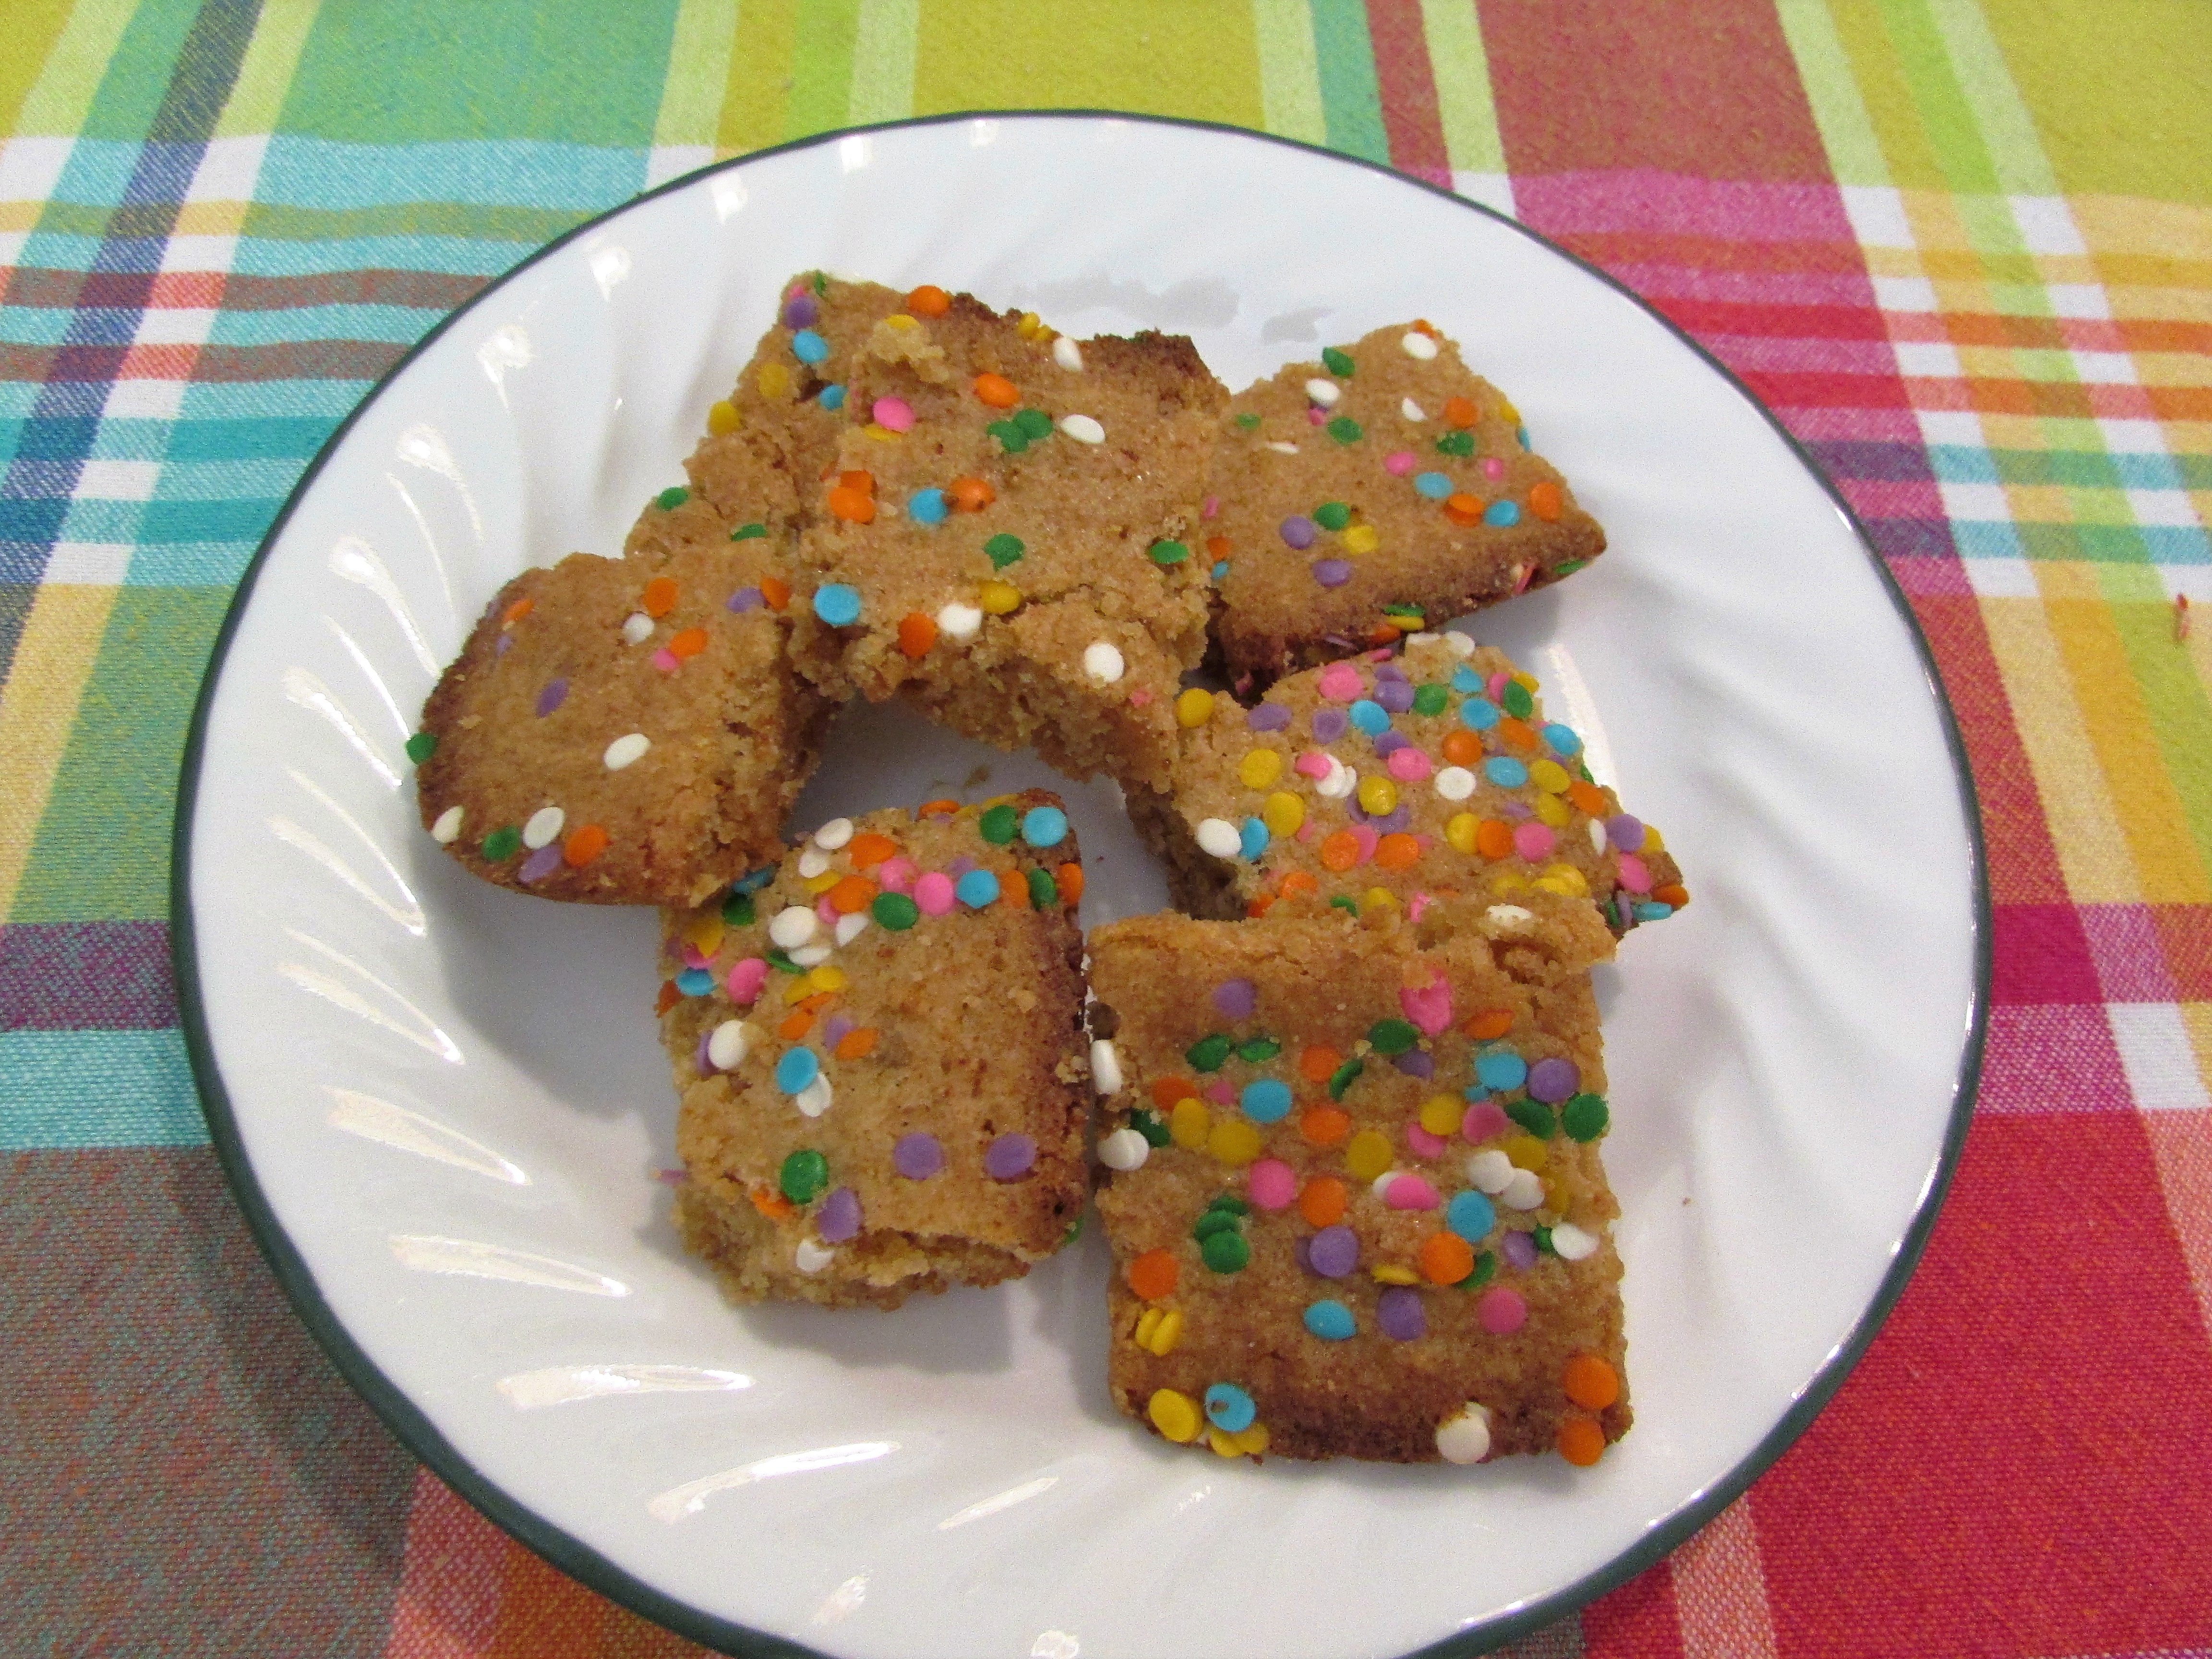
My grandsons visited this weekend, and I had no treat to offer them. These blonde brownies were easy to make and brought forth questions of, “Can I have another one?”
BLONDE BROWNIES
3/4 cup brown sugar (I used light)
1/2 cup butter
1 egg
1 tsp vanilla
1 cup flour
1 tsp baking powder
A pinch of salt
Combine sugar and butter, beat until fluffy. Add egg and vanilla, beat until combined.
Sift together flour and baking powder. Stir into wet ingredients and mix with spoon until combined.
Spread in 9 inch square pan. Bake at 350 degrees for 15-20 minutes.
I don’t have this size so I use a Pyrex 7 x 11 glass pan and it works fine. An 8 inch square would probably work too, just add a minute or two to the baking time.
I add sprinkles or jimmies to the top before baking, or you can stir 1/2 cup chopped nuts into the batter. One of these days I’m going to try some hulled sunflower seeds on top.
It’s Christmas Cookie Time! Hooray! Time to unpack my cookie cutters and whip up a new batch of sanding sugars. Creating your own colorful sugars is easy to do, even better, homemade sugars cost a fraction of what you pay at the grocer or specialty store.
Ingredients & Supplies:
1/4 C of sugar
Food Coloring – Gel or Liquid
Jar or Plastic Bag
Toothpick if using gel
Cornstarch (sometimes needed if using liquid food color)
Measure out your sugar into a jar or plastic bag. Add gel with a toothpick or drip 12 -24 drops of liquid food coloring into sugar. Start small, more color can be added later. I found with the gel food coloring, mashing the colorant into the sugar through the baggie combined it quicker than shaking it in a jar. Liquid food coloring might work better with the shaking technique.
Let the sugar dry for a few hours. I spread mine on a piece of parchment paper. The flexibility of the parchment made it very easy to lift and pour the sugar into a jar. You can also use a plate or bowl. A funnel is a good tool for pouring the sugar into the jar without mess. If you used liquid food coloring, you might need a 1/4 tsp of cornstarch worked into the mix for dryness. I didn’t need any cornstarch in my sugars.
I think the finished sugars have a brighter appearance than many of the decorative sugars available in the supermarket.


crop")