Plant – British Soldier Lichen (Cladonia cristatella) Part I

Would it seem odd if I labeled this post Throwback Thursday? Probably. I made my acquaintance with this small red lichen, Cladonia cristatella, better known as British Soldiers, years ago. In childhood, my friend Sherry, sister Susan, and I, would roam the fields near Sherry’s home in search of this small lichen to grow in terrariums. The lichen is a throwback to memories of earlier days.

I’ve been on quite a hunt for this plant, searching for it for weeks on end, I even know the date I began, August 31st. On that day we took Sherry, we’ve been friends for sixty years now, to the airport in Philadelphia, for her return trip home to the Dallas/Fort Worth area of Texas. I wanted to find a way to commemorate her trip to visit us, and also wanted a reminder of our decades of friendship. I envisioned an idea to use British Soldier Lichen, but oh my, what a time I have had finding it.

British soldier lichen, with its brilliant red caps, is named for the army of British “redcoats” who invaded colonial America. FloraFinder

I will write more about the use I am going to make of the lichen in Part II, this post is more about my search and where I finally found the lichen. I remembered as children we found the ‘soldiers’ growing along an abandoned roadway. I visited the same area and found nothing. I also rummaged around a broken-down fence that bordered a park near our home, I spotted the lichen there in the past, but nothing was found. I was near giving up, telling myself perhaps the lichen was seasonal and not growing in the area in late summer.

I had almost given up my great idea for a gift when on a bike ride, along the Glassboro-Williamstown bike trail, whizzing by a decaying split-rail fence, I spied a spark of red from the corner of my eye. I braked, threw down the kickstand, and shouted to my husband, “I found them!”

There were hundreds, more likely thousands, of the British Soldiers growing on the length of the railings. Need I say I was thrilled? I gathered a few, some for my project/gift, a few others to attempt growing over the winter. Parts II and III the blog posts on the British Soldiers will follow over the course of the next week.

Planting – Terrarium Creation

This is a re-post from a few years ago, but well worth repeating once again. If you have small outdoor plants you want to save from winter weather, they are the perfect candidate for placing in a terrarium.

1. Select Container/Add a layer of pebbles.

2. Add a layer of charcoal.

3. Add a layer of humus/soil.

4. Add plants and mosses.

5. Add lichens, rocks, and small statues. (Mine are elephants from Red Rose Teabag boxes) Water sparingly, rinse excess dirt off of sides. Cover with lid of some type. Enjoy your beautiful terrarium.

Care of terrariums: Mosses like gentle sun, morning light exposure is best for a terrarium. Try to lift lid each day to give terrarium fresh air. Your terrarium will self-water, if it develops a look of dryness water sparingly once again.

Projects & Plants – Preparing Lichen Branches for Crafting

IMG_4197

I am always entranced by branches covered with lichen. The frilly growth, the lovely greens…the possibilities…oh my. This type of lichen forms on decaying wood. I usually find them scattered on the ground after a drenching storm. The heavy winds and rain carry them to the ground. These lichen are known as foliose lichen

One problem I needed to deal with before I used the lichen branches was the bits of dirt and insects embedded in the wood. Some nature craft books recommend baking pine cones, branches, and other naturals in the oven to kill insects and/or their eggs. I didn’t want to destroy the beautiful softness or green color of the lichens, and the branches were larger than the dimensions of my oven; the solution: I soaked them in my laundry tub. This seemed to work for flushing out any stowaway insects. I weighted the branches down with plates, because of course…they float. Now I must come up with a project worthy of their beauty.

Pressed Flowers – January Pressings/Part One

IMG_9405

Last week I had a few spare hours and the perfect winter day to take a long walk. The sun warmed me, but the wind behaved like a naughty boy, throwing the tasseled ends of my scarf into my face, tangling strands of my hair around the frames of my sunglasses. No matter though, a sense of the glorious filled my spirit. God’s blue sky, the outdoors, paths to walk, a “pressing” mission to fulfill; even in the midst of January’s desolation I knew I would find something to put between the pages of my pressed flower books

I jumped a ditch of standing water, only to realize as I leapt over, the breadth was wider than my stride. My right foot mired in the muck, covering my favorite mesh slip-ons with mud. I shrugged away aggravation as the cold water squished into my sock with each step.

IMG_9388

Slung on my shoulder lay an old crocheted bag for my finds. Inside I had added several plastic bags for items small enough to fall through the mesh. A pair of scissors, always a good idea in brambly woods, was another good addition.

IMG_9390

A coppery notched leaf was the first good find.

IMG_9392

Nearby I spotted a patch of wild onions. They gleamed bright green and lush against the backdrop of muted browns and beiges.

IMG_9393

I picked out a few bits of sheet moss growing amid the grass.

IMG_9397

Jackpot! Several fallen branches adorned with delicate green lichen lay in my path. Usually the lichen is impossible to remove without damaging the ruffles, but the recently melted snow kept the lichen moist enough to easily peel away from the bark. The gathering of these frilly, ribbon-like lichens filled me with immense satisfaction.

IMG_9413

My walk led me back home where I picked a few pieces of ivy from the trunk of a tree. Winter painted the immature leaves bronze with chartreuse veining. I hope this gorgeous color combination holds true as the leaves dry in the book-press.

IMG_9428

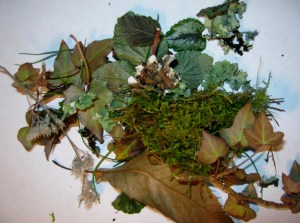
Laid out before me, the gleanings from the wintry forest and meadows filled me with pleasure. As always, I was surprised by how much I had in my bag. I realized I had gathered at least five pages of flower pressing material.

IMG_9431

The winter has been a damp one. I made sure every piece of foliage was placed on the paper with plenty of space around it. When I finished arranging the pieces I covered the pressings with another piece of computer paper and placed all the layers between the pages of a large, heavy book.

IMG_9432

Pressing Tip: Moss roots should be cut away before pressing. Separate each strand to press. Most thick mosses will not press well. Those with sprigs are the only type that will work.

IMG_9433

Pressing Tip: When you press thin stems, such as onions or grass, always try to keep a natural curve along their length. There are not many straight lines in nature, curves and twists will add interest to your pressed flower compositions.

IMG_9434

Plants – Collecting and Keeping Moss Thriving

IMG_3504

I recently collected some mosses on a warm day. To keep them thriving I have them in a low basin filled with about an inch and a half of moist soil. Topping the soil I have a layer of pine needles. I spray the moss with water daily, and so far, even the reindeer moss, which is really a lichen, is soft and green. I plan to create a naturescape with them and use them on my Christmas dinner tables as the centerpiece.

IMG_3503

I collect moss in areas where there is a chance it will destroyed by construction or gravel pits. I also like to save pieces in areas that are torn up by dirt bikers. If I take any from the nearby woods I do not collect near paths where people walk, instead I enter deeper into the woods to collect from areas only the squirrels can view.

pics 063

After a storm I often am able to collect scraps of lichen that fall with the dead branches brought down by heavy rains. These pieces of lichen laden bark look nice in terrariums or nature settings. I am hoping to make some fairy furniture in the winter and bring a little magic and light into the darker months of the year.

Project – Birthday Terrarium in Five Steps

1. Select Container/Add a layer of pebbles.

2. Add a layer of charcoal.

3. Add a layer of humus/soil.

4. Add plants and mosses.

5. Add lichens, rocks, and small statues. (Mine are elephants from Red Rose Teabag boxes) Water sparingly, rinse excess dirt off of sides. Cover with lid of some type. Enjoy your beautiful terrarium.

Care of terrariums: Mosses like gentle sun, morning light exposure is best for a terrarium. Try to lift lid each day to give terrarium fresh air. Your terrarium will self-water, if it develops a look of dryness water sparingly once again.

Pressed Flowers – Pressing the Odd Item Part V

Another item I press throughout the year are lichen. Lichen grow on the bark of dead and decaying trees. They are varied in color and markings and press well in heavy books. They will leave deep indentations within the book, so be sure it is one you don’t mind losing for pressing. I also have used heated books to press the lichen, but don’t necessarily enjoy the smell that ensues from the microwave when I open the door. The lichens will retain a bit of thickness, so they are not necessarily good for greeting cards, but they can be used to make fairy furniture and other natural arrangements.

A good site to visit for more information of lichens can be found here: Lichens. Happy Pressing!