I have good luck with my white and blue nigella plants self-seeding in the front of the butterfly border. Each year, the initial sowing of plants brings forth a new generation. Today, at half price, I was thrilled to find seeds for a pink variety called Mulberry Rose. It’s always exciting to procure a new variety of a plant you love.
This small flower creates quite a dynamic seedpod. It blooms the size of a quarter, is low-growing, and has delicate foliage. Beautifully rounded and loaded with seeds, the pod dries beautifully for indoor winter arrangements.
The seed packet suggests making successive sowings for continuous bloom. My new Nigella seeds are from Renee’s Garden. I am content in the knowledge that this small blossom will grace my garden for years to come.
One of my first memories of outdoor fun is chasing fairy wishes. I associate my parents and Mom’s cousin, whom I called Aunt Norma, with my first recollection of fairy wishes. The premise behind catching one was the fulfillment of a wish. Upon capturing the wish in your hand, you whispered your hope or dream, and then, and this was important, you had to let it go again.
The beautiful fairy wishes in the photograph were captured as they unfurled from a milkweed pod in my back garden. Anyone, who has read my blog for any length of time, knows I am a bit obsessed with helping butterflies thrive in my garden. I grow common milkweed as a host plant for Monarchs, fennel, dill, parsley, and rue for Black Swallowtails.
My prayer is that God helps me ride the winds of the written word, just like a milkweed wish, to spread the Good News of Salvation and His Love far and wide.
Jesus said to him, “I am the way, the truth, and the life. No one comes to the Father except through Me.
The beautiful moss spores are my choice for The Cosmic Photo Challenge/What’s Flowering Where You Are? Before the recent snowstorm, I grabbed my camera and took a woodland walk. I was amazed at the vivid green of the mosses and lichens. In places where the sun shone through the branches, I noticed some of the mosses had already sent up spore capsules. I’m going to stretch and say these are a type of bloom.
If I had to rate these moss spores for beauty between 1-10, they would receive a 10+ from me.
Skunk cabbage has also emerged in the dead of winter. Here are some of the ‘knobs’ before the snow covered them. I read an amazing fact on the PFEIFFER NATURE CENTER site: some skunk cabbage plants can be over 100 years old. Wow, I will feel a bit more awe over them when I take my next woods walk.
Next time when I become a bit winter-worn and weary over the cold weather, I’ll remind myself of those skunk cabbages never giving up.
As always, lichen on fallen branches are a welcome touch of green.
Whatsoever is Lovely? Definitely the small and delicate bits of green I found in the woods. I wish I could have a large garden plot filled with mosses and lichens in the winter.
Judy Dykstra Brown’s Blog offers a unique new challenge. The basis of the challenge is to search your photos with a number and create a blog post with them. This week the number is 126. Post a selection of photos on your blog and link back to her blog. Fun! I thought I would have more, but these are the three photos that had 126/26.
This is my first time taking part in this challenge. I will definitely try again. Why not take part too? What a good moment it was when a photo of my grandparents showed up in my search.
The two beachy scenes are Block Island, Rhode Island. I love the way visitors and islanders alike build rock cairns on the slopes and sand.
I was surprised I didn’t have more photos in the search, but then again, sometimes I relabel the numbers. If you do this also, Judy Dykstra Brown has a way for you to take part, choose a word instead.
Like the Steinbeck quote below, my photos seem to multiply while I sleep. Most of mine are on CD discs for storage.
Ideas are like rabbits. You get a couple and learn to handle them, and pretty soon you have a dozen.
Seven hundred days…that is how long the weather forecasters told us our area had not seen accumulating snowfall. This week, when the skies greyed and beautiful snowflakes began to descend, it created a swell of joy in many, especially children with new sleds and toboggans. It was a superb snowstorm, not so much as to cause a complete standstill, but enough to have a bit of fun in. Even the most winter-weary could not feel hostility toward it when they gazed at a landscape frosted with white.
There is little left in my yard to vase. I took advantage of an amaryllis that had grown so top-heavy it had to spend its last days in the garage. I found a basket instead of a vase. Anything glass or porcelain might have cracked in the freezing temperatures. I plucked a few stems of sedum that still had some dried flowers and placed them in the spring-green basket. The amaryllis mirrored the brilliant snow. It is a fun way to celebrate IAVOM (In a Vase on Monday) and the glorious snowfall.
Just a few minutes ago I posted this tweet on what is now called X. It was flagged immediately, and the photo blocked, for being considered sensitive content. I don’t need to say anything more because I know the readers here have sense. Anyway, the Bible says it better in Isaiah.
Woe to those who call evil good and good evil, who put darkness for light and light for darkness, who put bitter for sweet and sweet for bitter!
Day After Update: In the later hours of Sunday, I noticed the photo appeared again on Twitter, and was not marked as sensitive content. However, that flagging of a Bible Verse happened at all is eye-opening and indicative of the times we are living in.
I did immediately appeal. We will see what happens. The situation had the opposite effect from what they probably expect of people. It immediately filled me with a sense of battle, and I stood just now, and armored up using Ephesians 6:10-18. When I do this, I even go through the physical motions. God is with us.
Finally, be strong in the Lord and in his mighty power. Put on the full armor of God, so that you can take your stand against the devil’s schemes. For our struggle is not against flesh and blood, but against the rulers, against the authorities, against the powers of this dark world and against the spiritual forces of evil in the heavenly realms. Therefore put on the full armor of God, so that when the day of evil comes, you may be able to stand your ground, and after you have done everything, to stand. Stand firm then, with the belt of truth buckled around your waist, with the breastplate of righteousness in place, and with your feet fitted with the readiness that comes from the gospel of peace. In addition to all this, take up the shield of faith, with which you can extinguish all the flaming arrows of the evil one. Take the helmet of salvation and the sword of the Spirit, which is the word of God.
And pray in the Spirit on all occasions with all kinds of prayers and requests. With this in mind, be alert and always keep on praying for all the Lord’s people.
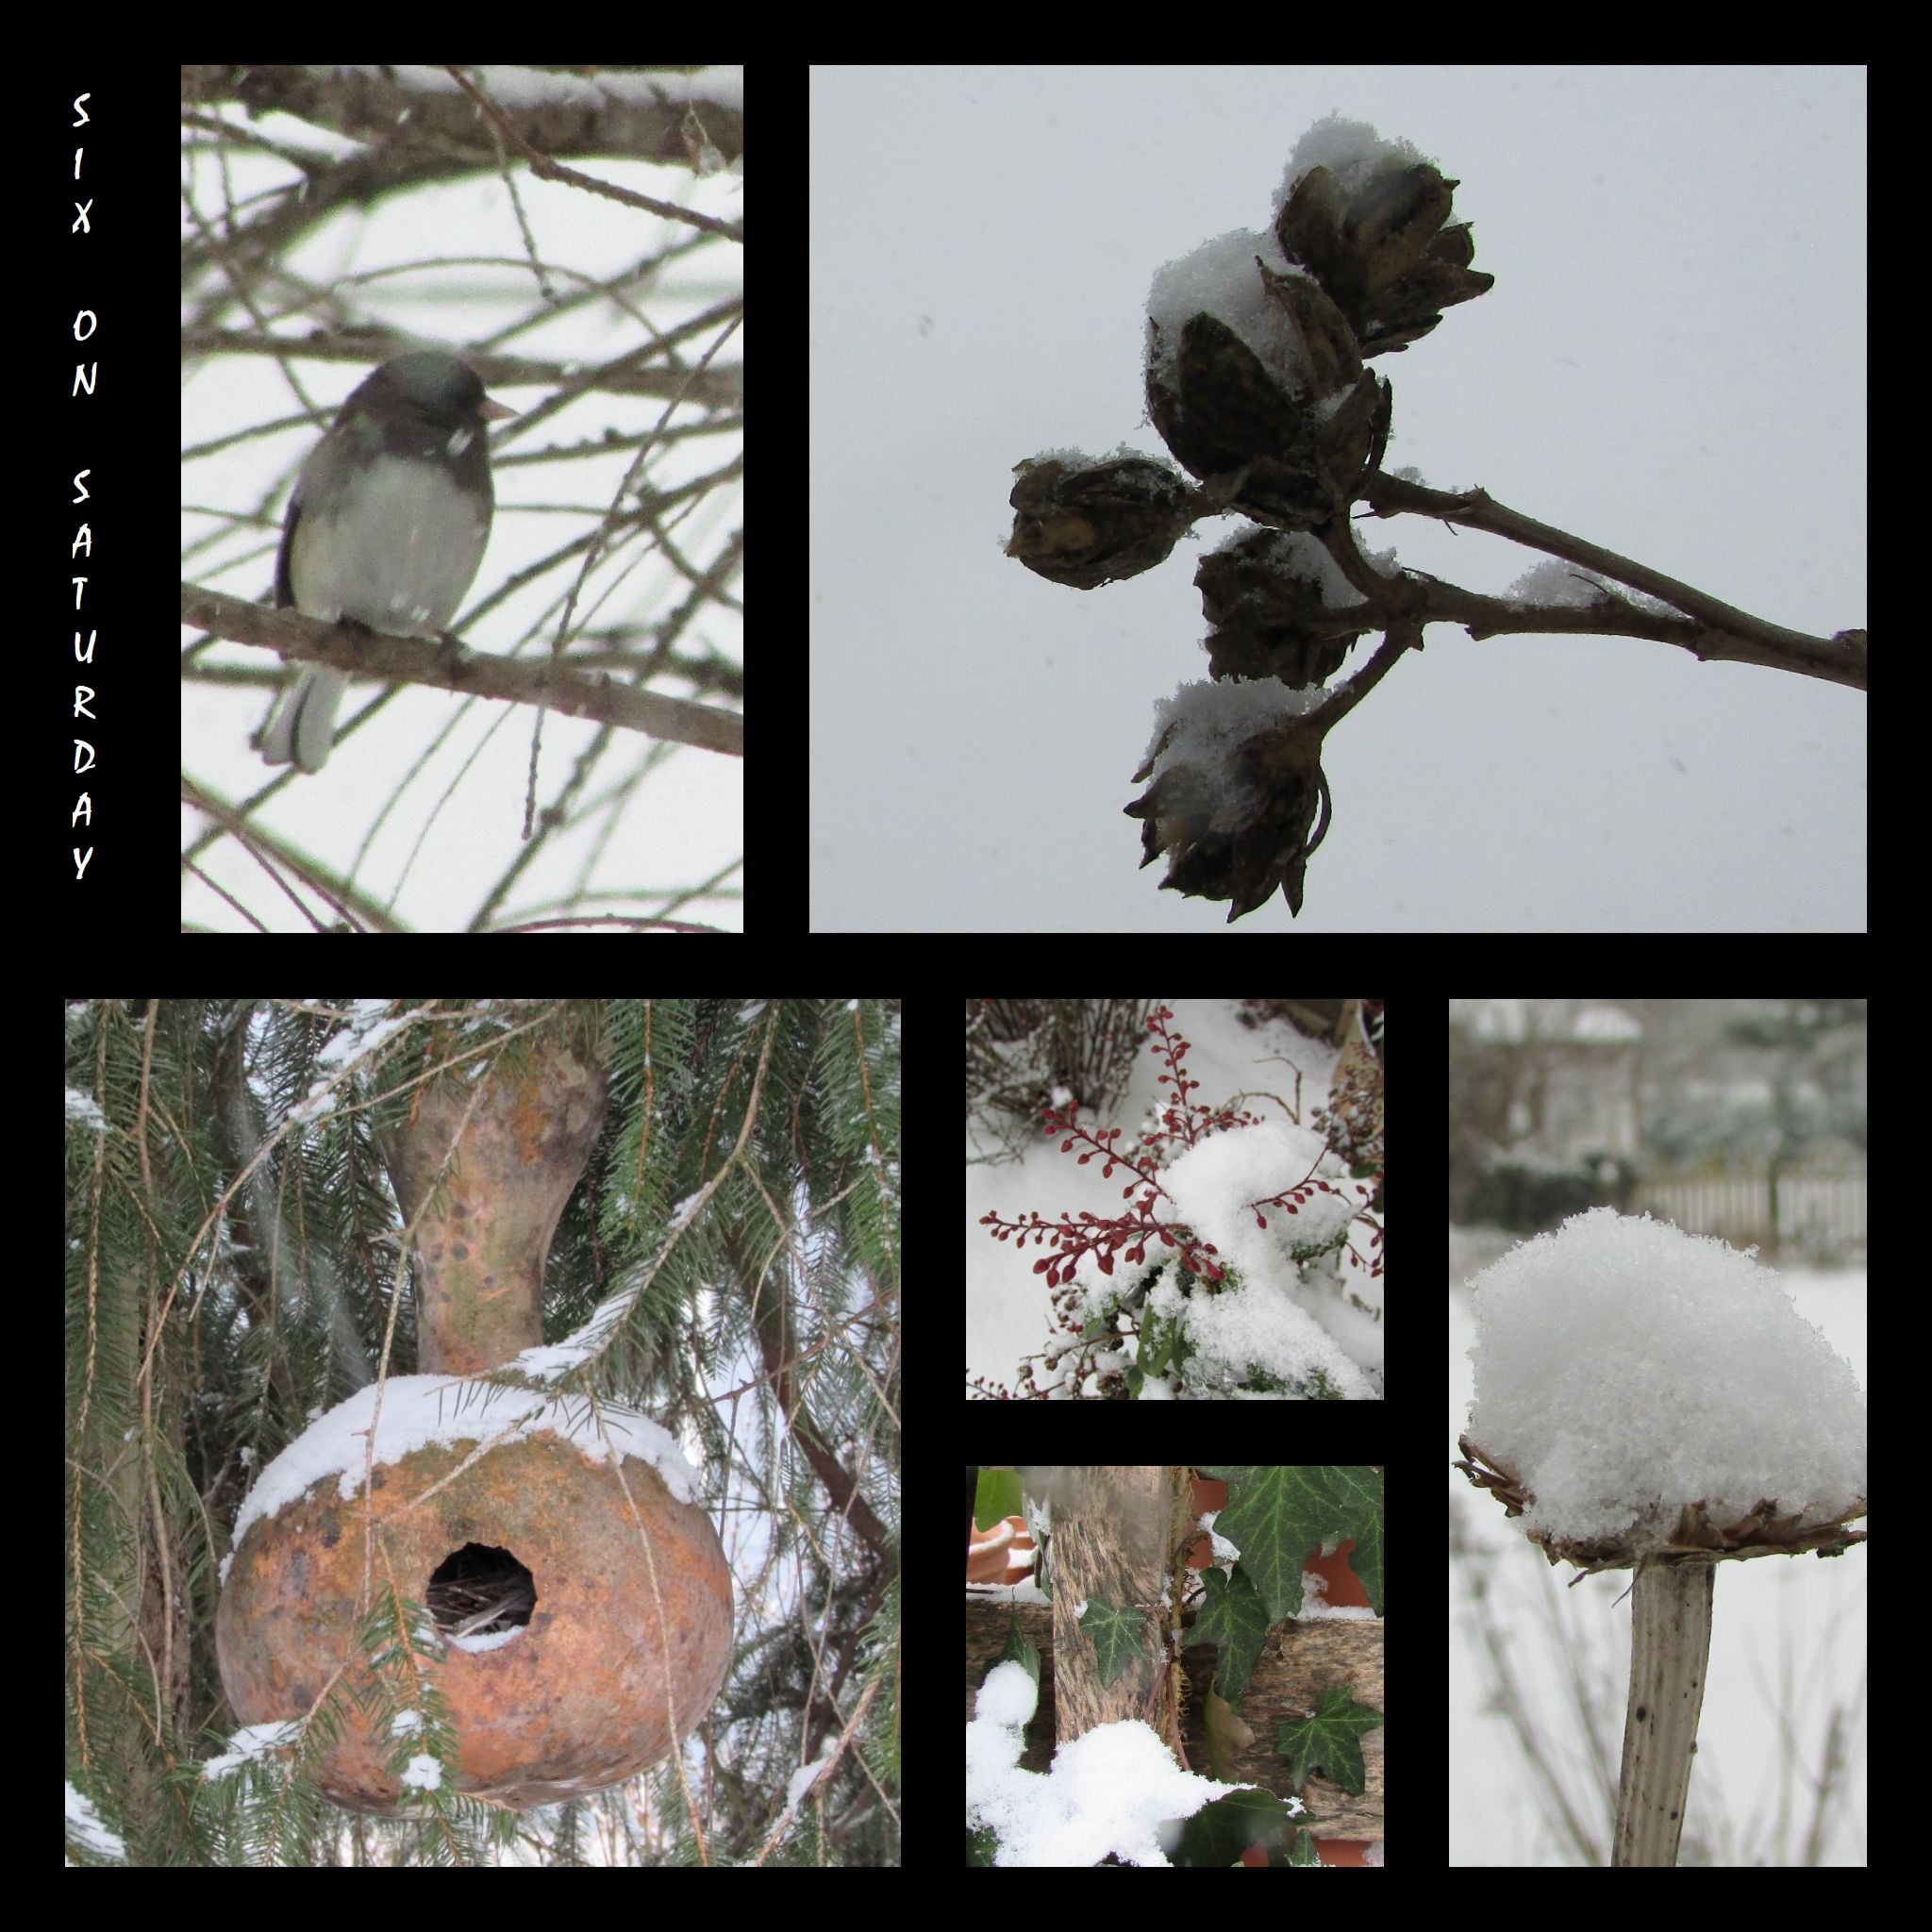
My area of Southern New Jersey went over 700 days without accumulating snowfall. Yesterday, we had a beautiful snowstorm throughout the day. What a lovely sense of peace the quiet flakes instill into the atmosphere. Early in the morning, I couldn’t resist grabbing my camera and taking photos as I fed the birds.
A Junco, one of a large flock that visits my yard, seemed to wait patiently for me to scatter birdseed.
The Rose of Sharon pods were the perfect resting place for snowflakes. Looking closely, you can see a few of the sharp points of individual flakes.
The gourd birdhouse, crafted several years ago, looked lovely with a coating of snow.
The Japonica, colorful with new growth, wore a blanket of snowflakes.
English Ivy, indestructible, seemed impervious to the cold.
A stem of a zinnia, left in place as cover for birds, held a mound of crystal snowflakes…beautiful.
The flying pig who holds court over the sideyard couldn’t escape the snowfall. A natural monochromatic setting with the grey sky behind him and the bird bath pedestal beneath him seems a good choice for Skywatch Friday.
I love this quote from my Farmer’s Almanac Daily Calendar:
When oak trees bend with snow in January, good crops may be expected.
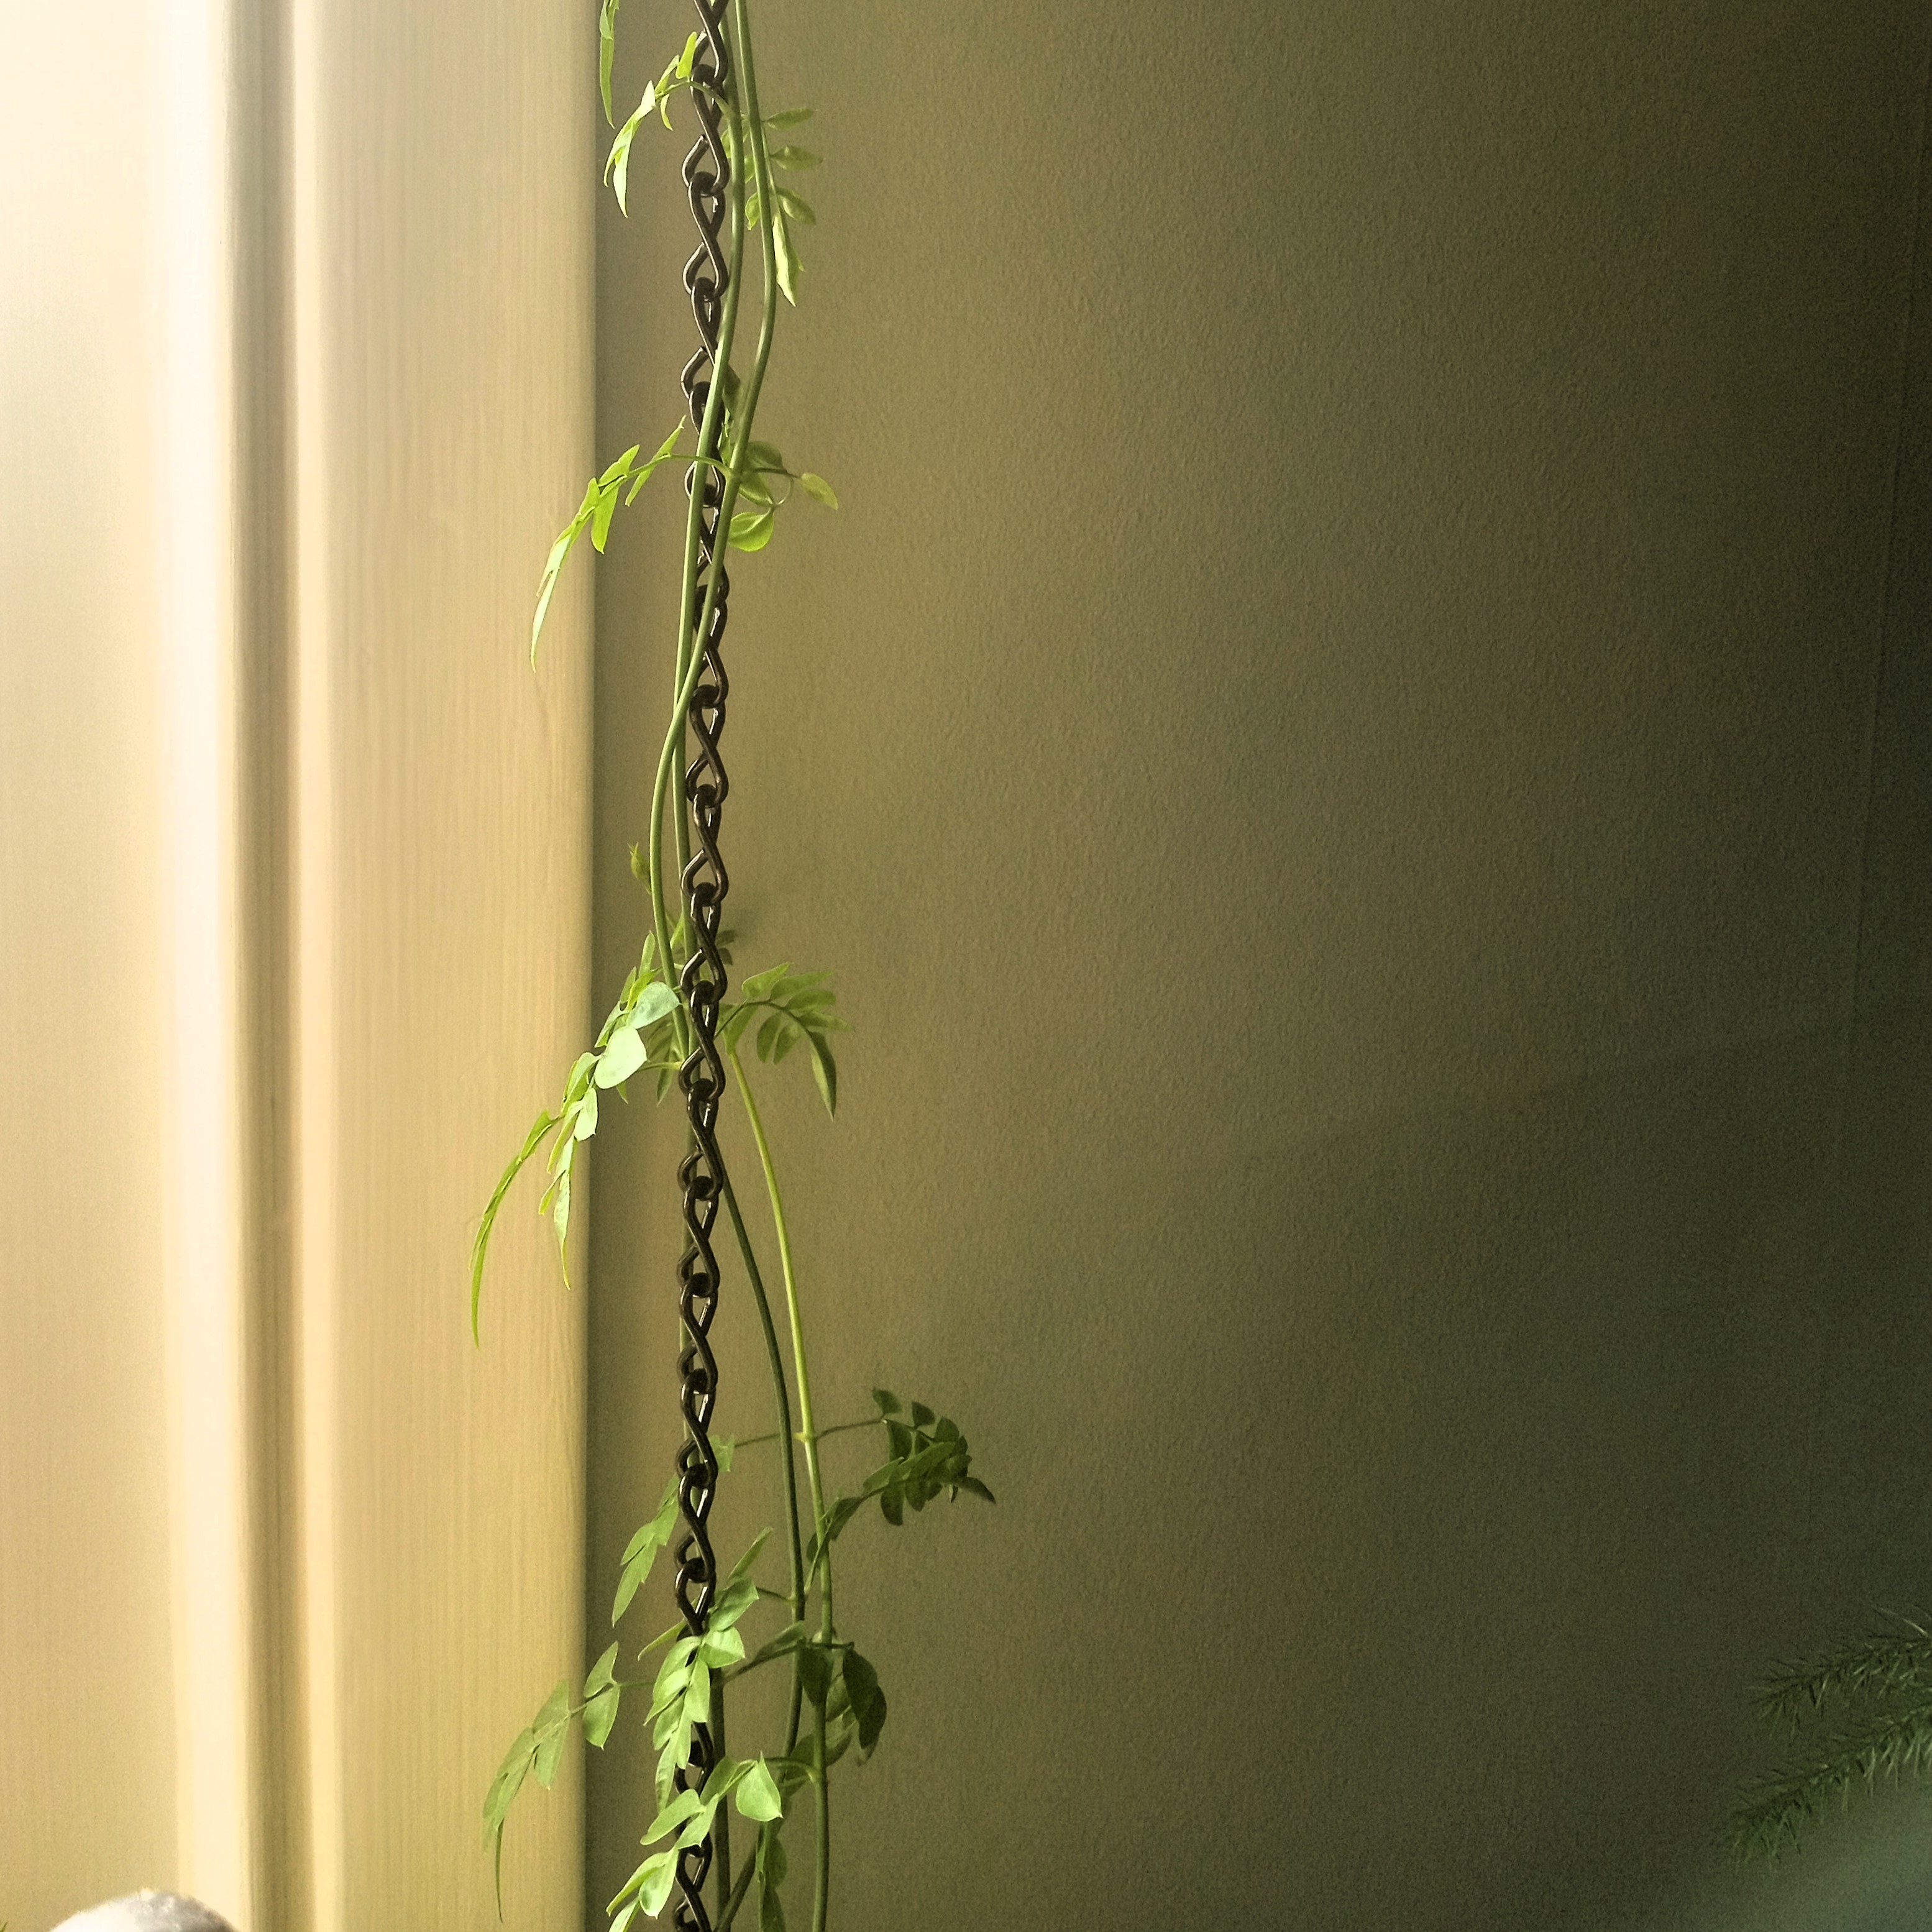
The smell of Jasmine is terrific. I love growing the plant indoors in the winter and outdoors on the porch in the summertime. I found a vining variety a few months ago, and it quickly thrived and outgrew its pot. After transplanting, the vines took off, sometimes appearing to grow an inch or two a day. I am hoping for a lot of bloom in the Spring, so I didn’t want to cut it back, but I needed portable support.
What I chose as support was inexpensive and light, and it works great with a shower curtain hook. A length of delicate chain cut the height of the window frame and attached with any hook allows the Jasmine vines to twine and grow upward. It hangs loose; attaching it to the pot or plant is unnecessary. Thigmotropism is the growth process that causes the Jasmine to twine and climb.
In plant biology, thigmotropism is a directional growth movement which occurs as a mechanosensory response to a touch stimulus. Thigmotropism is typically found in twining plants and tendrils
The Farmer’s Almanac counts down how many days of winter are left. As of today, there are 63 days left until Spring. Whoo-hoo! I have some sprigs of daffodils showing above ground, and this week, when storms knocked over pots planted with tulip bulbs, I saw that beneath the soil, the bulbs had rooted and were beginning to send up shoots. I hope being overturned won’t stunt the growth.
I have no flowers or interesting dried-out sprigs left to display in a vase for Rambling in the Garden – IAVOM. Happily, I do have a few evergreen plants growing in the gardens. I have gathered sprigs of Nandina, English Ivy, Barberry, and Vinca vine inside today’s vase. I also added a dried-out tassels of a Bald Cypress. To add some interest, I plucked Wisteria pods off the bush and added those into the mix.
The bouquet is so-so, but the vase is a treasure I found this week. Searching for unique containers to craft into hanging planters, I stopped at the local Goodwill. Usually, I find junk, and a caution for other treasure hunters; I often have seen Dollar Store items in the Goodwill store marked at $1.99. To be blunt, this always annoys me. I am often tempted to point it out to the manager, but the earnings from Goodwill Industries go to non-profit groups. Many of the stores have very high rents to pay in the shopping centers they are located in. For this reason, I don’t say a word.
Back to the find in the Goodwill, though. I found treasure—two beautiful McCoy Swan Vases. One is pink, and the other is blue. I used the blue vase for today’s arrangement. I do not have an eye for antiques as some do, but I love McCoy pottery, and I am good at spotting that variety.
My beautiful McCoy vase twins are, Whatsoever is Lovely to me—a perfect choice for Xingfu Mama’s Week Two Challenge.
Looking up in the Orchid Room at Longwood to the sky beyond the glass panels.
Longwood Gardens has a lot of construction going on. I hope I am able to one day visit more of the new greenhouse sections. When we visited this week, we saw that they are beginning to reconstruct the water lily gardens.
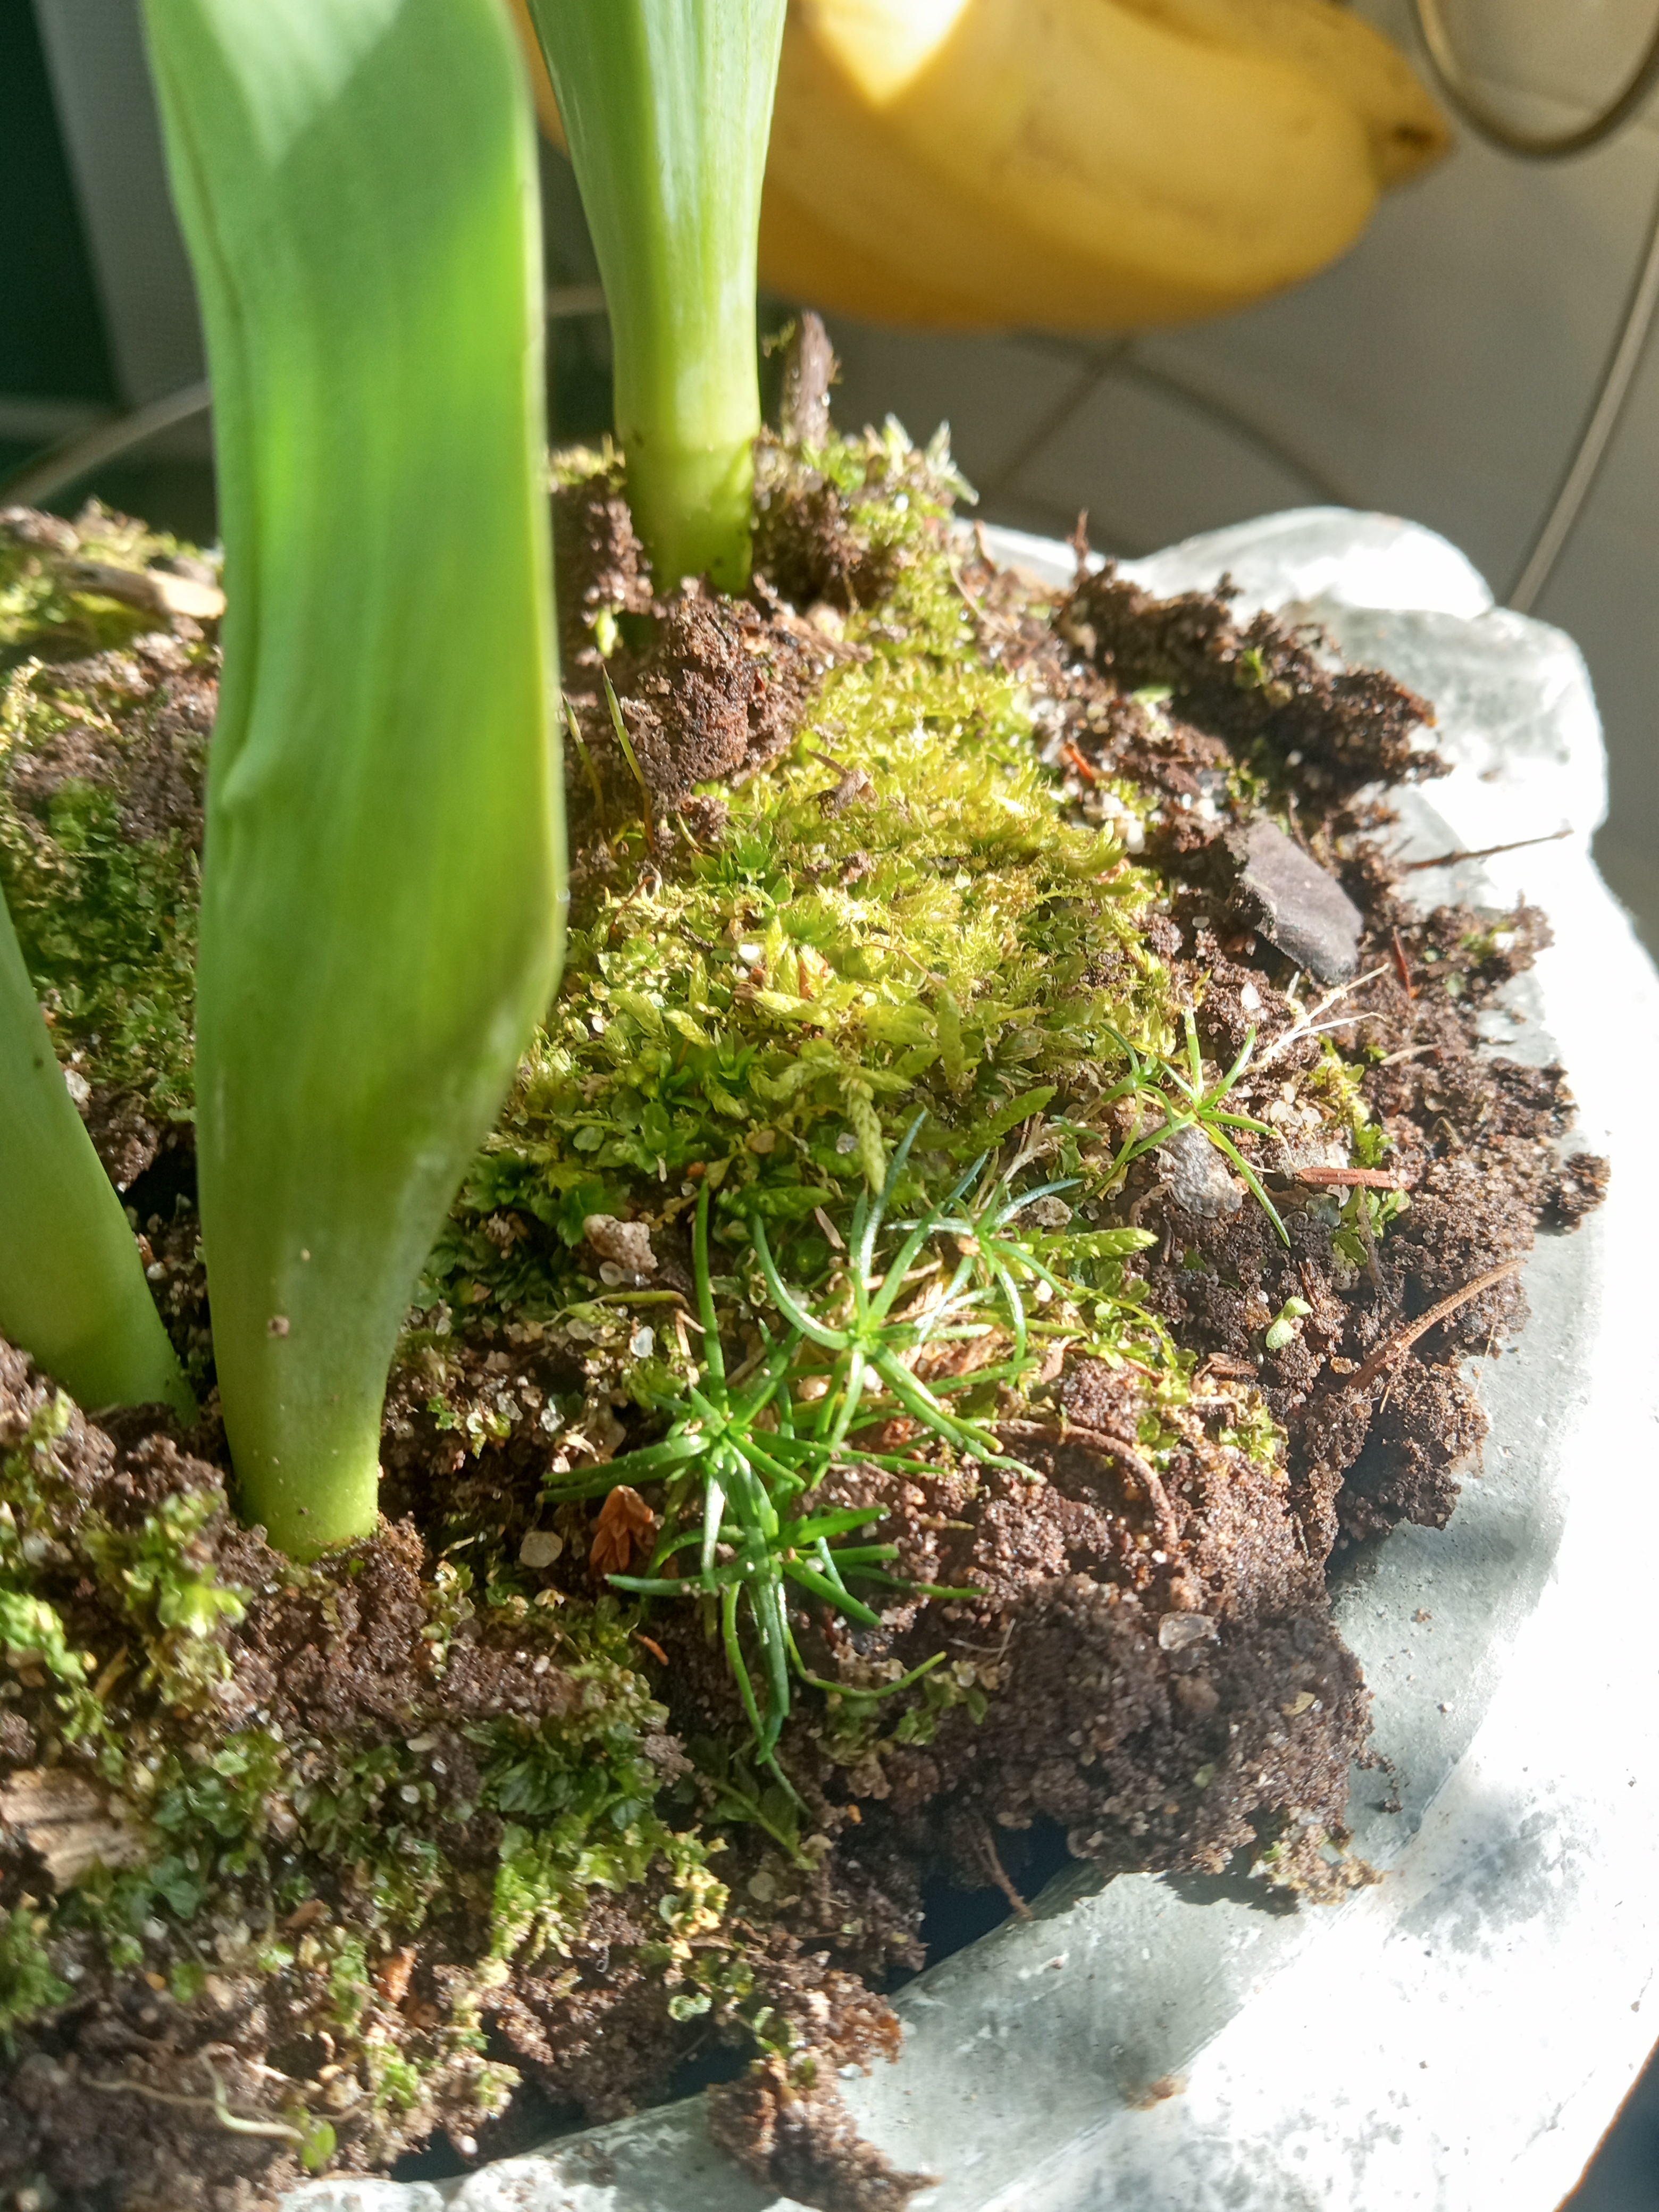
Oh, Happy Day, even though the sky is grey and cloudy. This week, I found potted tulips for sale in my local supermarket. At the top of the spear of foliage, I could see that they would be the shade of yellow I love. Sure enough, they have blossomed into a gorgeous, pale yellow. I put them on my counter near the window during the day, so they won’t grow too leggy. I also put a bit of moss on top of the bare earth to give it a more natural appearance. These beautiful booms certainly brighten my day and mood.
I’m reading Our Zoo by June Mottershead. The book tells the story of how the Chester Zoo in England came into existence. Goodreads has some interesting comments from readers who enjoyed the book.
I found the book by watching the six-episode series Our Zoo. The series can be found on Paramount, Hoopla (available free through some libraries), and other streaming services. I enjoyed this adaptation of the true story.
The Chester Zoo is still open in Upton-by-Chester, Chester, England. The website has excellent photographs of the zoo through the decades.
Here’s a short video that looks behind the scenes of the series.
Gathering in the green is one way to crawl out of the brain sludge of dreary winter weather. By green, I mean plants, green dreams of gardens to come, and green thoughts of using what is usually thrown away.
Quite a few pieces of ginger you buy in the supermarket are sprayed with a sprouting inhibitor. I recently found, in Produce Junction, a large ginger rhizome with swollen joints. They looked like they wanted to grow. Of course, to me, the sight of that ginger was irresistible. I let it lay undisturbed in my basement, and the swelling grew larger.
Yesterday, I planted it in a large 10″ pot. I hope to see sprouting above the soil’s surface in just a few weeks. I will update on the progress.
Planting indoors in such a large pot might have created havoc with dirt and debris everywhere, but I recently read an excellent tip in Martha Stewart’s Very Good Things: use an under-the-bed storage bin for planting indoors. This tip worked great for me. So much easier to close the lid when I was through and roll it under my plant table until needed again.
The online Farmer’s Almanac has an in-depth article on growing ginger from supermarket rhizomes.
A few of the many shades of blue pansies and violas I have grown in my gardens over the years.
Pansy and Johnny-Jump-Up are a variety of seeds I will be sowing this week. It seems early, but I should have sown them four weeks sooner. I don’t follow the recommended dates on the back of the packets. Earlier is always better if I want to have larger-sized plants for the Spring Garden. If my seedlings are pitifully small, I fall victim to the lure of lusher-appearing plants in the local nurseries.
I purchased several interesting varieties from Baker Creek Heirloom Seeds at the end of Autumn, and I can’t wait to see if they are as lovely as the photograph on the package. (Dilemma: I don’t remember the ‘safe’ spot I stored them in.)
The seeds of Pansy and Johnny-Jump-Ups sprout with some bottom warmth and humidity but also have one crucial requirement: they must have total darkness. I will put a plastic tray over the top of my flat and also cover that with a dark, wet washcloth. This will seal out any light rays that might interfere with sprouting.
Organic seed starter and sterile organic potting soil are what I use to start my seeds. The plants develop robustly if I fill the bottom 3/4 of the flats or pots with soil and the top quarter with seed starter. The foliage sits against the quick-draining starter, and the roots reach down into the richer soil. Two types of grow-lights work well for me: overhead and adjustable surround wands. A sunny window provides natural light and is also a good choice.
One variety I loved, purchased from Baker Creek last year, was Laeta Fire, a viola with dime-sized blooms perfect for flower pressing. I have a few seeds left in the packet and will grow them again. You can see how small this flower is in comparison to the normal-sized geranium leaf alongside it. When I persevere in my gardening throughout the winter, the process brings me a sense of peace and renewal.
Winter walks always find me looking up. There is much to see in the trees hidden in Spring, Summer, and Autumn.
Polyphemus Moth Cocoon
Last Quarter Moon, glowing in the morning sky, framed by woodland trees.
Bird’s nest. What a perfect display of avian construction skills. It is still holding on after months of heavy rains and winds. The nest reminds me to visit the Cornell Lab of Ornithology. If you don’t have a bird feeder at home, you can tune into theirs through YouTube. I enjoy watching the Panama Live Cam at this time of year.
I enjoyed a quick walk on this second morning in January. The air, crisp with cold, was stimulating, waking me up and opening my eyes to the beauty in the winter landscape. The limbs and twigs of the trees against the chilly sky are God’s sculptures raising their arms toward the heavens. I could almost imagine them beginning to sing.
I searched for dandelion cones with fluff emerging from their tips. I am partial to dandelions; in fact, I have named 2024 my year of the dandelion. I want to be as productive and as resilient as this beautiful plant.
What do I love about dandelions? Perhaps it’s the color and shape. The flower reflects the Sun. I admire the resilience of dandelions. They will bloom wherever they can and grow lushly, even within the cracks of the street and sidewalks. Just today, I photographed this determined plant thriving in the smallest of spaces between the curb and the blacktop. I have read recently that one dandelion plant can produce up to 2,000 seeds. I hope to be as productive as the dandelion and spread as much GOOD NEWS as possible.
Here’s a fun project to do with children. You can string the unopened pods of dandelion seeds onto a piece of thread, and within 24 hours, they change and open up into perfect spheres. It’s so easy, and if you choose the right place, they will reflect the sunshine and glow and bring a touch of magic into the room. The photos below show the process. So much fun!
The candy is light enough not to break the string but heavy enough to give it a bit of weight. I love bringing a touch of whimsy to winter days.
I don’t have much growing in the garden, but my IAVOM arrangement for the first day of 2024 contains the few flowers and pieces of foliage still blooming.
Contained in the vase is a Bidens blossom. This tiny flower is about the size of a quarter. It is inconspicuous in the garden border during the summer, overtaken by plants that grow exuberantly. After these plants die back in the cold temperatures, the Bidens thrive for several months. The Spruce has a great article on how to grow Bidens perennials in the garden.
One pansy was blooming brilliantly in a terracotta pot in the backyard. Hurrah! It is bedraggled in a few places, but on the whole, it is still lovely and perfect for Cee’s Flower of the Day.
Dandelions are within the vase but opened after I took the photograph. There will be more to come on dandelions tomorrow. I love the spent seedhead. It’s done its job, and the umbrella-like pappus dispersed all the seeds into the air.
Fennel is still filling the garden beds in various heights and sizes. When I picked a few sprigs for the vase I momentarily smelled that distinctive licorice fragrance the foliage puts out. This wonderful herb is one of my major host plants for butterflies. I imagine many Black Swallowtail caterpillars on the fennel come to Spring when I daydream about my 2024 gardens.
Lastly, I picked a few pieces of Butterfly Bush foliage, still glowing blue-green in the grip of winter weather, and used those leaves as a base for the flowers.
Did you know that the next full moon happens on January 25th, and it is called The Wolf Moon? As I write this, the current moon phase is a Waning Gibbous, and the moon is 88% full. I learned these things by visiting the Farmer’s Almanac Web Page.
What do you know about pom-poms? Well, a Farmer’s Almanac webpage is devoted to precisely that: information about pom-poms. Wow! I was going to post about the Almanac magazine and calendar I purchased for myself, and now, as a bonus, I have found this amazing webpage; a freebie to throw into the mix, offering you three good ways to keep up with the moon, the weather, and with all kinds of interesting facts.
I will glom onto each calendar page and visit the website every day. Another newbie today is the word glom, courtesy of One Daily Word Prompts challenge word. I didn’t know that to glom is a term from the Scot’s dialect, glaum, which means to grab onto.
Everything Must Belong Somewhere, the Ragtag prompt for today, perfectly describes how my daily calendar will sit by my computer, prompting me to tear off a page daily. Reading this calendar will enlarge (FOWC challenge) my gardening ability and give me a few conversation starters when visiting my friends.
A Postscript: Try a few of the one-word challenges this coming year. They are fun and get your brain cranking.
Here is a timely ‘playback’ post from 2016. If your Christmas timetable is beginning to crash, and you would like to create a personalized gift quickly, here is an easy way to transfer lettering of all sizes.
Creating this simple ‘PEACE ON EARTH’ plaque was easy and inexpensive. A scrap piece of wood would work just as well as a purchased plaque. I used FolkArt artist pigments for the best possible coverage. Because I wanted the wood to look rustic I only gave it one coat of Napthol Crimson.
The Napthol Crimson alone was a little brighter than I expected; I used Liquitex Transparent Burnt Umber Ink to antique the plaque. It worked perfectly. Quick Tip: Utilize a disposable brush to apply the ink, wipe off quickly to remove the majority of the color.
I chose a font and printed out letters in the size I desired for the plaque. I was lucky; you can see I almost ran out of ink. To transfer these letters to the plaque, I colored a piece of children’s sidewalk chalk over the back of the printed sheet.
Taped onto the front of the plaque with painter’s tape, I could trace around the edges of these letters with a ballpoint pen and transfer the chalk to the plaque. The outline is easy to see, yet any residue left behind after painting can wiped away when the paint is dry.
I used gold acrylic paint to fill in the letters. A swipe of black paint along the right sides gave the letters a shadowy dimension.
PEACE ON EARTH TO ALL MY BLOGGING FRIENDS! A BLESSED DECEMBER TO YOU.