Plants – Forcing Hyacinth Bulbs

IMG_9767

Forcing bulbs: “Forcing is a technique that imitates the environmental conditions that bulbs encounter outdoors, thereby tricking them into flowering earlier.” Beginner’s Guide to Forcing Bulbs

Another way to enjoy Spring bulbs is to force Hyacinths. The same protocol applies to these bulbs, place them in a cold place for at least twelve weeks before forcing. I bring my Hyacinth bulbs into bloom by using a special vase, named quite appropriately, a Hyacinth Vase.

IMG_9614

In my experience, the plant usually becomes top-heavy if I allow it to continue growing in water. When the beautiful blooms open their bulk causes the bulb to topple out of the vase. To counteract this problem I have begun planting the bulb in dirt when it nears bloom time. This has worked very well for me. Happy Gardening!

In-depth directions on forcing bulbs can be found here: Forcing Spring Bulbs

Follow Me on Pinterest

Planting – Poppies & Winter-Sowing

IMG_9719

Poppies! I LOVE poppies, but I have some problems with poppies too. Number one on my list of loves is the way poppies develop big, luscious looking pods. When the pods begin to widen and split to reveal the color of the flower inside, honestly, I must admit I run out into the yard several times a day to see if the silken petals have opened. There is something magical in the wispy crown in the center of each flower too. Often there will be a splotch or two of contrasting color at the base of each petal. The foliage of many poppy plants glows in beautiful bluish green tones. Yes…I LOVE poppies.

One of the major drawbacks of poppies, at least in my opinion, is how hard it is to grow them from seed. For years I followed the advice on the back of the packets and on the pages of reliable gardening books and sowed them directly in the ground. This NEVER worked for me. Heavy spring rains ALWAYS washed my poppy seeds away before they could sprout, or if they did, the delicate small seedlings would be beat into the ground by that same rain. the “experts” say poppies don’t transplant well. I think I probably agree if they are grown in the house, but I have found a way to get a head start on poppies and that is through winter sowing.

I’ve written many times about winter sowing, so I am not going to take the time to rewrite what I have already posted. You can read about winter-sowing here and follow some of the links I list for more information: Winter Sowing

I am also including a post that shows the results of my winter sown poppies: Poppies

If you want to grow poppies this year, and have a milk carton or two on hand, give winter-sowing a try. It only takes a few minutes to create a miniature greenhouse to place outside in the sunshine. Happy Gardening!

Follow Me on Pinterest

Planting – Tulip Bulbs

IMG_9733

I purchased tulip, daffodil and hyacinth bulbs in the Autumn months, when they were placed on clearance. My grandsons and I planted the daffodils in pots of dirt and placed them in the refrigerator. Later, when winter arrived, they were moved into the garage. These flowers are now growing and are near blooming. This week we turned our attention to the tulip bulbs. Put to bed for three months in the refrigerator, with only a plain brown lunch bag for protection, the bulbs had already begun sprouting when we released them from their cold confinement.

IMG_9734

I had come across a beautiful picture on Pinterest of tulip bulbs growing in a glass container. I thought we could create a version of our own. Into a tall glass vase, we placed some glass pebbles, added the bulbs, and poured in enough water to barely cover the bottom of the tulips. This is where the roots will form. We will need to keep a daily watch so the water level does not fall too low.

IMG_9741

I’ll post an update on the tulips as they grow. Happy gardening!

IMG_9743

Photographs & Phlowers – A Bee-autiful Wednesday

I need a little something to remind me of Spring and Summer today…perhaps the thought of “phlowers” and some buzzy insects. Artists and crafters feel free to use these photographs as copyright free reference.

August 19, 2011 059

Picture 101

Copy of Picture 133

Picture 124

September 12, 2011 029

Project – Tissue Paper Pots

spring pots 5

My grandsons created beautiful flowerpots with just a few inexpensive items:

Plastic flowerpot

Elmer’s Glue

Tissue Paper

Paintbrush

Disposable container for glue mixture

*Cover work surface before you begin. Artists smocks or aprons are a good idea too! 🙂

spring pots 3

We tore the tissue paper into small squares. To apply the tissue we used a solution of 1 part Elmer’s Glue to 1 part water. We dabbed a bit of this well-stirred mix onto the pot, topped it with a tissue square, and covered the whole pot in this fashion.

*Keep in mind that it is best to use colors that will blend with each other well. Red and green together might form a brown tone. Use a monochromatic scheme or primary colors that will blend to create a new secondary color.

spring pots 2

When we were near finished we dabbed down any edges that were not adhering to the pot. Drying time was about 24 hours.

spring pots 1

This project was enjoyed by my grandsons ages seven and four. I think with supervision and help, an even younger child could attempt the project. The pots looked sensational slipped over pots of daffodil bulbs we had forced in the cold garage and fridge.

Planting – Repotting Over-Wintered Geraniums

IMG_9678

Most of last summer’s geraniums were over-wintered in a box in my basement. I had only a 25% success rate with this method. Happily, the one geranium that succeeded in staying green was my Martha Washington geranium. The others looked more like the photograph below, completely lifeless.

IMG_9684

No matter how far down I cut along the stem, I found little trace of green or possible viability.

IMG_9687

I had better success with the potted geranium. In the Fall, I found it very easy to pick the pot up off its stand and transport it into the house. No matter that the leaves had a inchworm stowaway. He ate only a little bit of greenery.

IMG_9688

The plant has bloomed luxuriantly in a sunny window giving me many moments of joy when I walk into the room it grows in.

IMG_9689

The geranium isn’t about to stop giving me moments of bliss with its bright flowers. This is a photograph of a new bud I took yesterday. The success of the plant has made up my mind where the coming summer is concerned. I will grow all the geraniums in pots, and in the Autumn bring them inside to cheer up the house all winter long. Happy Gardening!

Praise – The Sparrow

sparrow

The Sparrow

During a week of snowfall, I ventured out to empty the trash into its receptacle, and immediately upon opening the porch door, heard the sweet singing of a sparrow. He sang even though food is scarce, the wind is fiercely cold, and there is more stormy trouble on the horizon. He sang because that is what he was created to do. So let it be with me Lord Jesus…whatever my circumstance put a song of praise within me.

I love so many of the words of Charles Haddon Spurgeon. Here’s a little bit of his wisdom: “We are on the way to Glory, so let us sing as we journey there and, as the lark, ascending up to Heaven’s gate sings as she soars, her wings keeping time with her music and mounting in her song as she rises through the air, so let it be with us— every day a Psalm, every night a day’s march nearer Home, a little nearer to Heaven’s music and a little better imitation of it! Let us sing, now, in our hearts if not with our lips, and when the time comes, let us join our lips with our hearts and sing to the Lord! That is our text, “Sing to the Lord, O you saints of His, and give thanks at the remembrance of His holiness.”

Prose – The Country of the Pointed Firs

Country of Pointed Firs

Sara Orne Jewett was born in South Berwick, Maine, in 1849. Many of her best books are set in Maine. The Country of the Pointed Firs is a collection of linked stories that give a portrait of a seaport along the Maine coast.

Sarah Orne Jewett

I have vacationed for many years on an island in Rhode Island by the name of Block Island.  Reading this novel, I envisioned the bluffs and craggy rocks of Block Island. The book is as soothing as a lullaby, yet holds your interest with the cast of characters and their occupations. Since I am a gardener I enjoyed reading of Mrs. Almira Todd’s collecting of herbs and dispensing of them to the townspeople of Dunnett, Maine. If you love books that transport you to another time, and stories that enable you to come away with a sense of new lifelong “literary” friends, you will enjoy this book.

The Country of the Pointed Firs is available through many sources. Amazon books, Kindle and Ebay are just a few of the sources.

Psalms and Proverbs – Snow

“He sends the snow in all its lovely whiteness, and scatters the frost upon the ground.” Psalms 147:16

A few pictures of yesterday’s snowstorm and what it left behind here in Southern New Jersey.

IMG_9656

IMG_9657

IMG_9658

IMG_9659

IMG_9661

IMG_9662

IMG_9664

IMG_9668

Plants and Problem-Solving – Eradicating Scale on Houseplants

scale 1

I don’t know how I missed it for so long. By the time I saw the shiny residue on the arrowhead plant, scale insects had already infested at least half the leaves and stems.

scale 2

I took a closer look on the underside of a leaf to be sure…yup…scale. Yuck! For more information on scale insects check out this site: Scale Insect Pests

scale 3

I don’t like to use harsh chemicals on my plants. I have grandchildren and two cats. I also attempt to keep products I use as organic as possible. I decided to try rubbing alcohol to treat the scale, a good treatment I have used in the past on mealy bugs and other insect pests.

scale 4

Using a cotton swab, I dipped in alcohol and swiped the legions of scale off the plant. I checked every leaf and stem. When I was finished I removed any leaves yellowed by the insects. I also dipped the plant beneath tepid running water from the faucet. The alcohol kills the insect pests on contact. If you leave it on the plant too long it could cause damage, especially to tender new growth.

I will keep a close watch on the plant. It is also a good idea to remove it from close contact with other plants, and to disinfect the surface it stood upon, and any drip saucers beneath its pot.

Follow Me on Pinterest

Painting, Phlowers & People – Botanical Painting

botanical tulip

If you take a close look at the photograph above you will see a pot of tulips bookended by apple juice and a carton of buttermilk. The tulips were purchased last week. I intend to sketch them and paint a botanical portrait. Years ago I painted several botanicals and they are still on display in a row in my downstairs hallway. They have aged a bit. The watercolor paper has pulled in the humid air of our summers and there are slight ripples in the smoothness. I think it is time to try my hand at botanicals again.

I was also inspired to try botanical painting once more by an artist featured in an old Victoria magazine. In the March/April 2009 edition the paintings of Catherine Watters, a botanical artist, are showcased.  I searched for her work on Google and was happy to find her personal website. You can take a look at her work here: Catherine Watters

While browsing through Ms. Watter’s beautiful site, I came upon a word I never heard before: Florilegium. When I checked the Word Hippo website I found Florilegium is pronounced pretty much as it is written. Wikipedia defines Florilegium as a collection of botanically accurate paintings of plants, done by botanical illustrators from life.

Hopefully my pot of tulips will not languish in the fridge for much longer. I’ll update my progress…hopefully I will get to it before they live out their life and expire in their cold confinement.

Phavorite – Links I Love/Free Photo Editor

HEART FOR LINKSFINISHED

When I received my new laptop as a gift, I didn’t want to purchase photo editing software because we already had a computer in the house with photo editing. An online search revealed this terrific photo editing site. This site is perfect for me and I’ve used it with great results. Give it a try: FREE PHOTO EDITOR ONLINE

Follow Me on Pinterest

Pots & Pans – Valentine Goodies

heart tarts

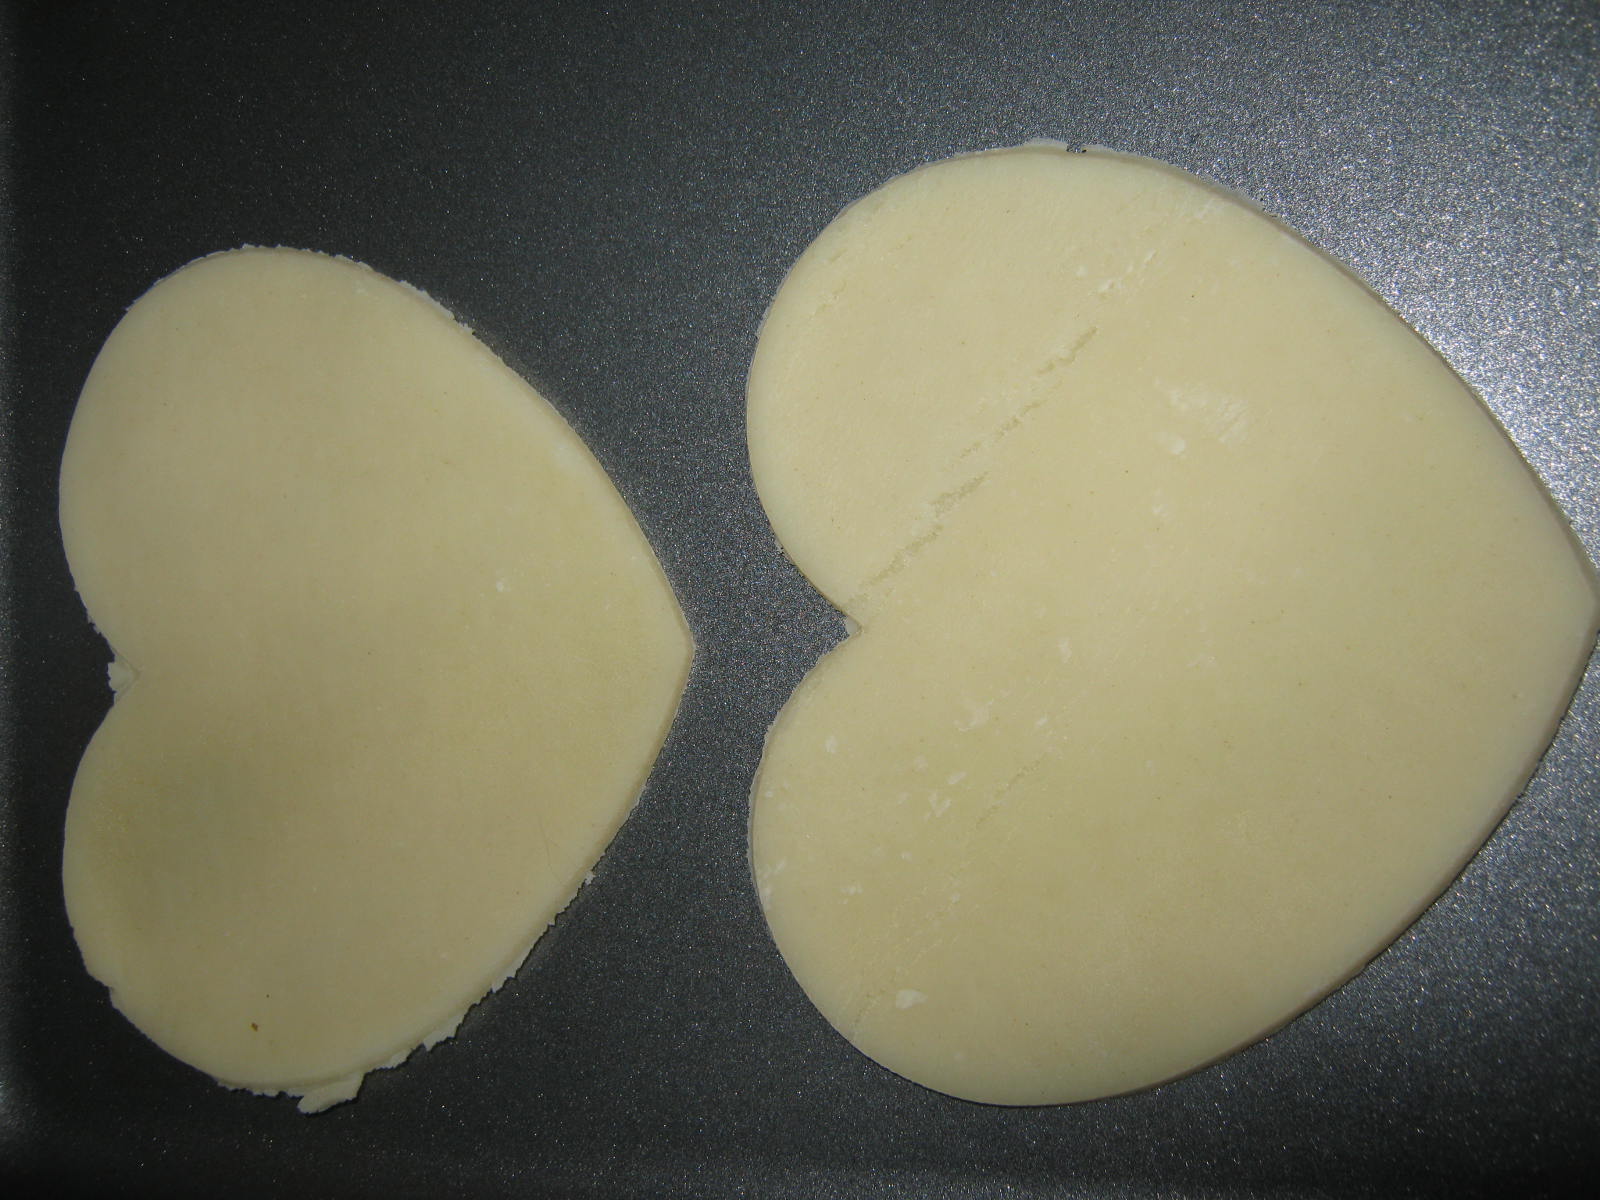
I found a terrific idea for Valentine Tarts in Sunday’s Parade Magazine. For those who aren’t familiar with Parade, the magazine is an insert in many papers in the U.S.A. I doubled the recipe and used four sheets of pie dough. Do not double the filling recipe below as it makes a large amount.

You can find the recipe here: Parade Magazine Homemade Valentine Heart Tarts

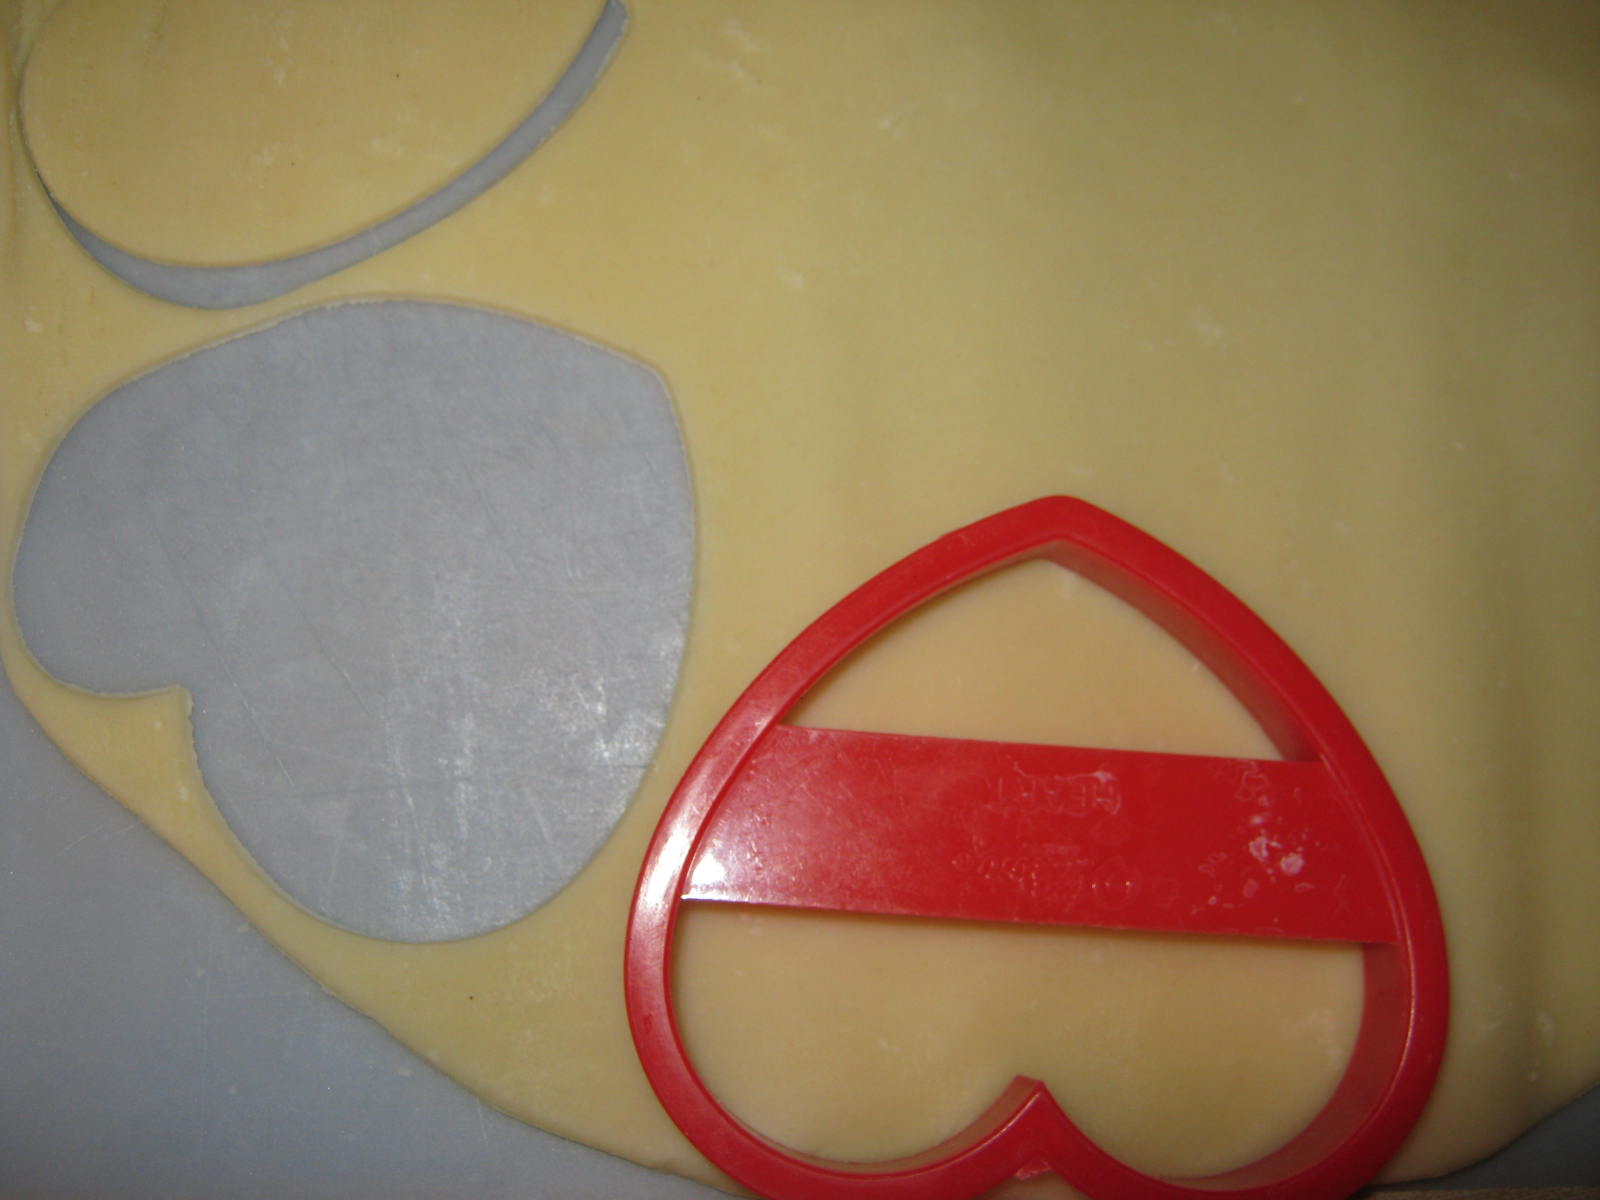
The basic instructions and recipe are on this site, along with some filling ideas. I searched around the Internet and found a cream cheese and raspberry filling recipe that I adapted for my tarts. A step by step photo tutorial is pictured below that will show you how I put my tarts together. I also added any little quirks or tips I thought might be helpful.

Filling:

8-ounce package cream cheese, softened
1/2 cup sugar
1 teaspoon vanilla
1 large egg, beaten lightly
1 tablespoon all-purpose flour

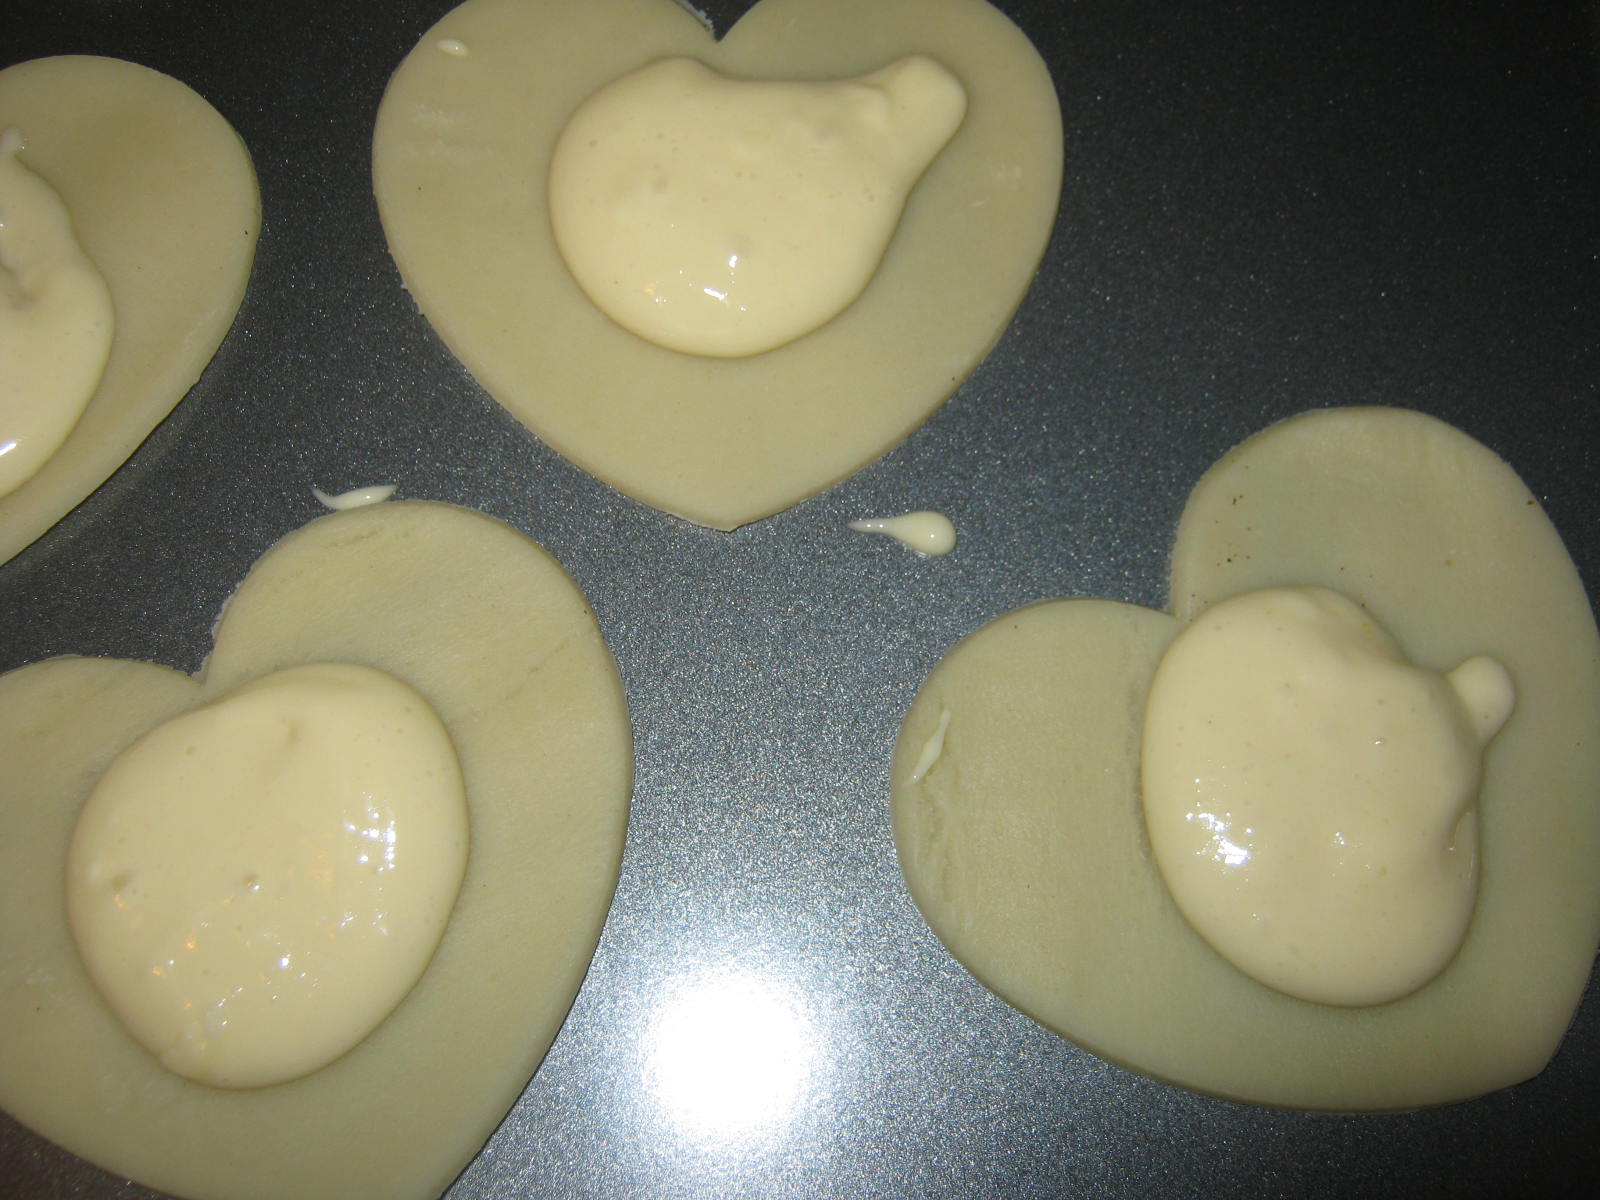
Beat these ingredients together.

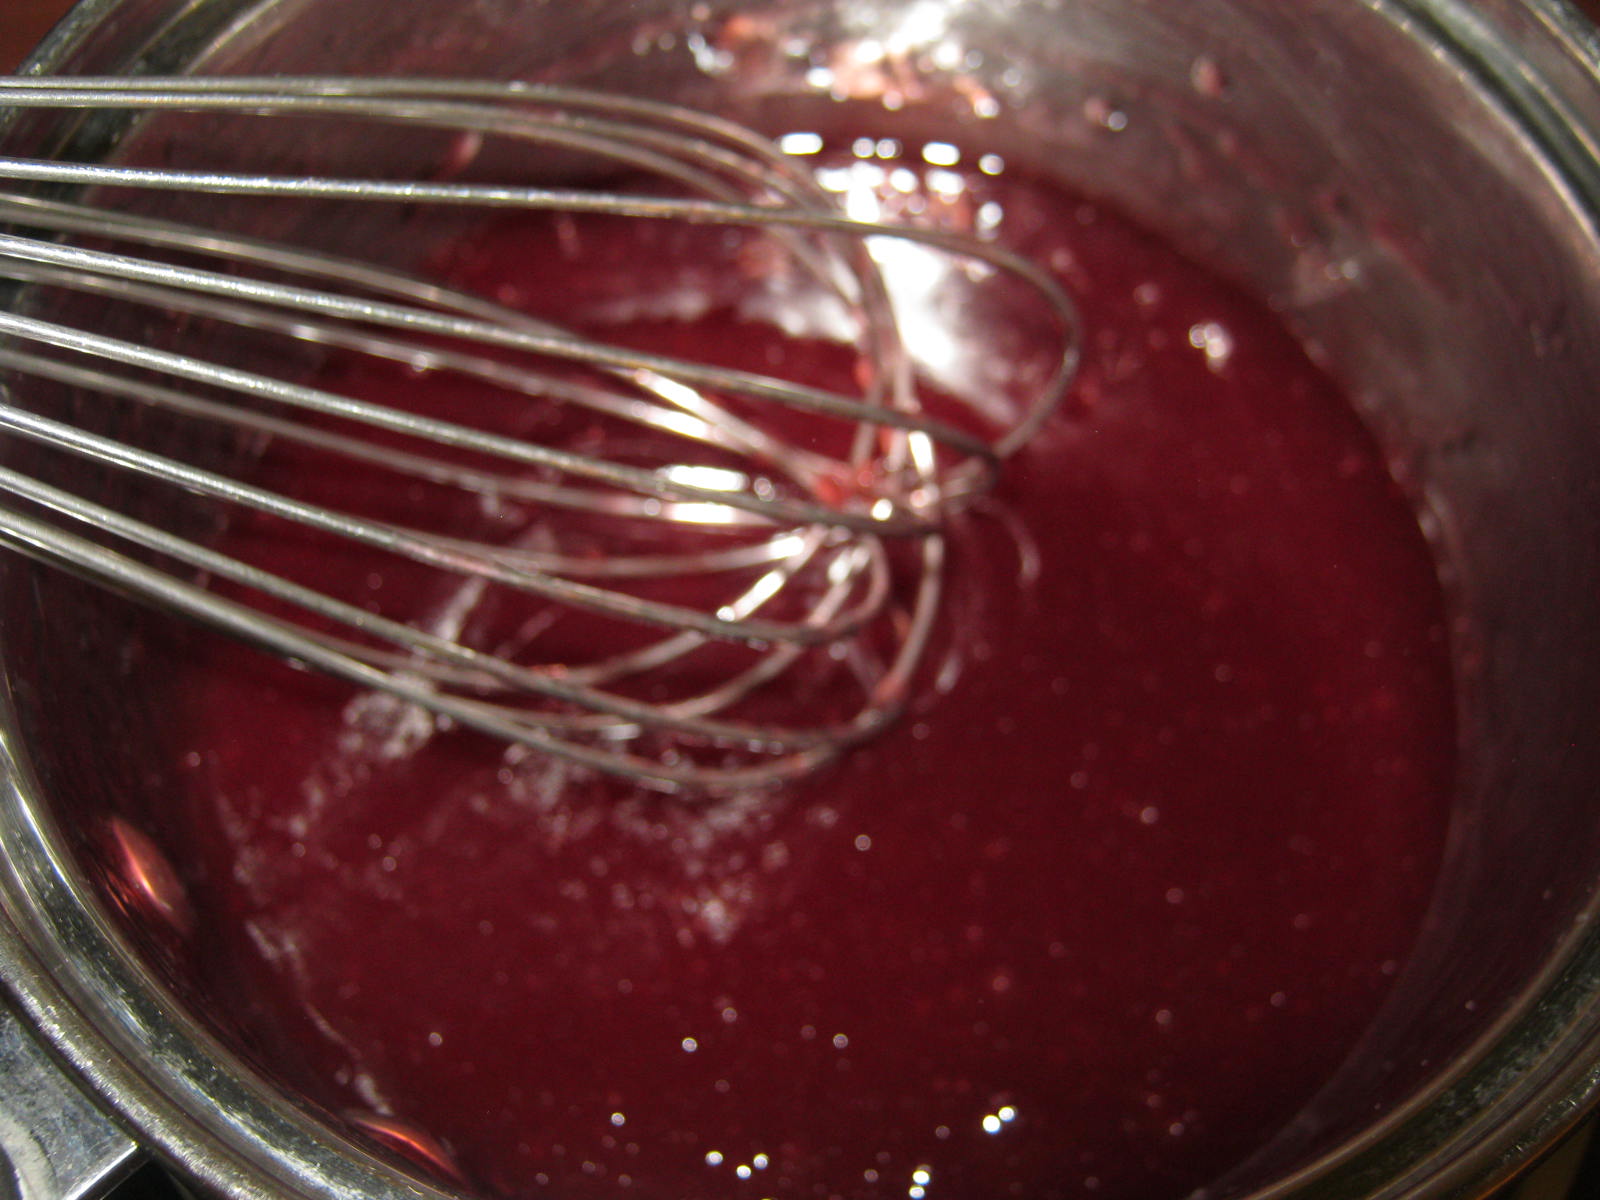
Heat jam on stovetop until smooth. A wire whisk works well.
1/2 cup seedless raspberry jam

IMG_9624

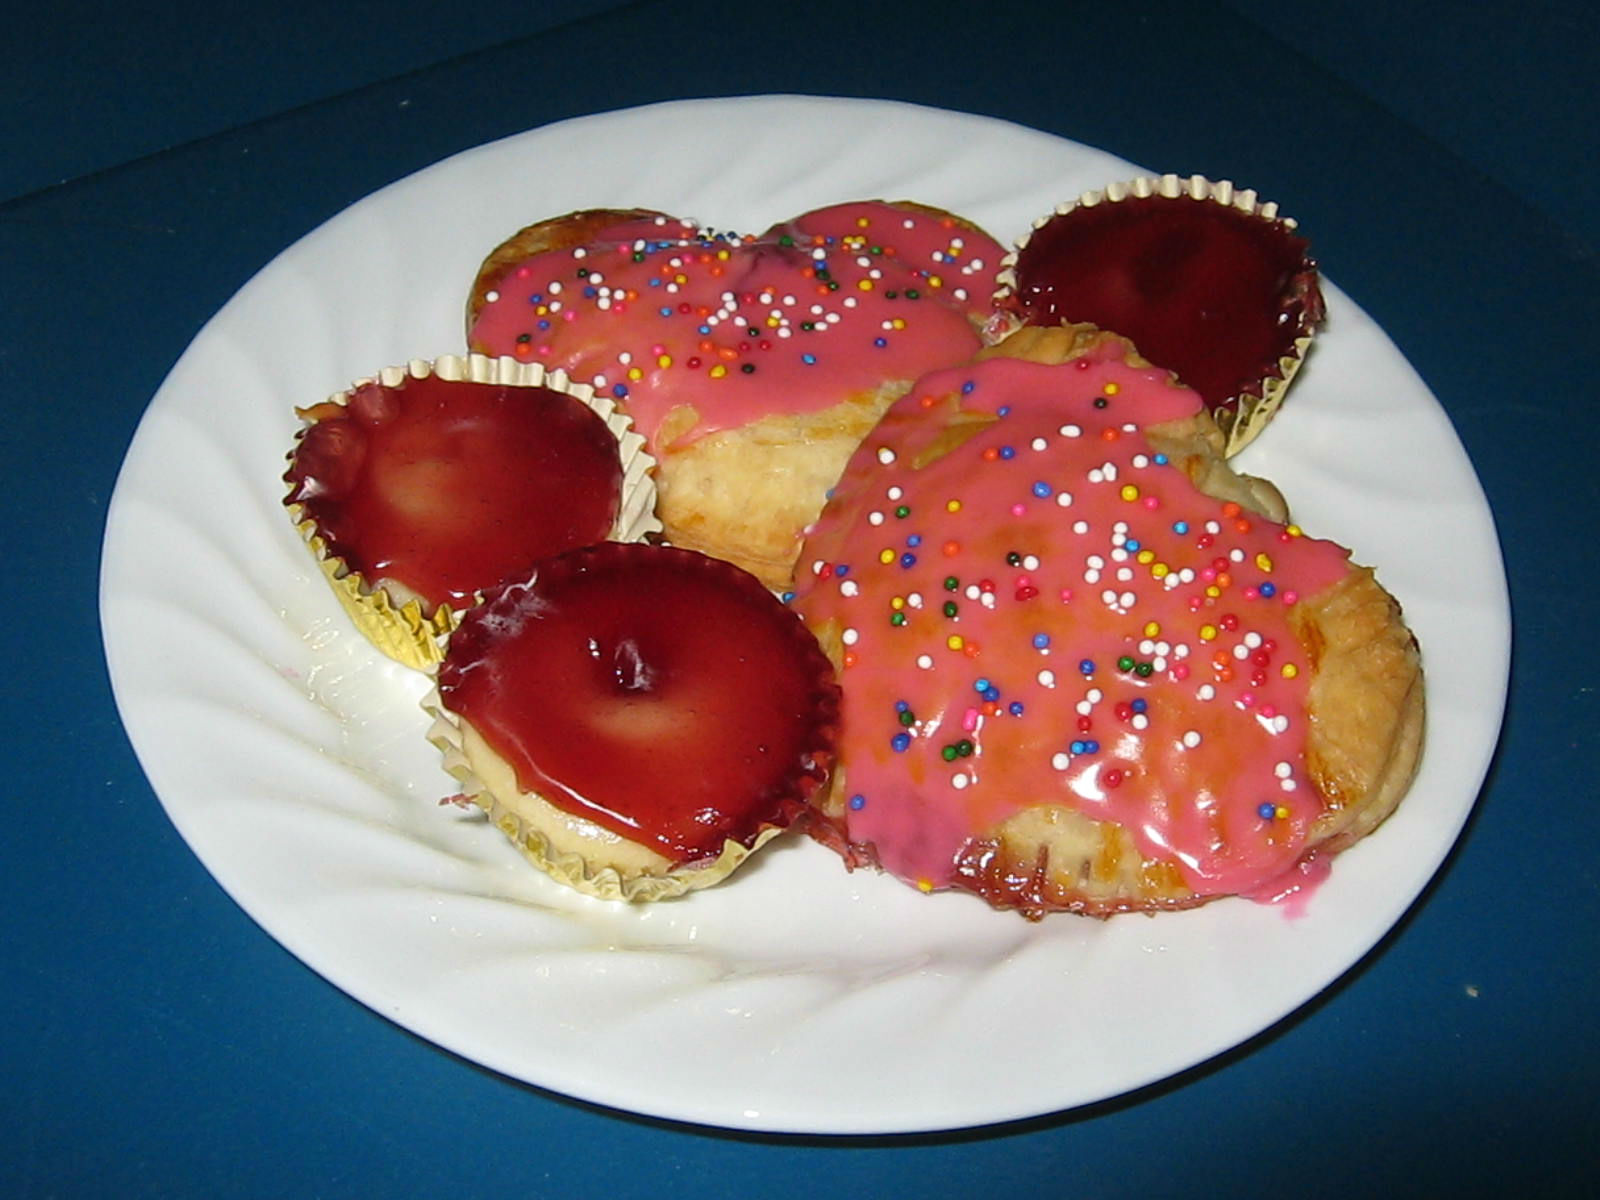
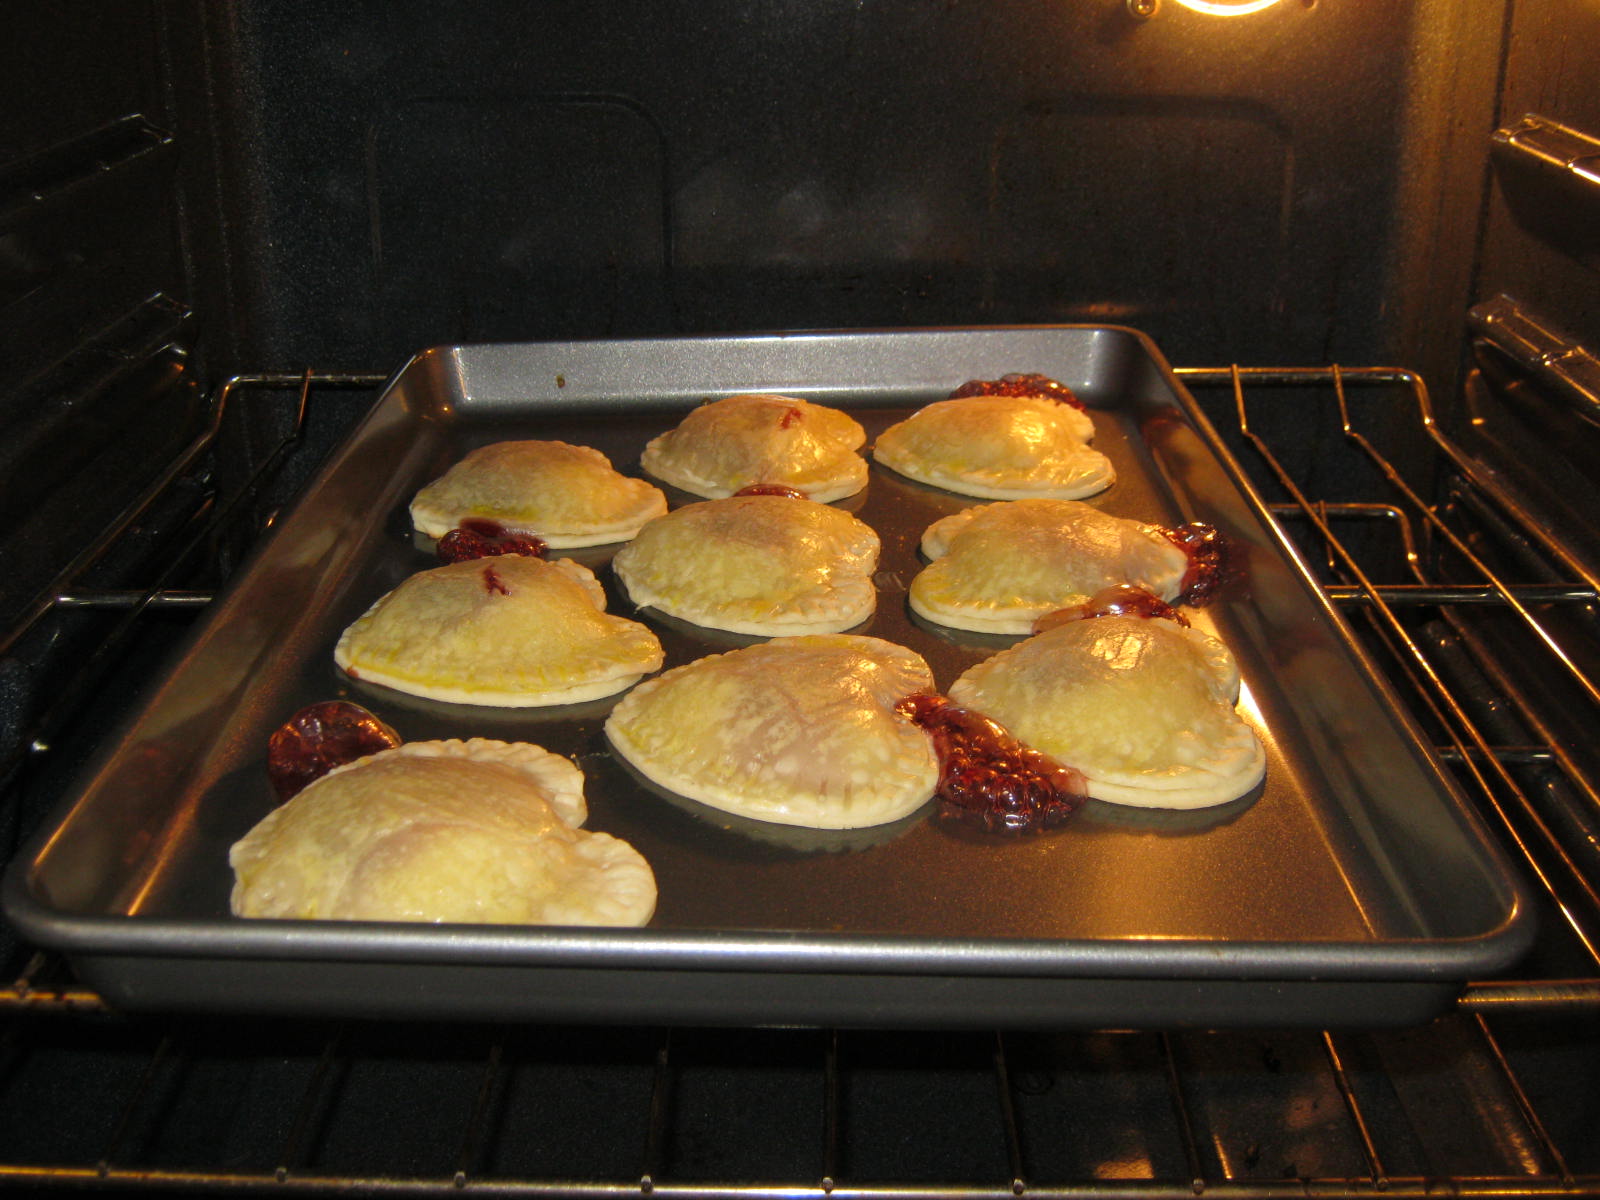
I was able to get eight to nine tarts out of two pie sheets.

IMG_9625

IMG_9630

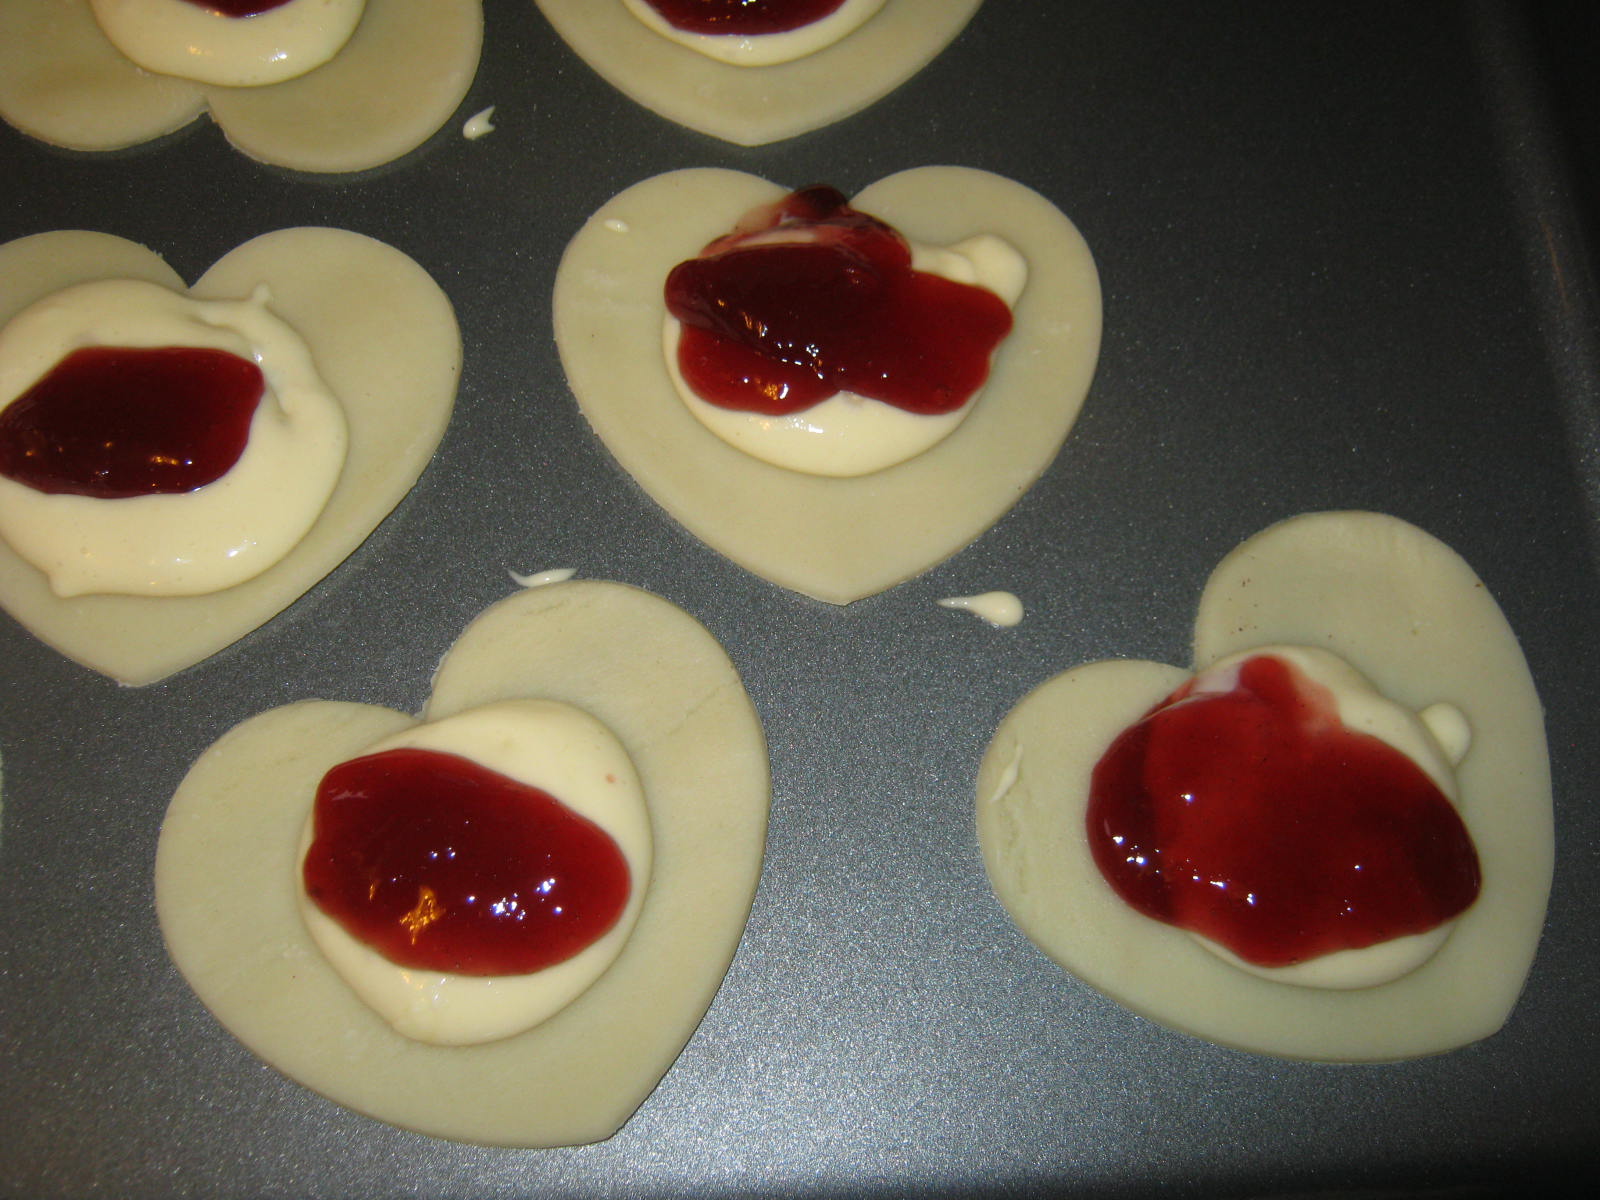
Just a little filling, less than a tablespoon, was plenty. I realized I had made WAY  too much filling early on.

IMG_9629

IMG_9631

If possible leave some wiggle room around each heart, especially near the edges of the pan, my crimping with a fork was very cramped!

IMG_9634

The egg wash did add a nice finish to the top of the tarts.

IMG_9635

Oh my! I definitely overfilled. The filling bubbled out. The raspberry baked like glue onto the pan. I had to soak them and work at the burnt areas with a teflon safe spatula.

IMG_9638

The burnt raspberry jam turns rock hard in moments. Remove the tarts to a cooling rack immediately upon completion of baking.

IMG_9642

Let the tarts completely cool before frosting. I should have made a double batch of the frosting. I forgot I had doubled the amount of tarts I had baked.

IMG_9644

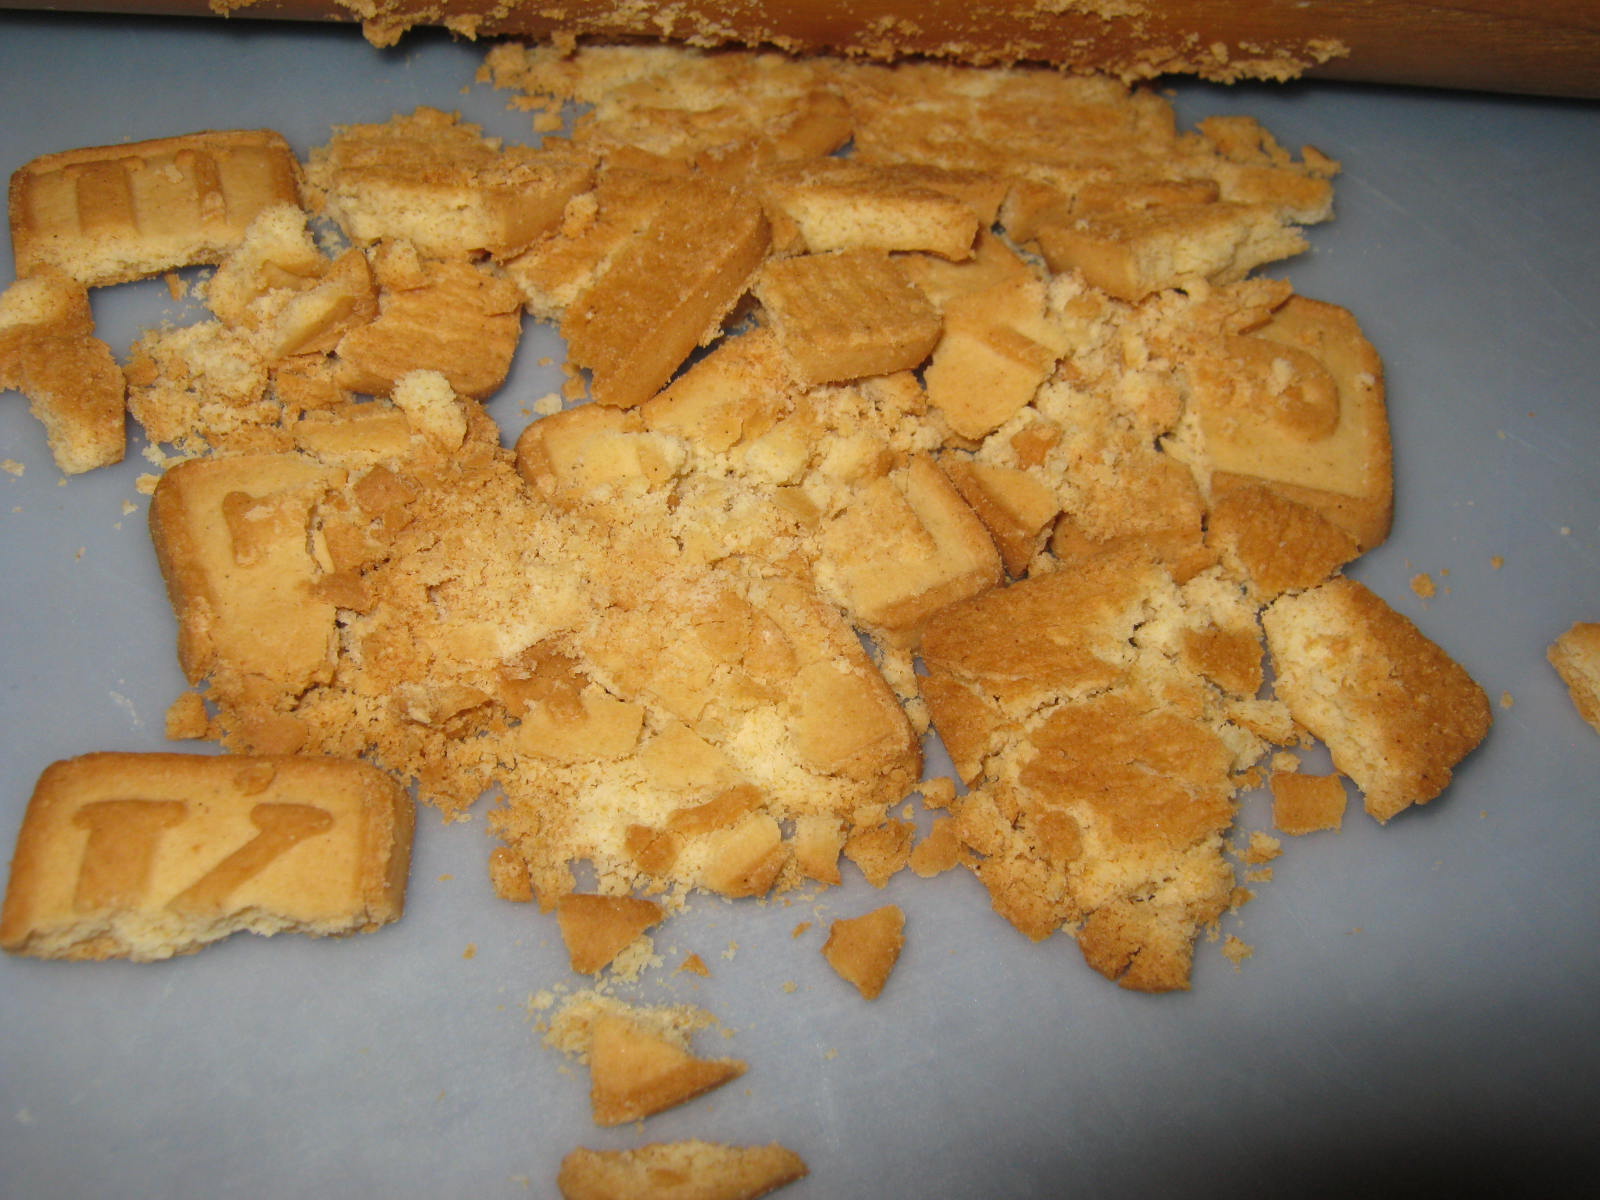
I had so much filling left over, I crushed some vanilla shortbread, added some butter, and made some small cheesecakes. They turned out terrific.

IMG_9639

Although it is a bit expensive to make this special dessert. I will definitely make them again. The tarts are a departure from the normal cookies, large pies, and cakes.

Follow Me on Pinterest

Praise & Phlowers – Daffodils/Tell the Good News

Daffodils3

Psalm 145:1-7 (The Living Bible)

I will praise you, my God and King,
And bless your name each day and forever.
Great is Jehovah! Greatly praise him!
His greatness is beyond discovery!
Let each generation tell its children
What glorious things he does.
I will meditate about your glory,
Splendor, majesty and miracles.
Your awe-inspiring deeds
Shall be on every tongue;
I will proclaim your greatness.
Everyone will tell about how good you are,
And sing about your righteousness.

Project – Children’s Valentine Ornament

Valentine 3

I keep a small four foot pine tree on a washstand throughout the year. I call it my “Round the Year Tree.” This past week my grandsons had a good time creating decorations for February to place on the tree.

Most of our materials were purchased at the dollar store. The wire I had on hand from other projects.

Materials:

1 package foam Valentine heart stickers

1 package small Valentine Stickers

Several strands of wrapped floral wire cut in four inch pieces (pipe cleaners, string or yarn, opened paper clips, or other types wire can also be used.


Directions: You will need two matching foam hearts for each ornament. Leave the backing on the foam hearts. Apply small stickers to the front of the foam hearts. Remove backing paper on one foam heart. Place a piece of wire in center of heart with about three inches extending from the top. Remove the backing paper from the second heart and apply sticky side to sticky side on wire topped heart. Match edges as closely as possible. Bend top of wire into a hook shape. These Valentine Ornaments are light and will hang on just about anything. Fun, inexpensive and easy to craft with primary-aged children.


Projects – Crayon Chips & Wax Paper = Stained Glass Valentine Hearts

I am re-blogging this post on Stained Glass Valentines. Happy February! ❤

Timelesslady's avatarMINDING MY P'S WITH Q

My grandsons and I created beautiful Waxed Paper Stained Glass Hearts to put on our windows. First we used pencil sharpeners and created shavings of pink, red, and violet crayola crayons. Yes, our crayon box is now depleted of these colors…must buy more.

I used the back of a cereal box and cut out a heart shaped pattern. We traced this onto waxed paper with a Sharpie, and then dribbled bits of the shaved crayons into the outline.  We covered the shavings and paper with another sheet of waxed paper, and I ran a hot iron over them very briefly. This melted the crayons into a beautiful pool of swirled and translucent colors. I carefully picked it up and laid it on the garage floor to dry. When they had hardened we cut them out and hung them on our window with double sided tape. (I have since realized a glue stick is…

View original post 33 more words

Painting – Wetcanvas The Floral/Botanical February 2014 Project

8880dscf0490__2_

This gorgeous, copyright free, macro photograph, shared by al22 in the WetCanvas Reference Library, is February’s Floral/Botanical challenge. The beauty of this flower is almost indescribable. It’s easier to just say, “Ahhh…” than try to put what you feel into words. Take a look at the link I’m including to this challenge. Better yet, peruse the whole WetCanvas website. This is one of the best sites on the web for artists of all kinds.

WetCanvas The Floral/Botanical February 2014 Project

The floral/botanical challenge will have postings of the artist’s paintings on the 25th of the month.

If still life is more to your liking, take a look at the Watercolor Studio challenge for this month. This photograph is also copyright free and uploaded to the library by JEFrantz.

Still_Life_0041

You can find this challenge here: Watercolor Studio February 2014 Challenge

Bookmark the Wetcanvas Studio challenge, check back over the course of the month and see the different renderings of the artists who take part. Better yet, join WetCanvas and give it a try yourself.

Follow Me on Pinterest

Pots and Pans – Chocolate-dipped Pretzels


Chocolate-covered pretzels are a perfect project for children primary-aged or older. Yesterday, my grandsons and I covered pretzels with Ghirardelli Chocolate and some rainbow sprinkles.

The supplies we used were: chocolate melting pot, 1/2 a bag of Ghirardelli baking chips, Herr’s sour dough pretzels, and candy sprinkles. It’s a good idea to place several layers of newspaper or other protection in your work area.

IMG_9548

My first step was plugging in the chocolate fondue pot and adding the half bag of chips. I bought the fondue pot several years ago for about ten dollars. I have been very happy with the results it produces. Anyone who has ever heated chocolate with microwave, double-boiler or stovetop pot has also probably heated it to a temperature that is too high. The resulting mass of hardened, rocky chocolate is beyond saving. This small pot melts the chocolate perfectly…although a bit slowly. I begin melting chocolate about a half hour before I want to dip the pretzels.

IMG_9552

Herr’s makes a delicious, large and sturdy sour-dough pretzel. The pretzel holds up to dipping without breaking, but is not too hard or brittle for youngsters to enjoy.

We set aside the pretzels we intended to dip, poured the sprinkles onto plates, covered cookie sheets with parchment and began dipping. The pot is made for dipping so I didn’t worry about anyone being burned.

IMG_9547

The weather is chilly here, so instead of placing the cookie sheets in the fridge for a quick set, we put them on the back porch. Within a half hour the pretzels were ready to eat. This project was enjoyed by my grandsons. Happy dipping!


Follow Me on Pinterest

Plants – Wardian Case

IMG_9518

Wardian Case Recipe

Smidgen of Gravel
3 Cups of Potting Soil
Handful of Moss
2 Miniature Phaleonopsis Orchids

Add gravel to soil, spread in bottom of case, place moss on top, dig two holes for small pots, place orchids in soil, smooth soil and moss around edges of pots. Put lid on case. Enjoy!

IMG_9517

Follow Me on Pinterest

IMG_9513