Planting – Garlic Bulbs

IMG_0485

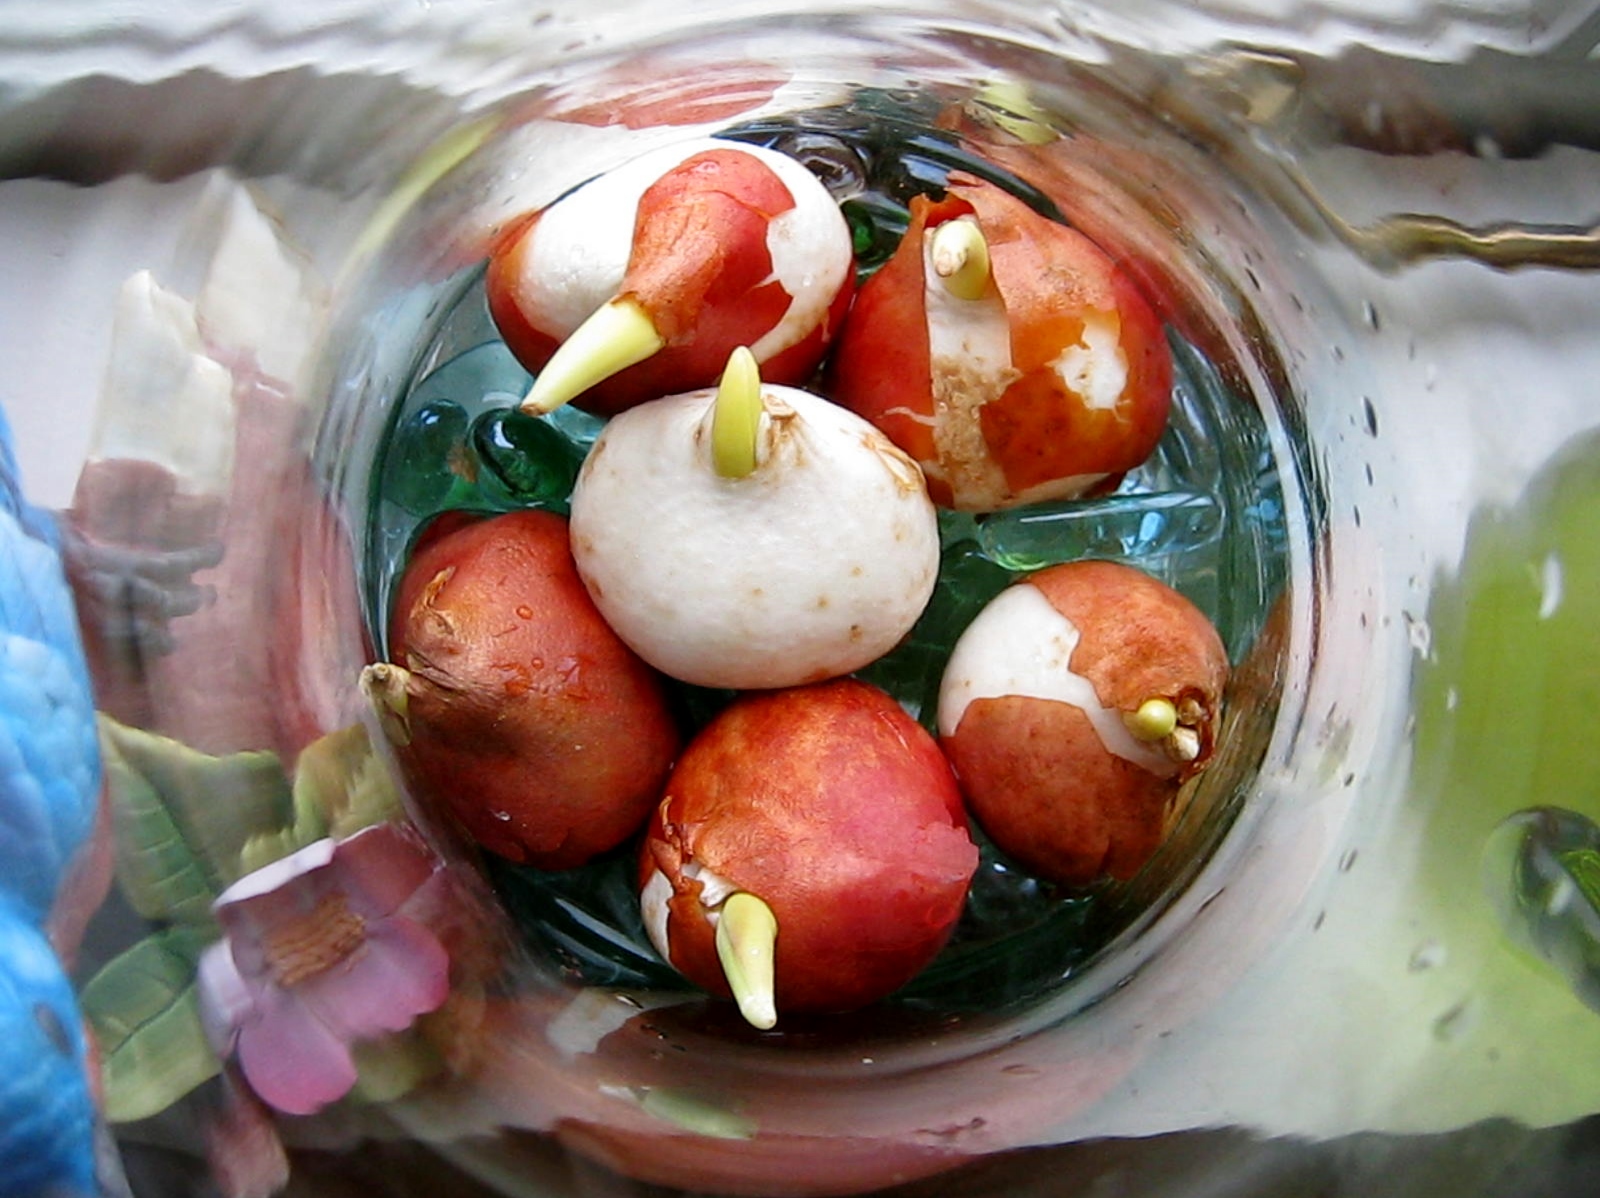
I recently bought several bulbs of sprouting garlic off the salvage table in a local fruit stand. I have blogged about growing garlic cloves indoors in the past, but this time, since it is Spring, I am going to try growing them in my Square Foot Gardens. Each clove of the garlic bulb will grow a new bulb, multiplying my initial investment many times over.

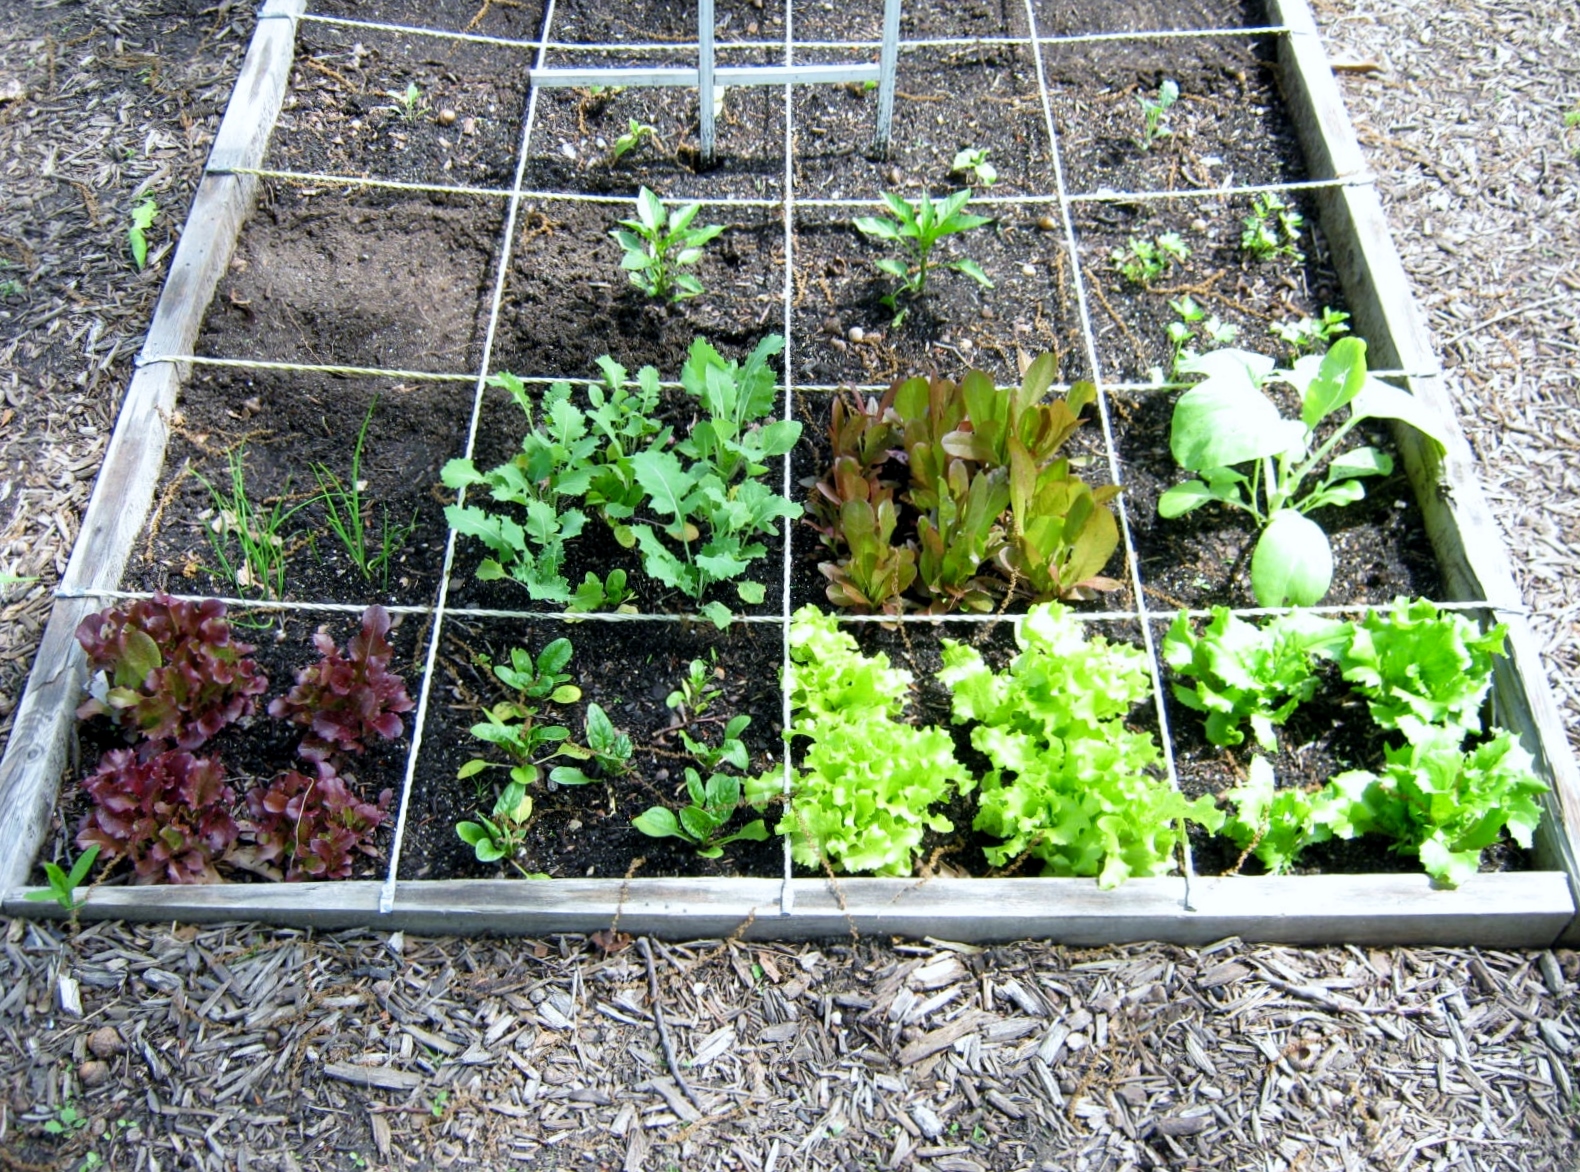
I researched planting the cloves and found that in a Square Foot garden there were many varied spacings…between four to nine cloves per square. I opted for the larger number since I have so many of the sprouting cloves.

IMG_0492

Here are the nine placed in a square foot, ready to be covered over with soil. Inside the garlic bulb were several smaller cloves that had not sprouted. I decided to use these as a rodent repellent and smashed and smeared several on the edges of my square foot borders.

IMG_0490

I also placed a few smashed cloves within some squares planted with spinach and kale. So far they have not been nibbled or dug up by hungry critters.

IMG_0493

I’m not sure what kind of results I will have, but even if the resulting bulbs aren’t good for cooking, it will still be worth growing the garlic to use as organic repellents and insecticides.

Plantings – Garden Growings-On

Seedlings, Seedlings, Seedlings! They are EVERYWHERE! Last night I had to bring them into the house instead of overnighting in the garage…it is going to be very cold during the next twelve hours or so. I also covered the spinach and the kale I planted Sunday with overturned terracotta pots. They would probably be fine without the protection, but why risk it?

IMG_0510

My dining room table

IMG_0508

Coleus galore! I have more in other rooms, and I started another batch a few weeks later for those bare spots left by poppies, bleeding heart, spring bulbs and other plants that die away near the end of June.

IMG_0480

Gorgeous tomato seedlings…I tried many varieties this year.

Planting – The Scraggly Ones Reborn

IMG_0402

Every year, at summer’s end, I take cuttings from outdoor plants I hope to save over the winter. They usually root for me, but never seem to thrive. They stay alive, but only put out minimal new growth. I do realize that winter is the dormant season for many plants. Combine that with how cold we keep our home at night, and my cuttings don’t have much of a chance to really take hold and grow quickly. A week or so ago I gathered all these “scraggly ones” together on my kitchen table. Along with several pots of houseplants I had rooted from cuttings, I had about eighteen plants in total. I decided that it was going to come down to “Survival of the Fittest,” and put six each of the plants/cuttings into hanging basket pots. I was pretty pleased with the resulting mix of shapes, sizes and textures. I think they will be rather unique as they grow on outdoors. For now I’ll put them outside on their hooks when the days are warm, and in a few weeks post an update.

IMG_0474

It will be interesting to watch how they develop over the next few months.

IMG_0475

Planting – Garden Goings-On/Seeds and Sprouts

IMG_9881

Poppy Seeds are sprouting in my winter sown containers. (gallon milk cartons) Poppies are always one of the first seeds to sprout when winter sown. This is absolutely, at least for me, the best way to sow and grow poppies.

poppies 004

Here is a picture of me, probably two summers ago, beside my near five foot bread seed poppies. If you look to the right of my shoulder you can see the big poppy buds ready to burst into bloom. These poppies were sown with the winter sowing method and grew in my Square Foot Gardens, one plant to a square. Here’s a link to the blog of Mel Bartholomew, the creator of the Square Foot Garden Method. Square Foot Gardening

IMG_9884

My winter sown crop of seeds are sown now. I have found that for a few the soil has begun to dry out a bit. I have needed to place them in a pan of water to enable them to wick up a bit of moisture. You can find a post on winter sowing here: Winter-sown seeds.

IMG_9891

The coleus seeds I sowed with my small seed sowing method have sprouted and because they are well-spaced out have not developed any fungal or damping-off disease. They are a bit leggy, but when I repot them separately in a few weeks, I will cover some of the leggy stem with soil. They should begin to develop color within a week or two.

IMG_9887

The Martha Washington Geranium I over-wintered with bare roots is leafing out nicely.

IMG_9888

The green onions I rerooted and potted up are growing terrific stems. I just used a few cut up into beautiful green rings in a Cheesy Potato recipe. The original post on how I regrow the bottoms of the onions can be found here: Regrowing Green Onion Stems

IMG_9886

Most of my seeds, except for larger varieties such as zinnias and four o’clocks, have been sown into plastic containers. I use recycled grocery containers for most of my seed sowing.

IMG_9885

Parsley, always rather slow-growing for me in the house, has been repotted into separate pots. It will be moved into the garden very soon. Parsley is cold tolerant and after hardening off for a few nights, will probably grow fine in the herb or square foot gardens.

IMG_9890

Spider babies, rooting in water, are doing well and will soon be combined in a hanging basket for the patio. The new spider plants will join the mother and sister plants rooted up in previous years. My collection keeps expanding. Spider plants are one of the best houseplants for filtering toxins and impurities out of the air. Happy Gardening!

Planting & Problem-Solving – Tulip Bulbs/Update

tulips 1

On February 20th, I shared a post on how my grandsons and I placed pre-chilled tulip bulbs in a vase of pebbles and water in an attempt to bring them into bloom.

You can read the post here: Planting/Tulip Bulbs

We are watching their progress now. The bulbs have sprouted at different rates, some leafing out quickly, others plodding along, but all are showing signs of growth. A few days ago I noticed a problem that needed solving if I hoped to continue bringing the tulips into flower, yucky green mold thriving on a bulb where it touched the side of the vase.

tulip2

I decided to give my trusty bottle of alcohol a try. Alcohol, safe and pure, is usually my first go-to solution for houseplant or gardening problems.

tulip 3

A few swipes of the alcohol and “Voila,” goodbye pesky green mold.

tulip 4

I realized another solution was keeping the bare portion of the bulbs away from the side of the vase and let the skin side protect the bulb from another bout of mold. I’m looking forward to showing my grandsons the progress of their tulips this week. Happy Gardening!

tulip 5

Follow Me on Pinterest

Planting – Seed Sorting

IMG_9825

Busy, busy, busy is my motto this weekend. Except for three containers of coleus I am WAY behind on my winter-sowing and indoor seed starting. Yesterday I sorted out every seed packet in the house, checking the dates, and  discarding those completely empty. I have hundreds of seeds to plant, some held over in my cool, dark basement since 2011. My Square Foot Garden book lists the amount of time you can store seeds and expect them to be viable. I will be using this terrific garden manual almost daily for the next few weeks as I plan out this year’s square foot plots. I am also going to grow some veggies in containers this year. Oooops! I am too long on here already…time to end this post and begin to plant, plant, plant…happy planting to you!

For those of you wondering when to plant indoors and out for your area, check out this terrific site: Let’s Grow Veggies The site allows you a free fourteen day trial period without a credit card commitment first.

Planting – Poppies & Winter-Sowing

IMG_9719

Poppies! I LOVE poppies, but I have some problems with poppies too. Number one on my list of loves is the way poppies develop big, luscious looking pods. When the pods begin to widen and split to reveal the color of the flower inside, honestly, I must admit I run out into the yard several times a day to see if the silken petals have opened. There is something magical in the wispy crown in the center of each flower too. Often there will be a splotch or two of contrasting color at the base of each petal. The foliage of many poppy plants glows in beautiful bluish green tones. Yes…I LOVE poppies.

One of the major drawbacks of poppies, at least in my opinion, is how hard it is to grow them from seed. For years I followed the advice on the back of the packets and on the pages of reliable gardening books and sowed them directly in the ground. This NEVER worked for me. Heavy spring rains ALWAYS washed my poppy seeds away before they could sprout, or if they did, the delicate small seedlings would be beat into the ground by that same rain. the “experts” say poppies don’t transplant well. I think I probably agree if they are grown in the house, but I have found a way to get a head start on poppies and that is through winter sowing.

I’ve written many times about winter sowing, so I am not going to take the time to rewrite what I have already posted. You can read about winter-sowing here and follow some of the links I list for more information: Winter Sowing

I am also including a post that shows the results of my winter sown poppies: Poppies

If you want to grow poppies this year, and have a milk carton or two on hand, give winter-sowing a try. It only takes a few minutes to create a miniature greenhouse to place outside in the sunshine. Happy Gardening!

Follow Me on Pinterest

Planting – Tulip Bulbs

IMG_9733

I purchased tulip, daffodil and hyacinth bulbs in the Autumn months, when they were placed on clearance. My grandsons and I planted the daffodils in pots of dirt and placed them in the refrigerator. Later, when winter arrived, they were moved into the garage. These flowers are now growing and are near blooming. This week we turned our attention to the tulip bulbs. Put to bed for three months in the refrigerator, with only a plain brown lunch bag for protection, the bulbs had already begun sprouting when we released them from their cold confinement.

IMG_9734

I had come across a beautiful picture on Pinterest of tulip bulbs growing in a glass container. I thought we could create a version of our own. Into a tall glass vase, we placed some glass pebbles, added the bulbs, and poured in enough water to barely cover the bottom of the tulips. This is where the roots will form. We will need to keep a daily watch so the water level does not fall too low.

IMG_9741

I’ll post an update on the tulips as they grow. Happy gardening!

IMG_9743

Planting – Repotting Over-Wintered Geraniums

IMG_9678

Most of last summer’s geraniums were over-wintered in a box in my basement. I had only a 25% success rate with this method. Happily, the one geranium that succeeded in staying green was my Martha Washington geranium. The others looked more like the photograph below, completely lifeless.

IMG_9684

No matter how far down I cut along the stem, I found little trace of green or possible viability.

IMG_9687

I had better success with the potted geranium. In the Fall, I found it very easy to pick the pot up off its stand and transport it into the house. No matter that the leaves had a inchworm stowaway. He ate only a little bit of greenery.

IMG_9688

The plant has bloomed luxuriantly in a sunny window giving me many moments of joy when I walk into the room it grows in.

IMG_9689

The geranium isn’t about to stop giving me moments of bliss with its bright flowers. This is a photograph of a new bud I took yesterday. The success of the plant has made up my mind where the coming summer is concerned. I will grow all the geraniums in pots, and in the Autumn bring them inside to cheer up the house all winter long. Happy Gardening!

Projects and Planting – Rooting Plant Cuttings With Honey

This really works! I have TOO MANY plants in every nook and cranny because of it. Happy Rooting! A repost of one of my most popular posts on Pinterest.

My Lemon Verbena plant is thriving, but it is in definite need of a trim. I want to grow several lemon verbena plants in my herb garden this year so today was the perfect day to take cuttings. In the past I have used rooting hormone on the stem ends of the cuttings, but this year I am aiming to go as natural and organic as possible. I have heard in the past that Honey is a natural rooting compound. I always have honey in my pantry so I pulled it out and gave it a try.

I followed the same protocol I use with rooting hormone. I punched out a drainage hole in 3 oz plastic cups and filled these with sterile soil. I watered the potting medium and created a hole with a plastic highlighter.

I dipped the lower inch and a half of the verbena cuttings into the honey and inserted them into the soil. I avoided brushing the sides of the planting hole to keep the honey intact on the stem end.

I gently firmed up the soil around the stem and then inserted the cup in a plastic bag and sealed it. The honey is anti-fungal and will create a seal on the cut end of the cutting and help retain moisture.

When I was finished I had six small pots. I used a recycled cookie tray to hold the six cuttings steady, and placed them under lights in my basement.

The lovely smelling leaves I stripped away were also put to good use. I simmered them in a pot of water and freshened up the house with a little extra moisture and lemon scent in the air.

Follow Me on Pinterest

Plantings – Microgreens

In winter I love sprouting microgreens. The seed companies listed in this post are very reliable. The seeds I bought from them a year or two ago are still near 100 % viable. I have flats of microgreens growing in my sunniest windows at this time.

Sowing seeds and indoor gardening seem to be dominating my blog posts. I am starved right now for green, tired of the bare branches of trees silhouetted against the sky. I have been sowing seeds in hopes of harvesting Microgreens. Microgreens are harvested from seeds sprouted through the early leafing out stage. I am using seeds from Pinetree Garden Seeds. This is my first attempt at this type of gardening.

I am growing the Microgreens on my windowsill in plastic throwaway containers from cookies and other snacks. To see how I went about the process, check out the photos below this paragraph.

I gathered my supplies: antique pots to look pretty, throwaway plastic from cookie containers, corn holder for poking holes in the plastic.

I made sure the containers would fit inside my chosen pots before I added the dirt.

I poked holes for drainage in the plastic with the corn holder.

I filled the containers with organic soil.

I watered containers of soil and let them drain.

I spaced the pea seeds out in rows.

I sowed the Kitchen Sink Mix en masse.

I covered with one of my favorite kitchen tools, Glad’s Press ‘n Seal.

The seeds are already up…they sprouted in less than two days. I will post a Microgreens Part II later this week.


My Microgreens are up and growing fast. I can’t wait to try them in a salad.

Oh My! The Microgreens look terrible…what happened to my lush crop? I’m afraid to say I have already eaten most of it. I pop off the tops of the pea sprouts and eat them like candy. This is reminiscent of the peas I grow outdoors in the Spring. They never make it to my table. Warm afternoons usually find me standing in the midst of the pea patch eating the fresh peas out of the pods. Actually, the microgreens are a complete success. I am really enjoying growing them and most of all eating them. The best use for them so far was garnishing my turkey and swiss cheese sandwich with a row of them. Oh Happy Day!

The kitchen sink variety is also thriving and perhaps today I will start grazing on them too. Moo!

Plantings – Sowing Small Seeds

This method of planting small seeds might seem tedious, but I have tried many ways of sowing tiny seeds and feel this is the very best. So…here is a re-blogging of my small seed sowing method. I wish I could remember where I first heard of the process so I could give the proper source credit for the idea.

I have collected seeds from my coleus plants for well over ten years. Each year I plant the offspring of the previous year, the seedlings grow, are cross-pollinated by the bees, and new seeds are harvested in the late Autumn. I start my coleus very early, the seeds are small, quick to sprout, but slow to grow. I don’t sow them thickly into the flats. Seedlings sown too close together tend to get damp-off disease.

I found these great lidded containers made by Solo this year. They are the perfect coleus incubator/flat.

I sow the seeds sparingly using the sharpened point of a pencil. I dip the pencil point into water and touch it to one seed. The dampness grabs hold of the seed. I then touch the seed to the wet seed starter mix in the flat, and the seed adheres to the wet soil. I repeat this process between sixty and seventy times per flat.

I use wire garbage bag ties, marked in segments with magic marker, to guide me in the placement of the seeds.

After I sow a row of seeds I remove the wire guide so I don’t double sow a row.

The next step is a gentle, all-over spray of water to seal the seeds to the wet soil.

I then cover the flat with the lid. It is gratifying to see it instantly steam up with warmth and humidity.

I have good luck with the sprouting by placing the planted flat of coleus seed on top of my refrigerator or near, but not on, a heating vent. I’ll update the progress as the seeds sprout and grow.


Follow Me on Pinterest

Plantings – Coleus Sampler

Coleus sampler 1

Sampler of last year’s coleus leaves.

I’ve been cleaning chaff from my coleus seed harvest, dreaming of next year’s new plants. When I’m finished the tedious task, I’ll place the seeds in the refrigerator or in the garage for a few weeks to give them a dose of coldness. This process is called stratification.

Stratification:  In horticulture, stratification is the process of pre-treating seeds to simulate natural winter conditions a seed must endure before germination.

For tips on stratification for seeds read this article: Making Winter for Seeds: Cold Stratification From Fridge to Snow Sowing.

I start my seeds in early January to have good-sized plants by late April/early May. If you’ve never grown coleus, give them a try. The colors and variety will be sure to please you.

Plantings and Pressed Flowers – Growing Snow Peas

IMG_8925

This beautiful blossom is not a Sweet Pea blooming in Springtime, it is instead the bloom of a Snow Pea blooming in my Square Foot Garden in mid-November. I planted the peas near the end of August and they are still producing pea pods for me. I love the fact that anything at all is still growing in the rapidly falling temperatures. The flower of the Snow Pea is quite attractive, a beautiful lavender and deep purple combination.

IMG_8933

What a bonus that the flower develops quickly into a tender, delicious peapod. They are such a welcome addition to my salad greens.

IMG_8934

Another bonus: the twirling fronds the snow pea uses for climbing are a perfect foil for my pressed flower compositions. They press within three days inside the pages of a book. They add the perfect delicate touch to a Victorian Pressed Flower Card.

IMG_8932

Follow Me On Pinterest

Pleasure & Planting – Baker Creek Heirloom Seed Catalog

IMG_8914

Oh the JOY of receiving this amazing catalog in the mail! It is over 350 pages and full, and I mean FULL of heirloom seeds. There are also hundreds of pictures that prompt an instant, “Ahhhh…” Well, let me stop right now and give you the link to the website and you can order a catalog of your own. Baker Creek Heirloom Seeds

Here is a sampling of the pages in the seed catalog. Truly, it is the best seed catalog I have ever held in my hands. Amazing!

IMG_8916

IMG_8915

IMG_8917

IMG_8918

Plantings – Last Minute Planting

IMG_8909

Today I emptied out a summer pot and filled the back side with a mixture of early tulips and daffodils. In the front of these I planted a dozen winter pansies. I have not decided if I will let the pansies rough it through the winter months, or if I will coddle them a bit by covering on frigid and snowy nights…still deciding…will update in the coming cold months. Brrrrrr…………

IMG_8910

Planting – Front Garden Color Combo

buggy 004

I love this combination of wave petunias, angelonia, heliotrope, coleus and low-growing pink zinnias. I crowd my plants a bit in the front garden, but I am rarely disappointed by stunted plants, they all seem to thrive in their close quarters. Perhaps the tight lacing of foliage prevents quick dehydration of the ground below them.

buggy 042

buggy 044

Plantings – Vine Supports

flowers 042

I love vining flowers of all types: morning-glory, cardinal vine, sweet pea, moon flowers, trumpet vine, these and vegetable vines can all be found growing in my gardens. What I don’t like is the need to purchase an expensive trellis or make do with garden twine. This year I have begun using Greenbrier vine as a support for my vines. Harvesting a bit of this vine from the woods does no harm, although it is a cover for wildlife, it can also be quite invasive and choke out trees and other native vines.

flowers 044

I begin with my longest piece of Greenbrier and poke the end into the ground. I weave several additional pieces of the Greenbrier around this first vine. I then attach more strands to any wood that is not covered with aluminum using a small push-pin. So far, this has worked very well, As the vines become heavier, even though the Greenbrier has hardened, I will need to add some nails or staples for added support. I like the natural way the vines grow up these brambles. Instead of a formal pattern or a column of plants climbing twine, the vines follow the more natural path of the Greenbrier.

flowers 048

Projects and Planting – Growing a Mango from Seed/Beginning

blog 006

Yes! It’s messy. Yes! If you’re not careful you might slip and cut yourself or the seed you are trying to extract from the Mango pit. Here’s how I prepared my mango seed for planting.

1. Find and enjoy a delicious and ripe mango. The variety I planted was a Champagne Mango. In my opinion the most delicious type of mango I have ever eaten.

2. Soak the pit in water for about 24 hours. As you can see I had several pits to use. Did I say I LOVE mangoes? 🙂

birthday boy 020

3. After soaking, I snipped a bit of the pit side with my pruning sheers, then zipped the edge away. I’ve also seen videos where people have cut the side of the mango with scissors. Either way, once cut or zipped, you must open the mango with your fingers. Be careful not to nick or harm the tender seed inside.

blog 008

4. I once again soaked the husked seeds and then potted them up in potting soil.

I have seen Youtube videos that tell you to plant the pit and wait for it to split and grow. This would be the more natural approach. I am hoping to jump-start the growth by removing the pit first.

Follow Me on Pinterest

Plantings – Square Foot Garden Update

003

I couldn’t be happier with my Square Foot Garden beds. This is year number two using this method. I am thrilled with the results again. The lettuce is amazing. Eating lettuce only a few minutes away from the garden is a pleasure I wish for everyone. Happy Gardening!

002