If you have blogged, like me, for over a decade, you may be running into the same problem as I have in the past few years: finding unique ideas and themes to post about. I am not a fan of the phrase “circle back,” but in my day-to-day life, I often repeat the same projects, recipes, and outings as in previous years.
In the coming year, starting with the Christmas season, I plan to mine my archives and bring back a few of the better projects, recipes, outings, etc., that might be lost in the never-never land of thousands of posts and photographs.
Paper Snowflakes – I cut close to a hundred this year to cover my windowpanes. I can’t imagine being without paper snowflakes on my windows in December and January.
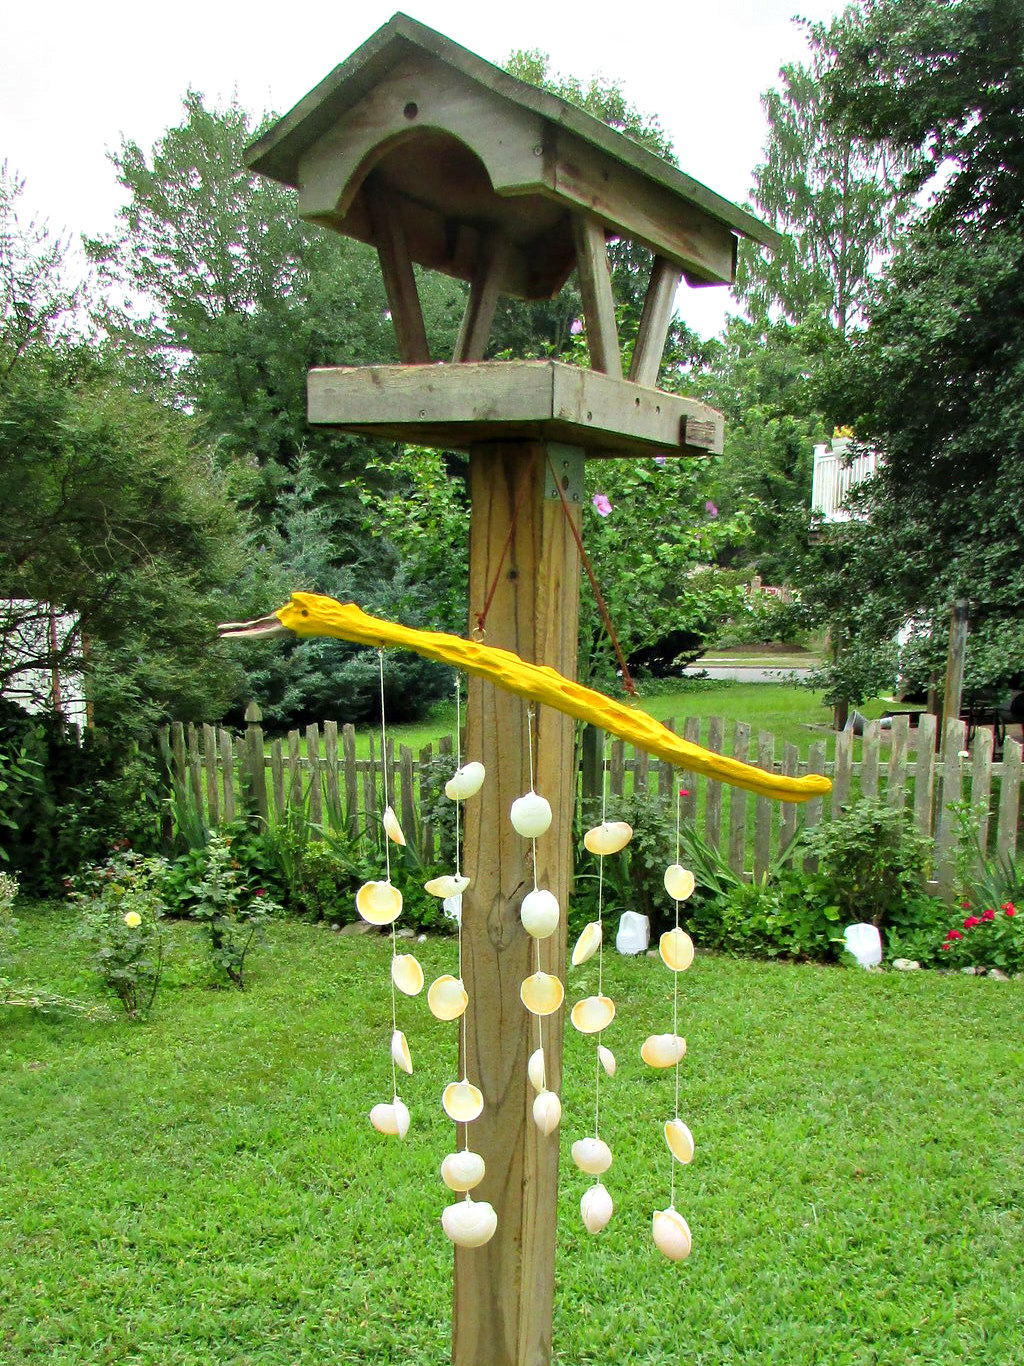
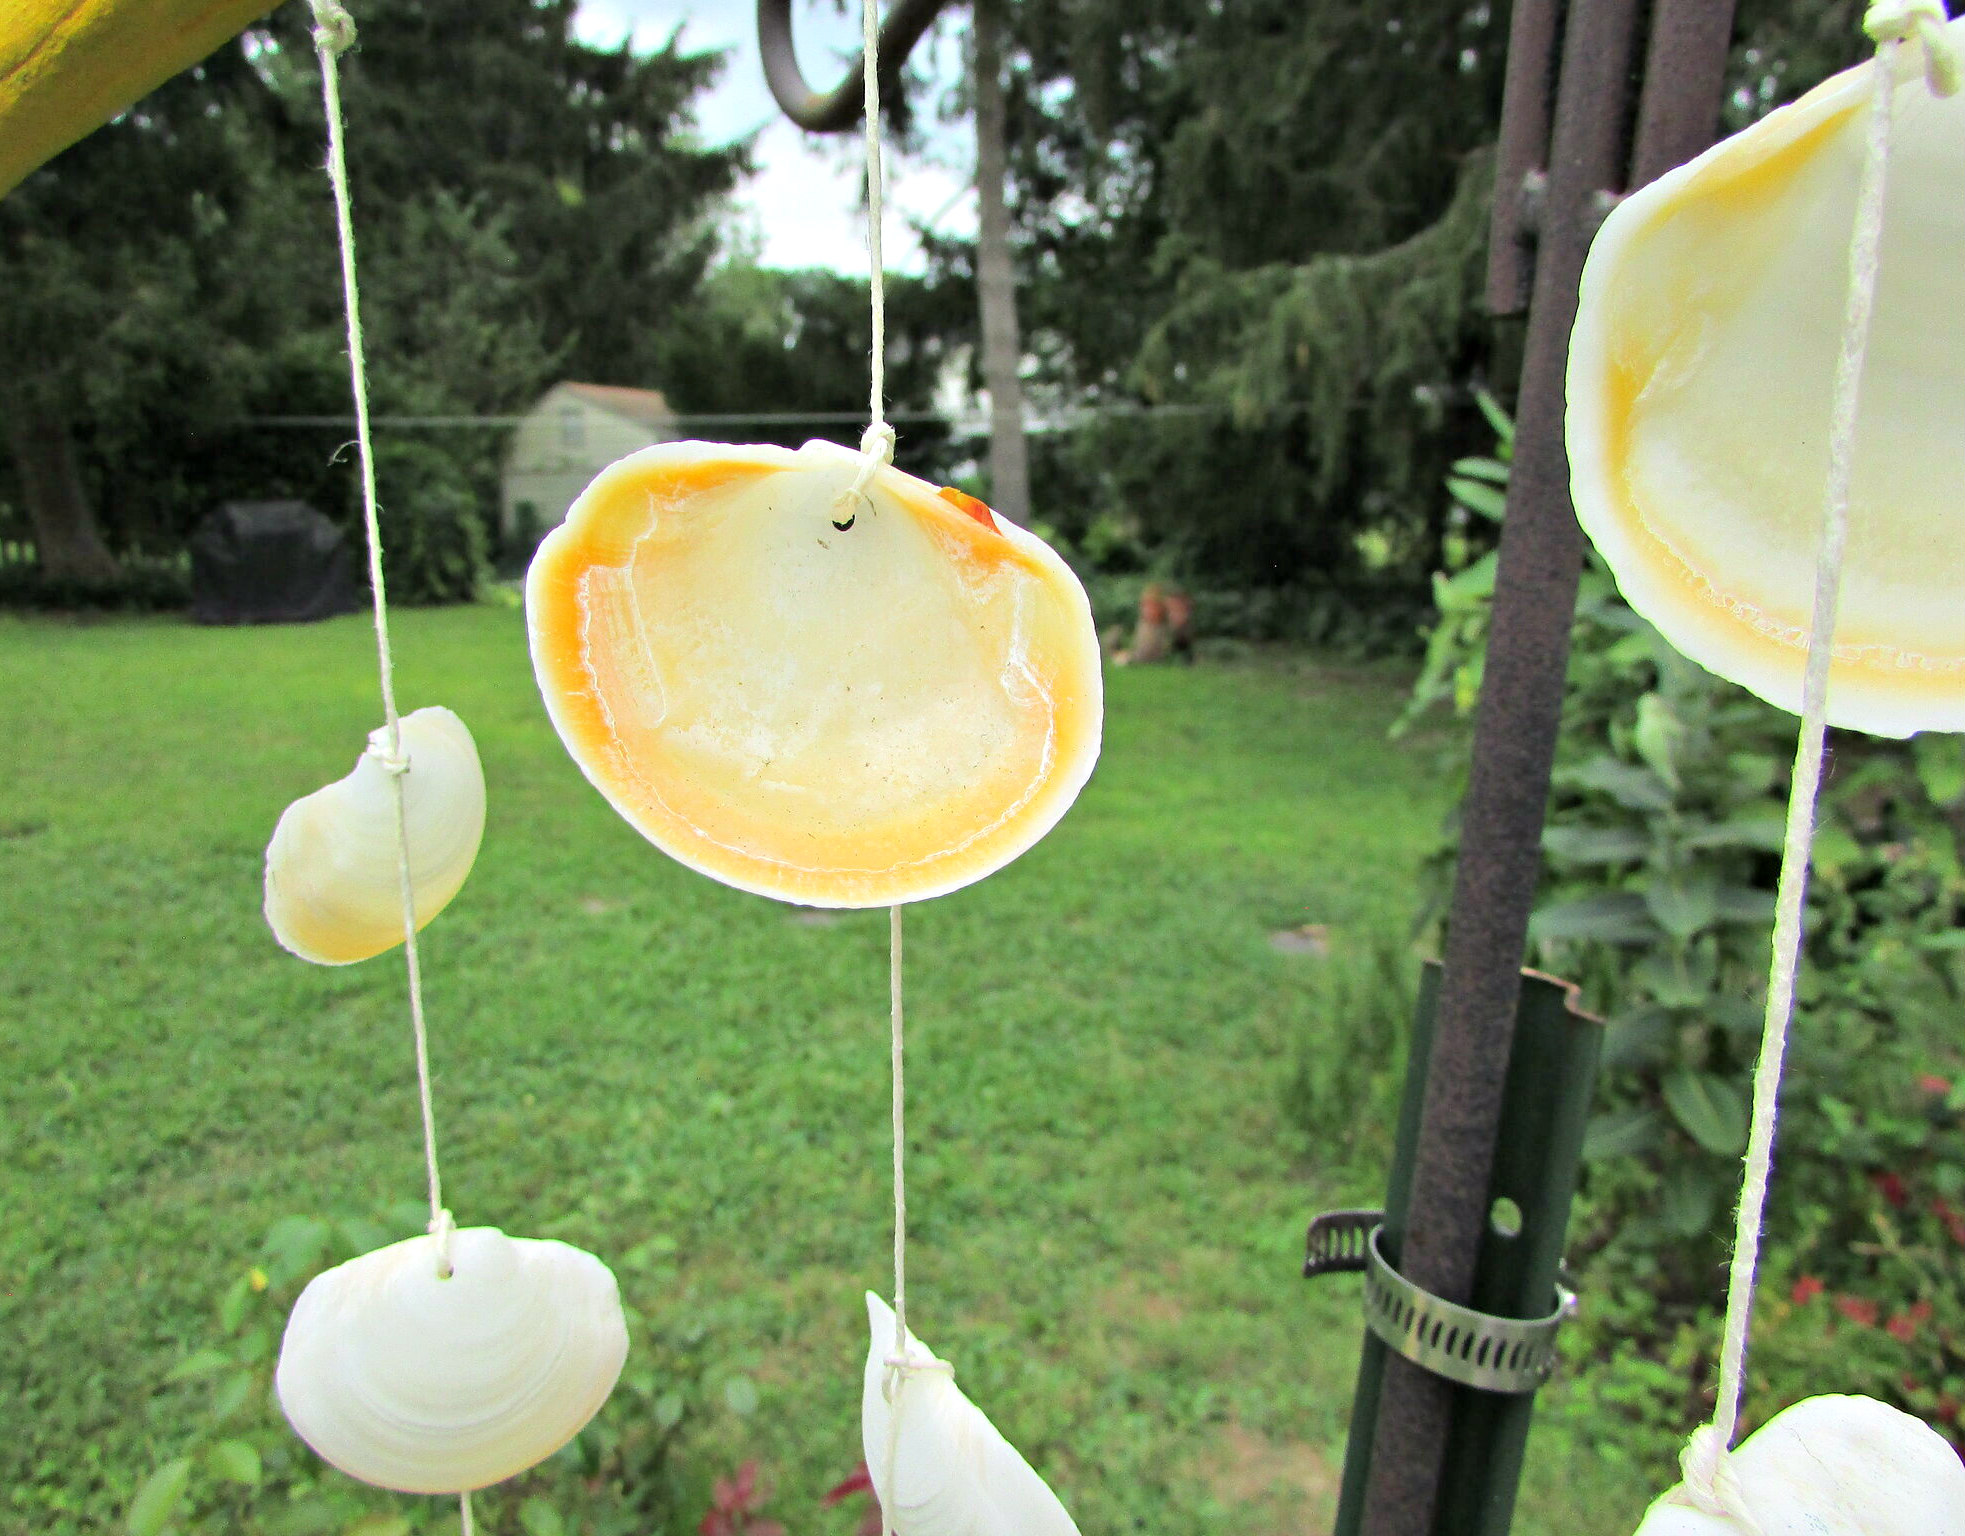
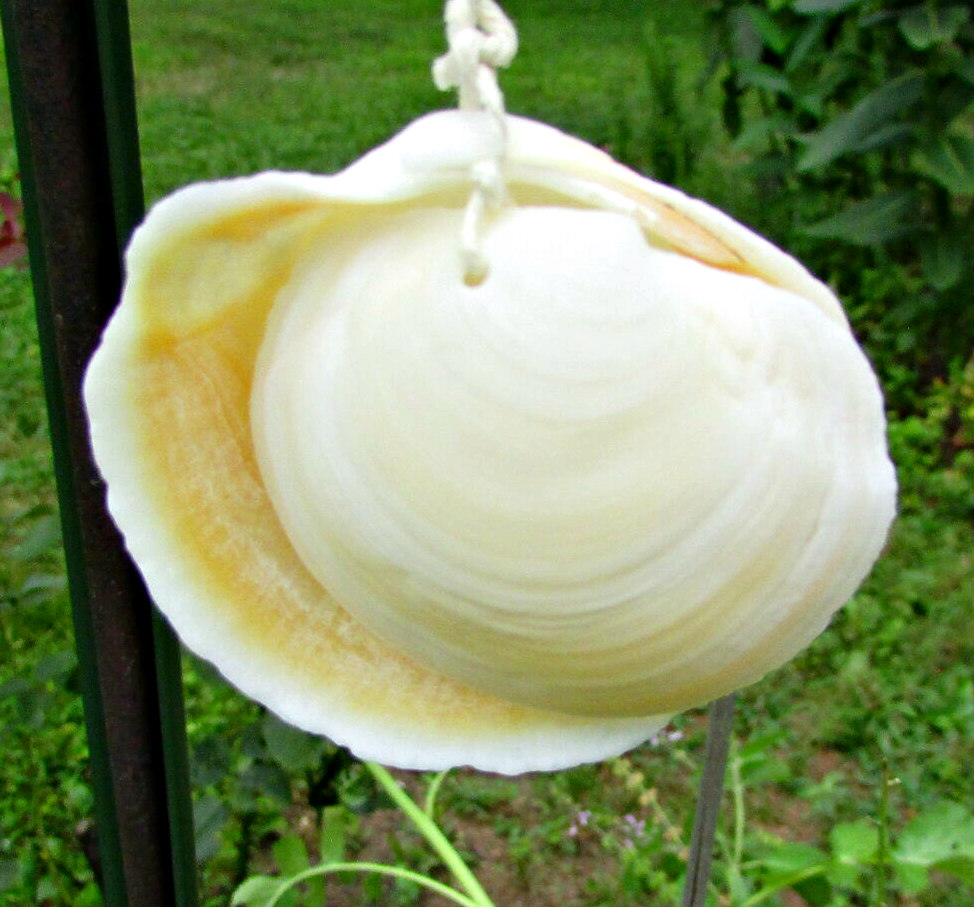
We visited Sanibel Island in June, and I brought home quite a few seashells. One of the more common varieties was a clam called a Buttercup Lucine (Anodontia alba). I love the color yellow, so the gold edging on the interior appealed to me, and I collected about three to four dozen of these clams in different sizes. Happily, they were easy to transport back home as they stack together nicely for traveling.
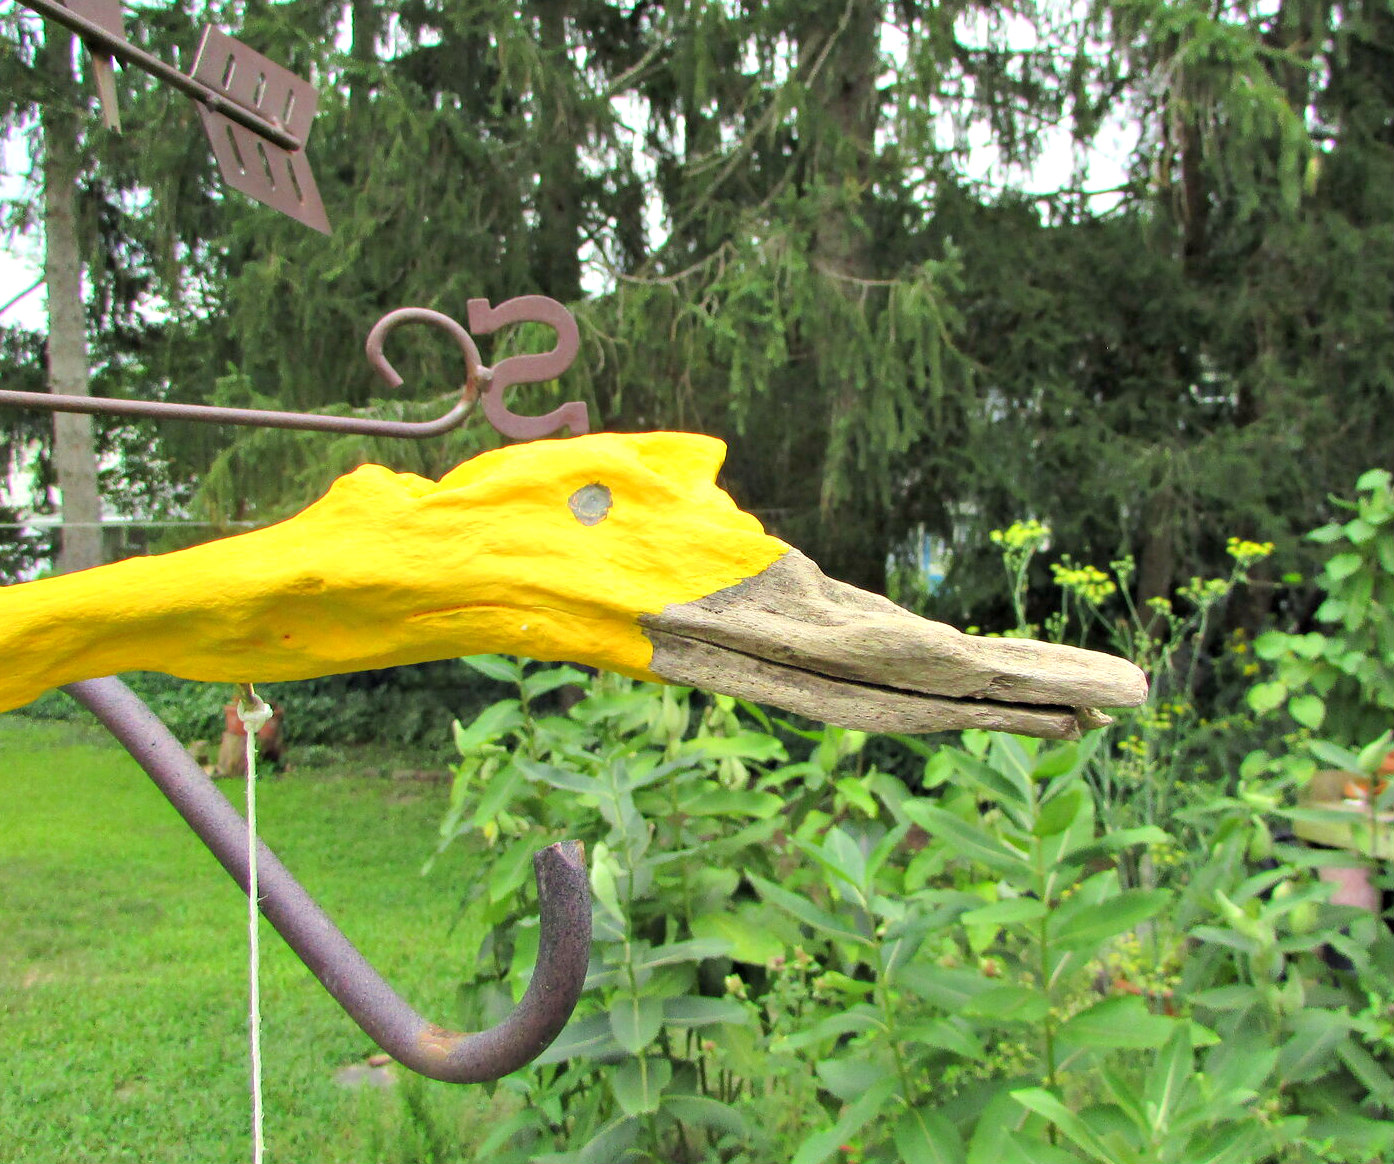
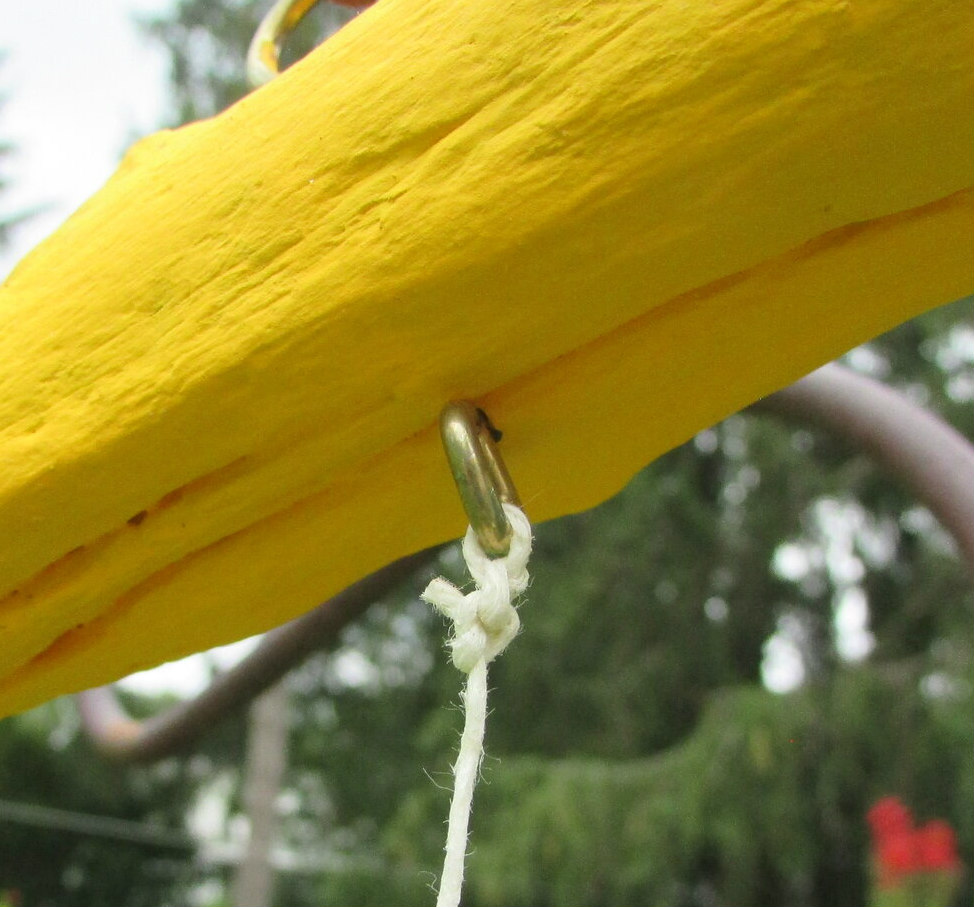
I probably wouldn’t have brought so many back home if I didn’t have a specific project in mind, a wind chime. We found a piece of driftwood on the banks of the Delaware River that resembled a bird’s beak and head. It was just the right size to create a mobile with the Buttercup Lucines.
I was glad I had extra shells because one out of every three cracked when I drilled it with the Dremel tool. I had success with many and had enough to create the chime.
I left the beak a natural color for contrast and added a graphite and colored pencil eye. I painted the rest of the bird-shaped driftwood a golden yellow to match the inner colors of the shell.
As far as ease of making this project, I’d give it a five out of 1-10. The painting and the stringing into screw eyes were fairly easy. The hardest part of the project was drilling the seashells. Whenever I look at my project, I remember the joy of collecting shells on Sanibel Island.
I used waxed hemp thread/cord for the stringing material. It is sturdy and very easy to knot and tie off.
PS My husband made a keen observation that I had to agree with: the chime is more of a clacker than a chime, but hey, it sings the song of the sea, and that is definitely music to me.
A way to preserve flowers is to pound their essence and color into a sheet of paper. I had some handmade paper, measuring 6×4, with deckled edges. I found it the perfect background for pounding some of my garden flowers.
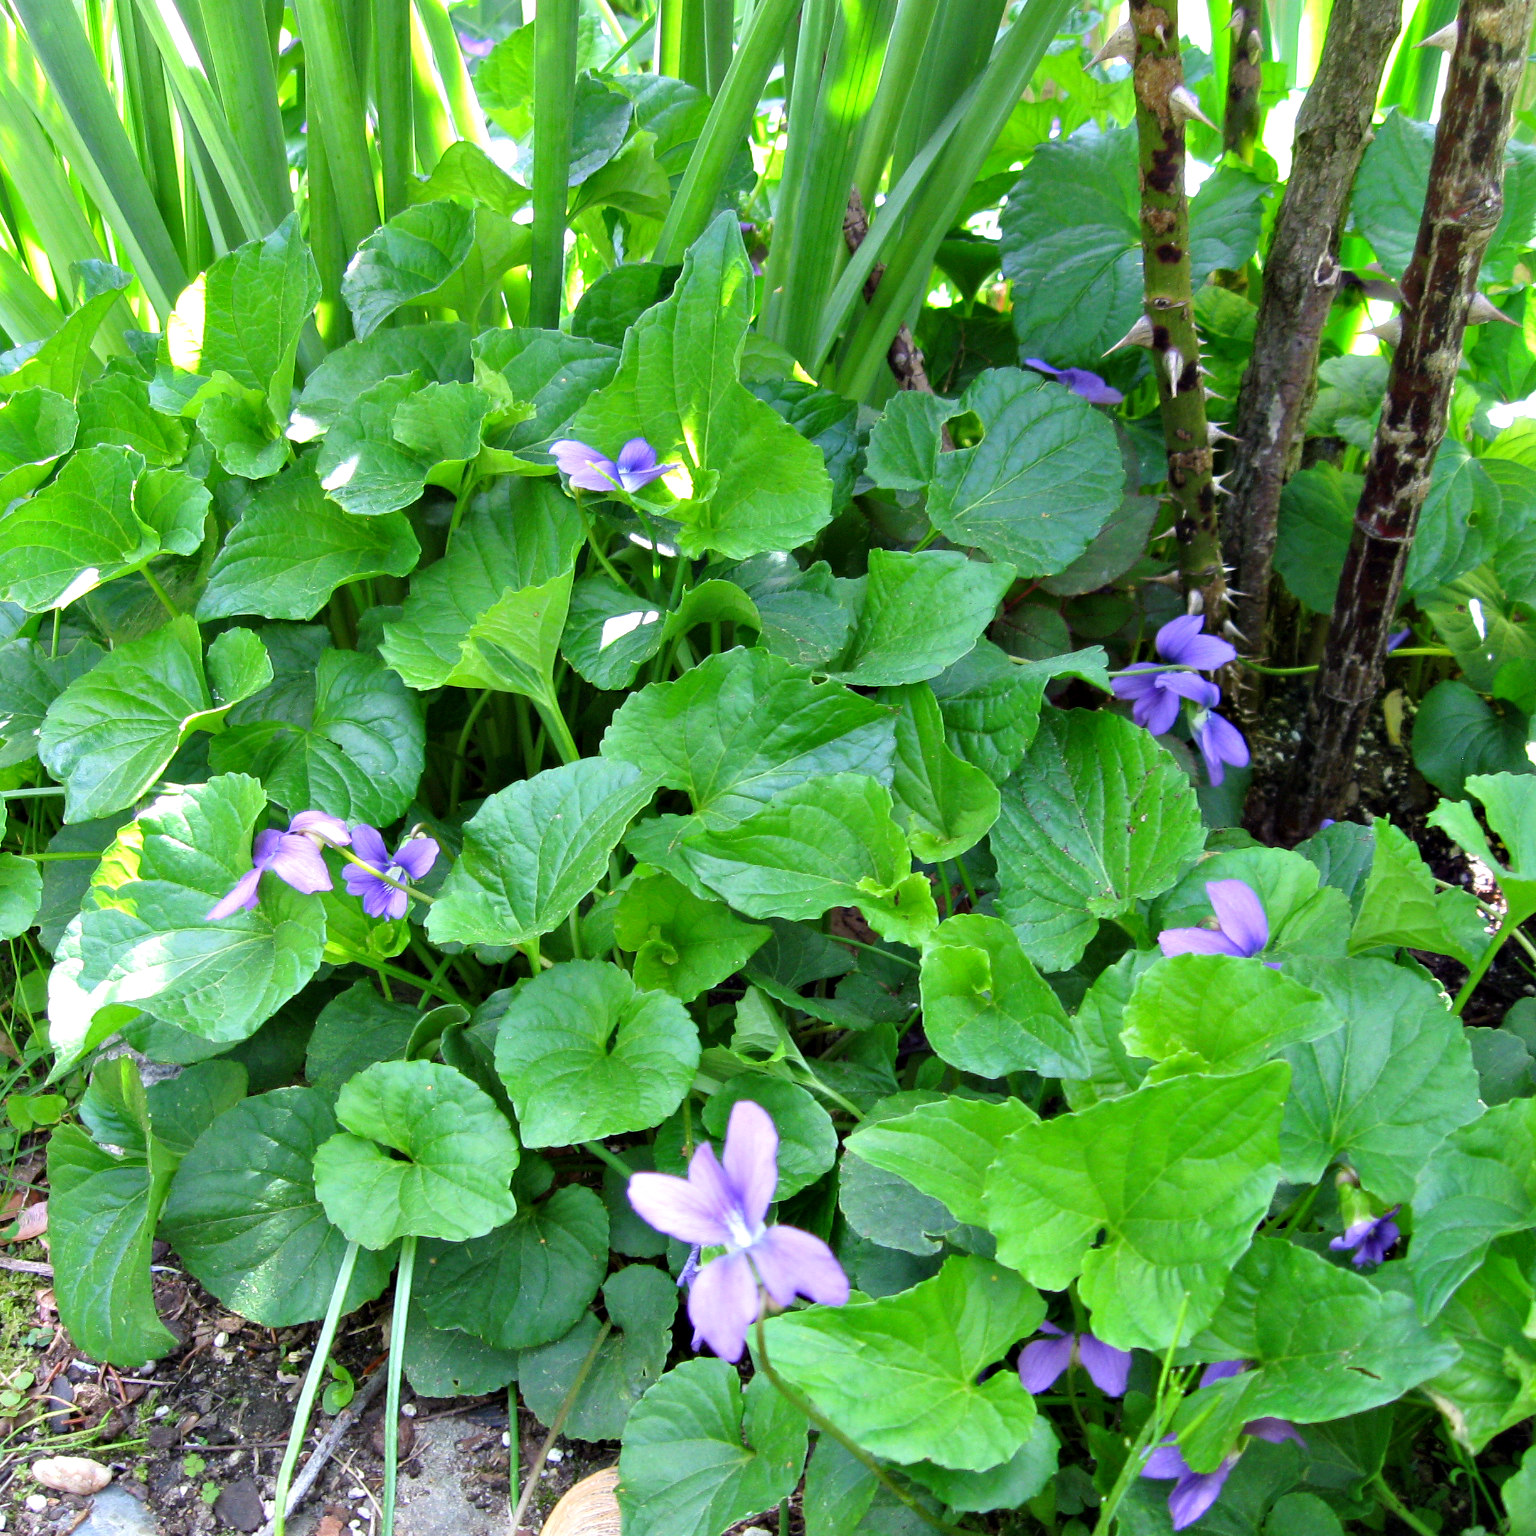
I started my flower pounding with violets. Years ago, I transferred some from the woods into my garden beds. I have hundreds of violets in my grass and flower beds in early spring. I don’t mind them at all. I pull them out if they overwhelm my perennials or annuals. Because they sow seed, there will be many more to take their place next year. They are also a great ground cover for areas I don’t want to weed weekly. The leaves are a host for the fritillary butterfly.
The beautiful violet color is easy to transfer. I place the flowers and leaves on the handmade paper, then, using a piece of tracing paper to see what I’m doing, I place this over the flowers and pound them flat with a small hammer. It is easy to work in a corrugated box based on the floor rather than on the floor itself. Some flowers stick to the handmade paper. I let these sit for a few minutes, and then gently remove them. Voilà, there is an impressionistic-type print of the flowers.
After drying the paper out for about two weeks, I used a 005 permanent marker to create a few lines, using the photos I took before I pounded the flowers as a reference.
I love the way the finished product turned out. I will continue pounding flowers all summer, labeling each pounded flower print with where it was taken from in my garden or other places. At the end of the summer, I intend to make a handmade book containing all the prints.
I post this fun Christmas craft every year, inexpensive, and oh so rewarding.
This is a throwback post and a craft that’s been around for countless years. Since the time of paper and scissors, adults and children have been cutting paper snowflakes for windows and gift packages.
I cut over a hundred every year for my windows. I’ve included a how-to video with this post, but I have tweaked my snowflakes over the years and want to share a new tip or two. There are two weeks between now and December. I need to cut a few daily to prepare enough for December 1st.
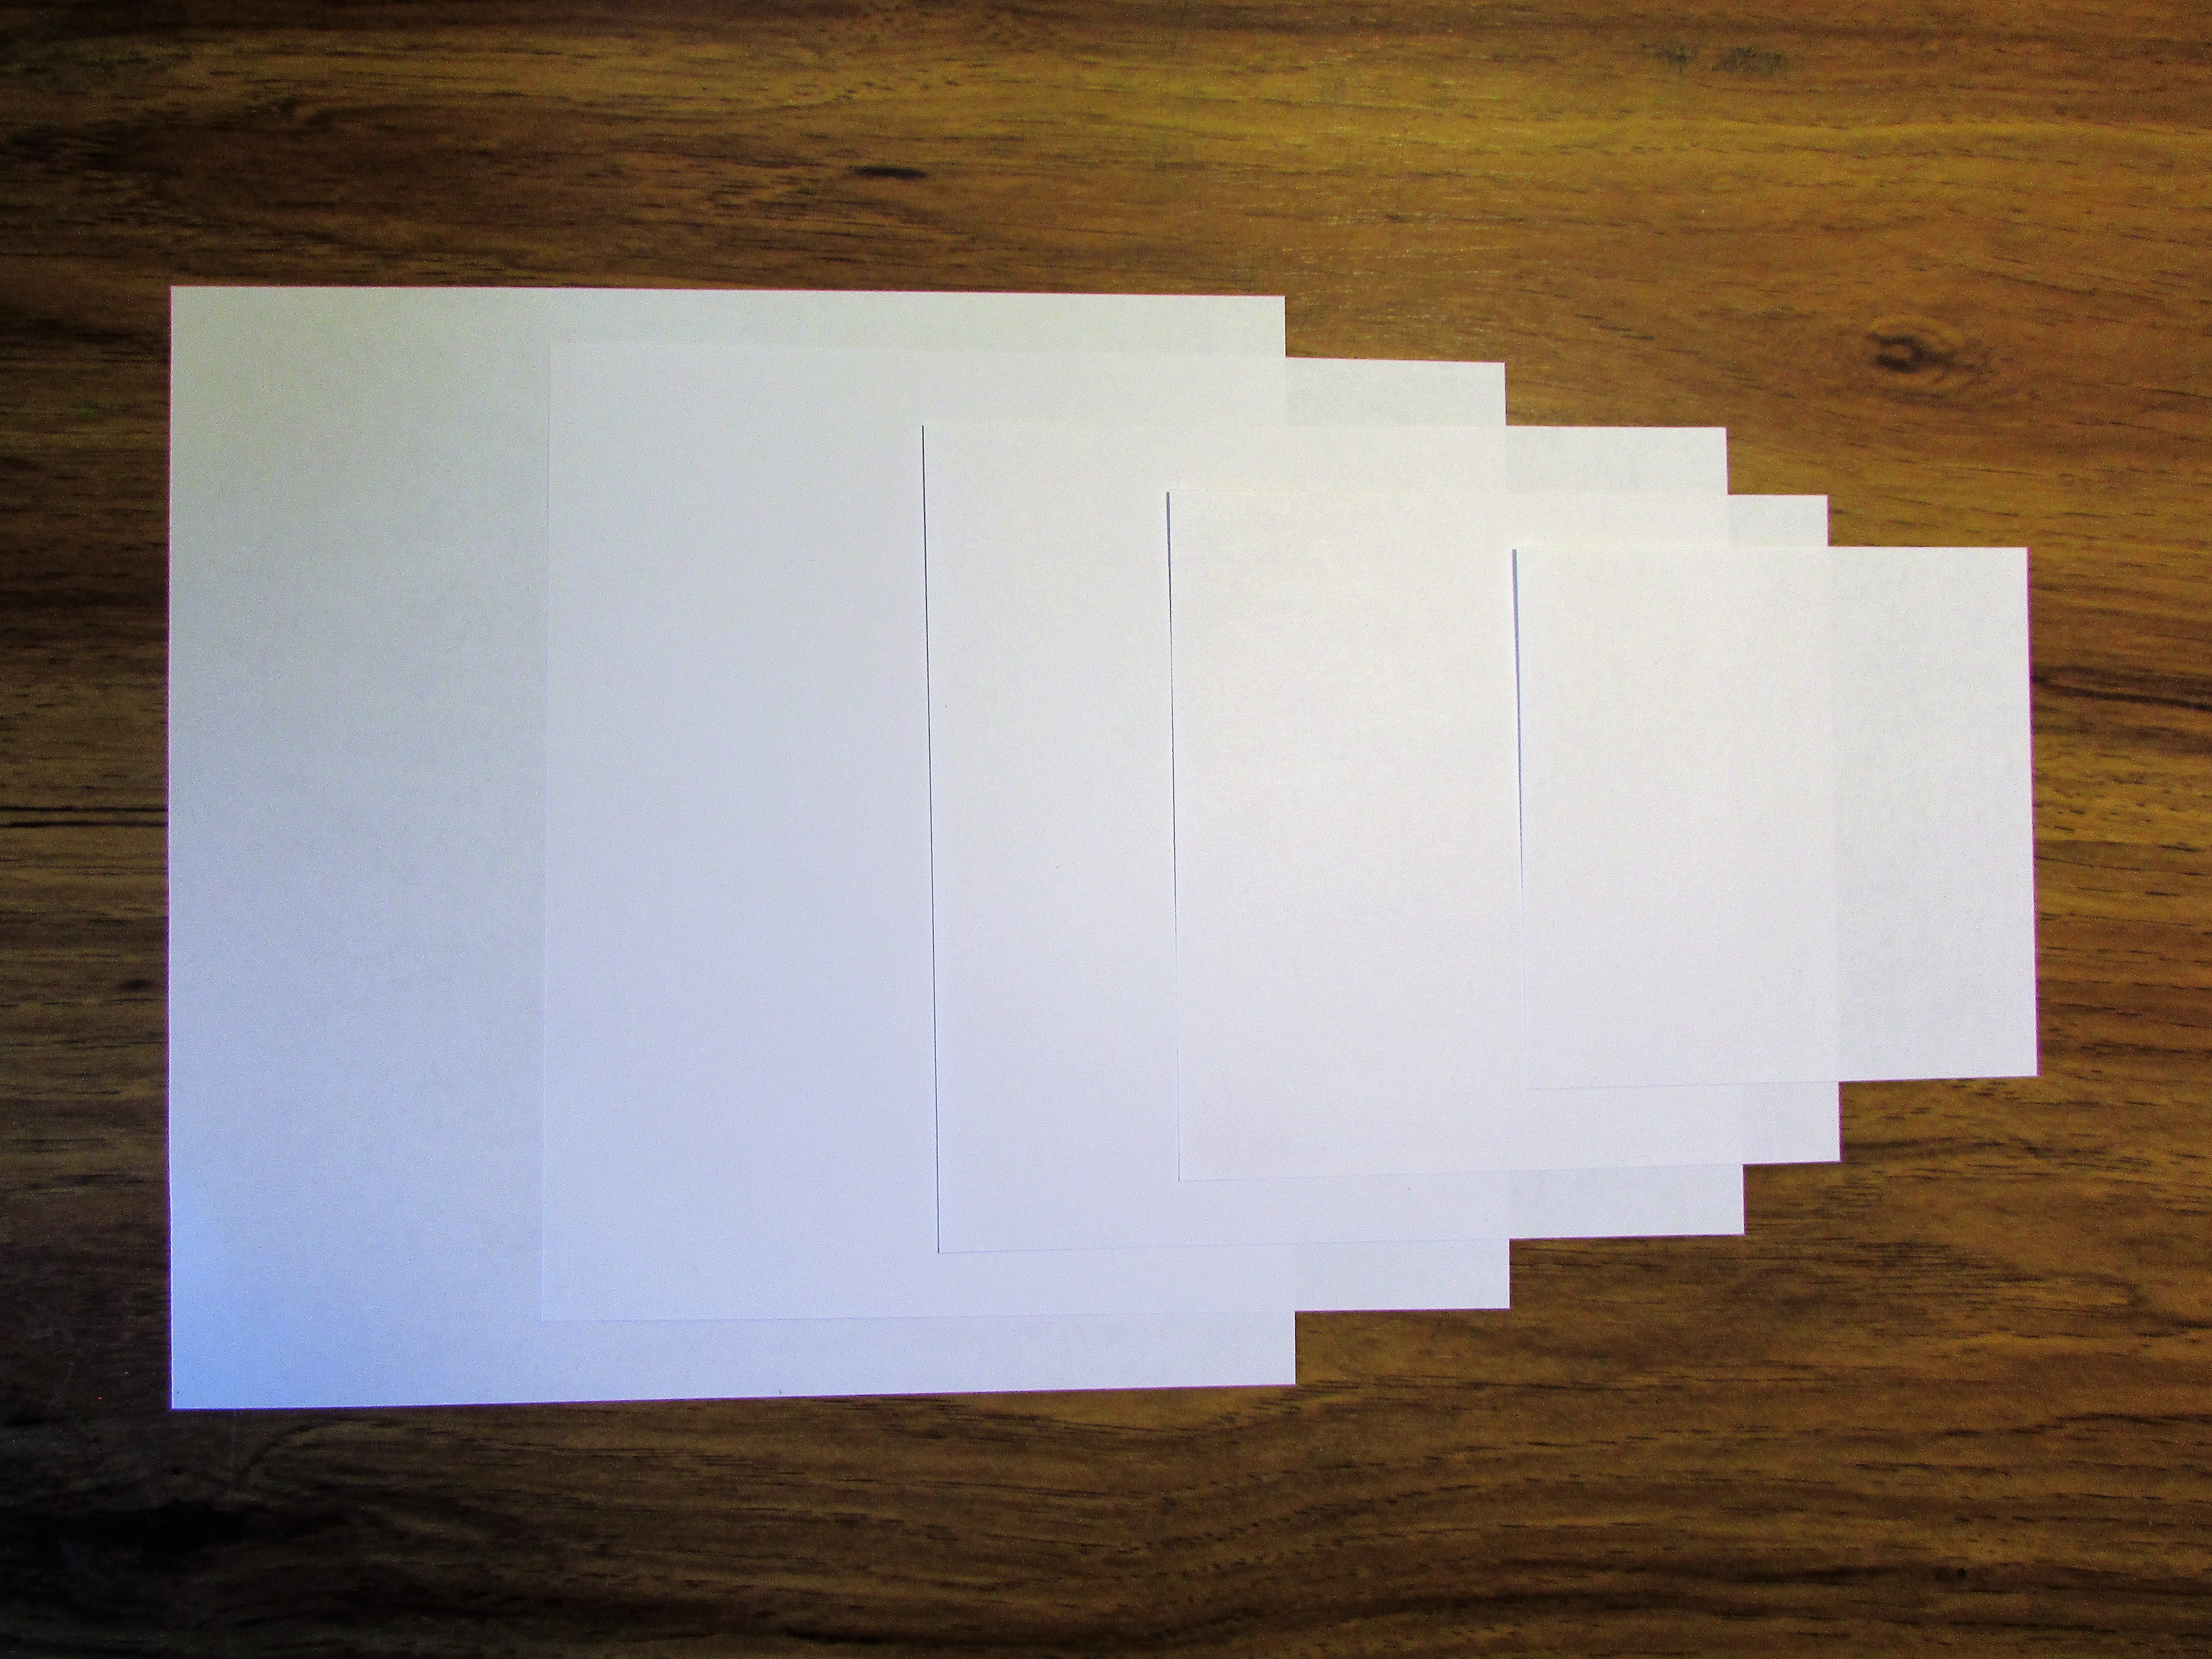
The most important tip I want to share is to cut many different-sized snowflakes. The snowflakes on my windows look more interesting if they are not uniform in size. I use squares of computer paper cut into various sizes, four inches to eight, and everything in between. If you start with a square and do the folding correctly, your snowflakes will be a success.
As always, the best way to store paper snowflakes is inside a book until you are ready to use them. Here is a true story and a tip, too. Write down what book you place them in and where they are kept. I lost dozens and dozens of finished snowflakes a year or two ago. I found them months later in the “safe” place I had stashed them.
To finish off the snowflakes, press them between sheets of wax paper with an old iron you reserve for crafts, or to preserve your iron and board, encase them in several layers of newspaper and press them in wax paper. When you pull the wax paper away, your snowflakes will have a protective layer of wax to keep off the condensation winter windows often form.
I use washable school glue sticks to keep the snowflakes in place. When it’s time to take them down just pull the paper away from the windowpane and swipe with a wet washcloth once or twice. Let the moisture soak in for a minute, wipe again, and all the paper and glue washes away. Sometimes, if I use the right cloth, I don’t even need to use window cleaner. Anyone who has ever picked transparent tape off of a piece of window glass will know how tedious it is and how long it takes. Gluing the snowflakes to the windows sounds scary, but believe me, I’ve done it for years and it is SOOOOOO much easier than taping because of easy removal.
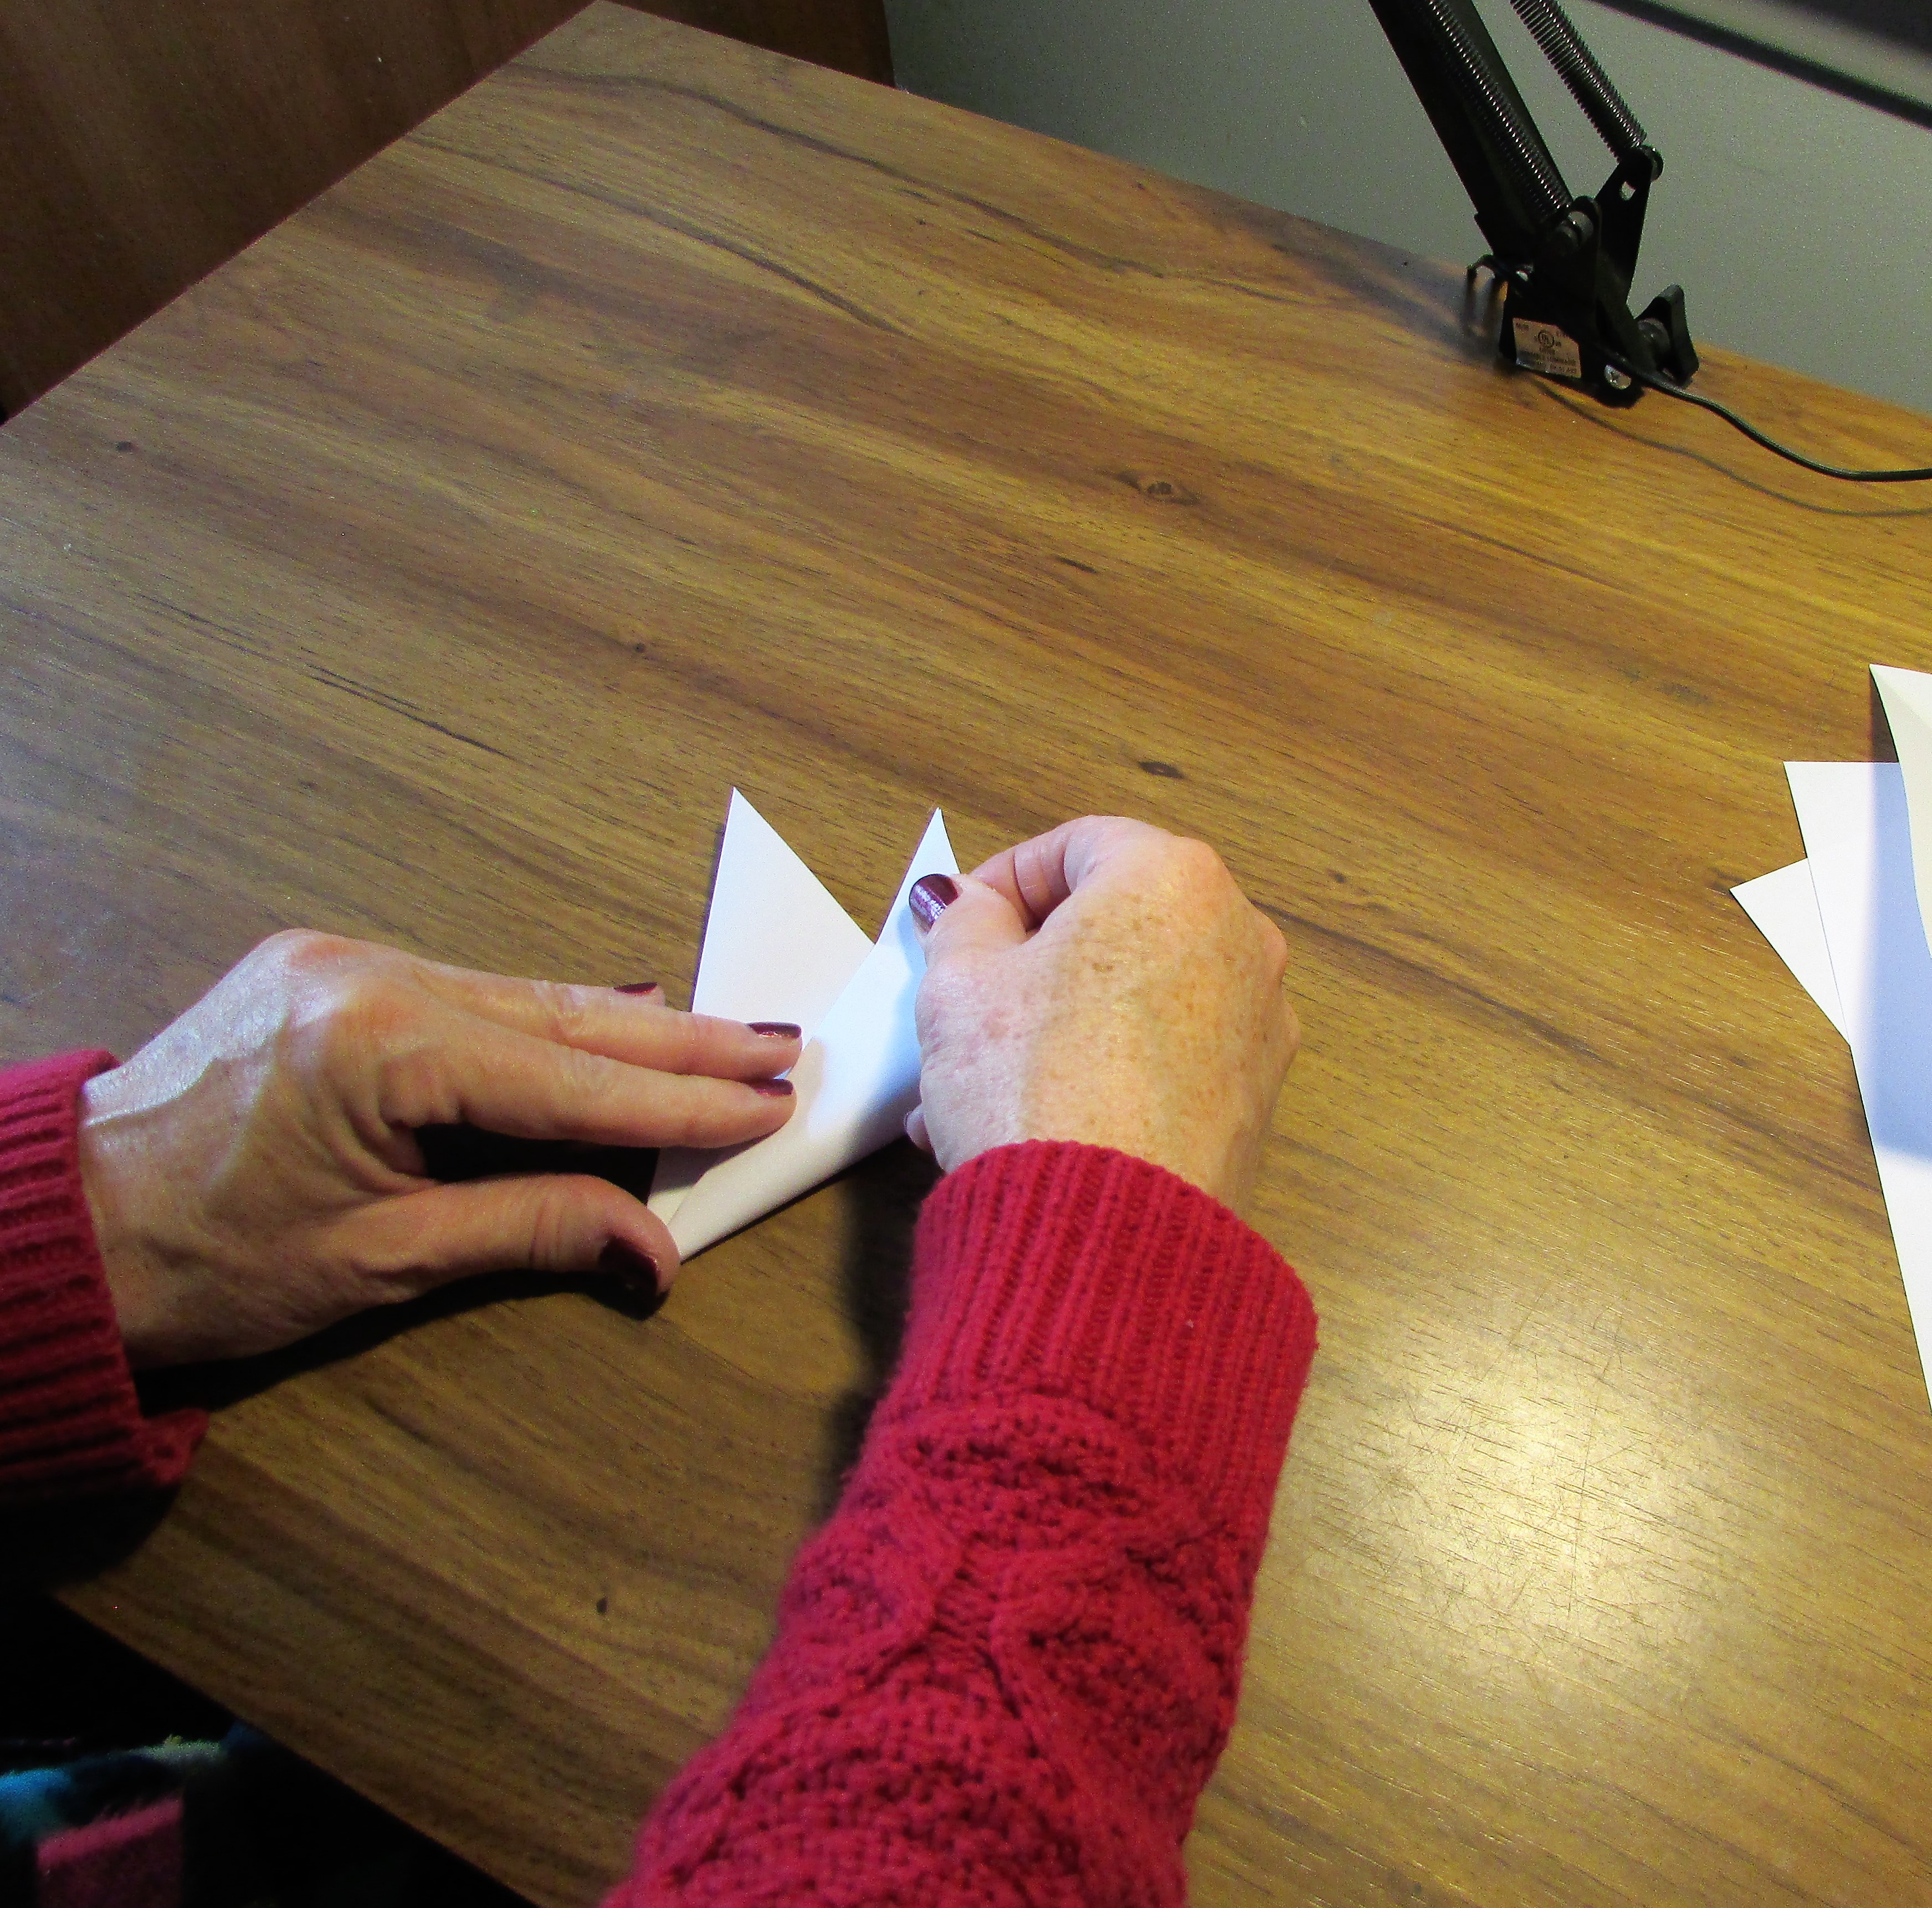
Step by Step in Photographs
You will need squares of paper. Computer paper is a good choice for snowflakes. I use different sizes, eight, seven, six, five and four-inch squares. All of these sizes are fairly easy to fold and cut.
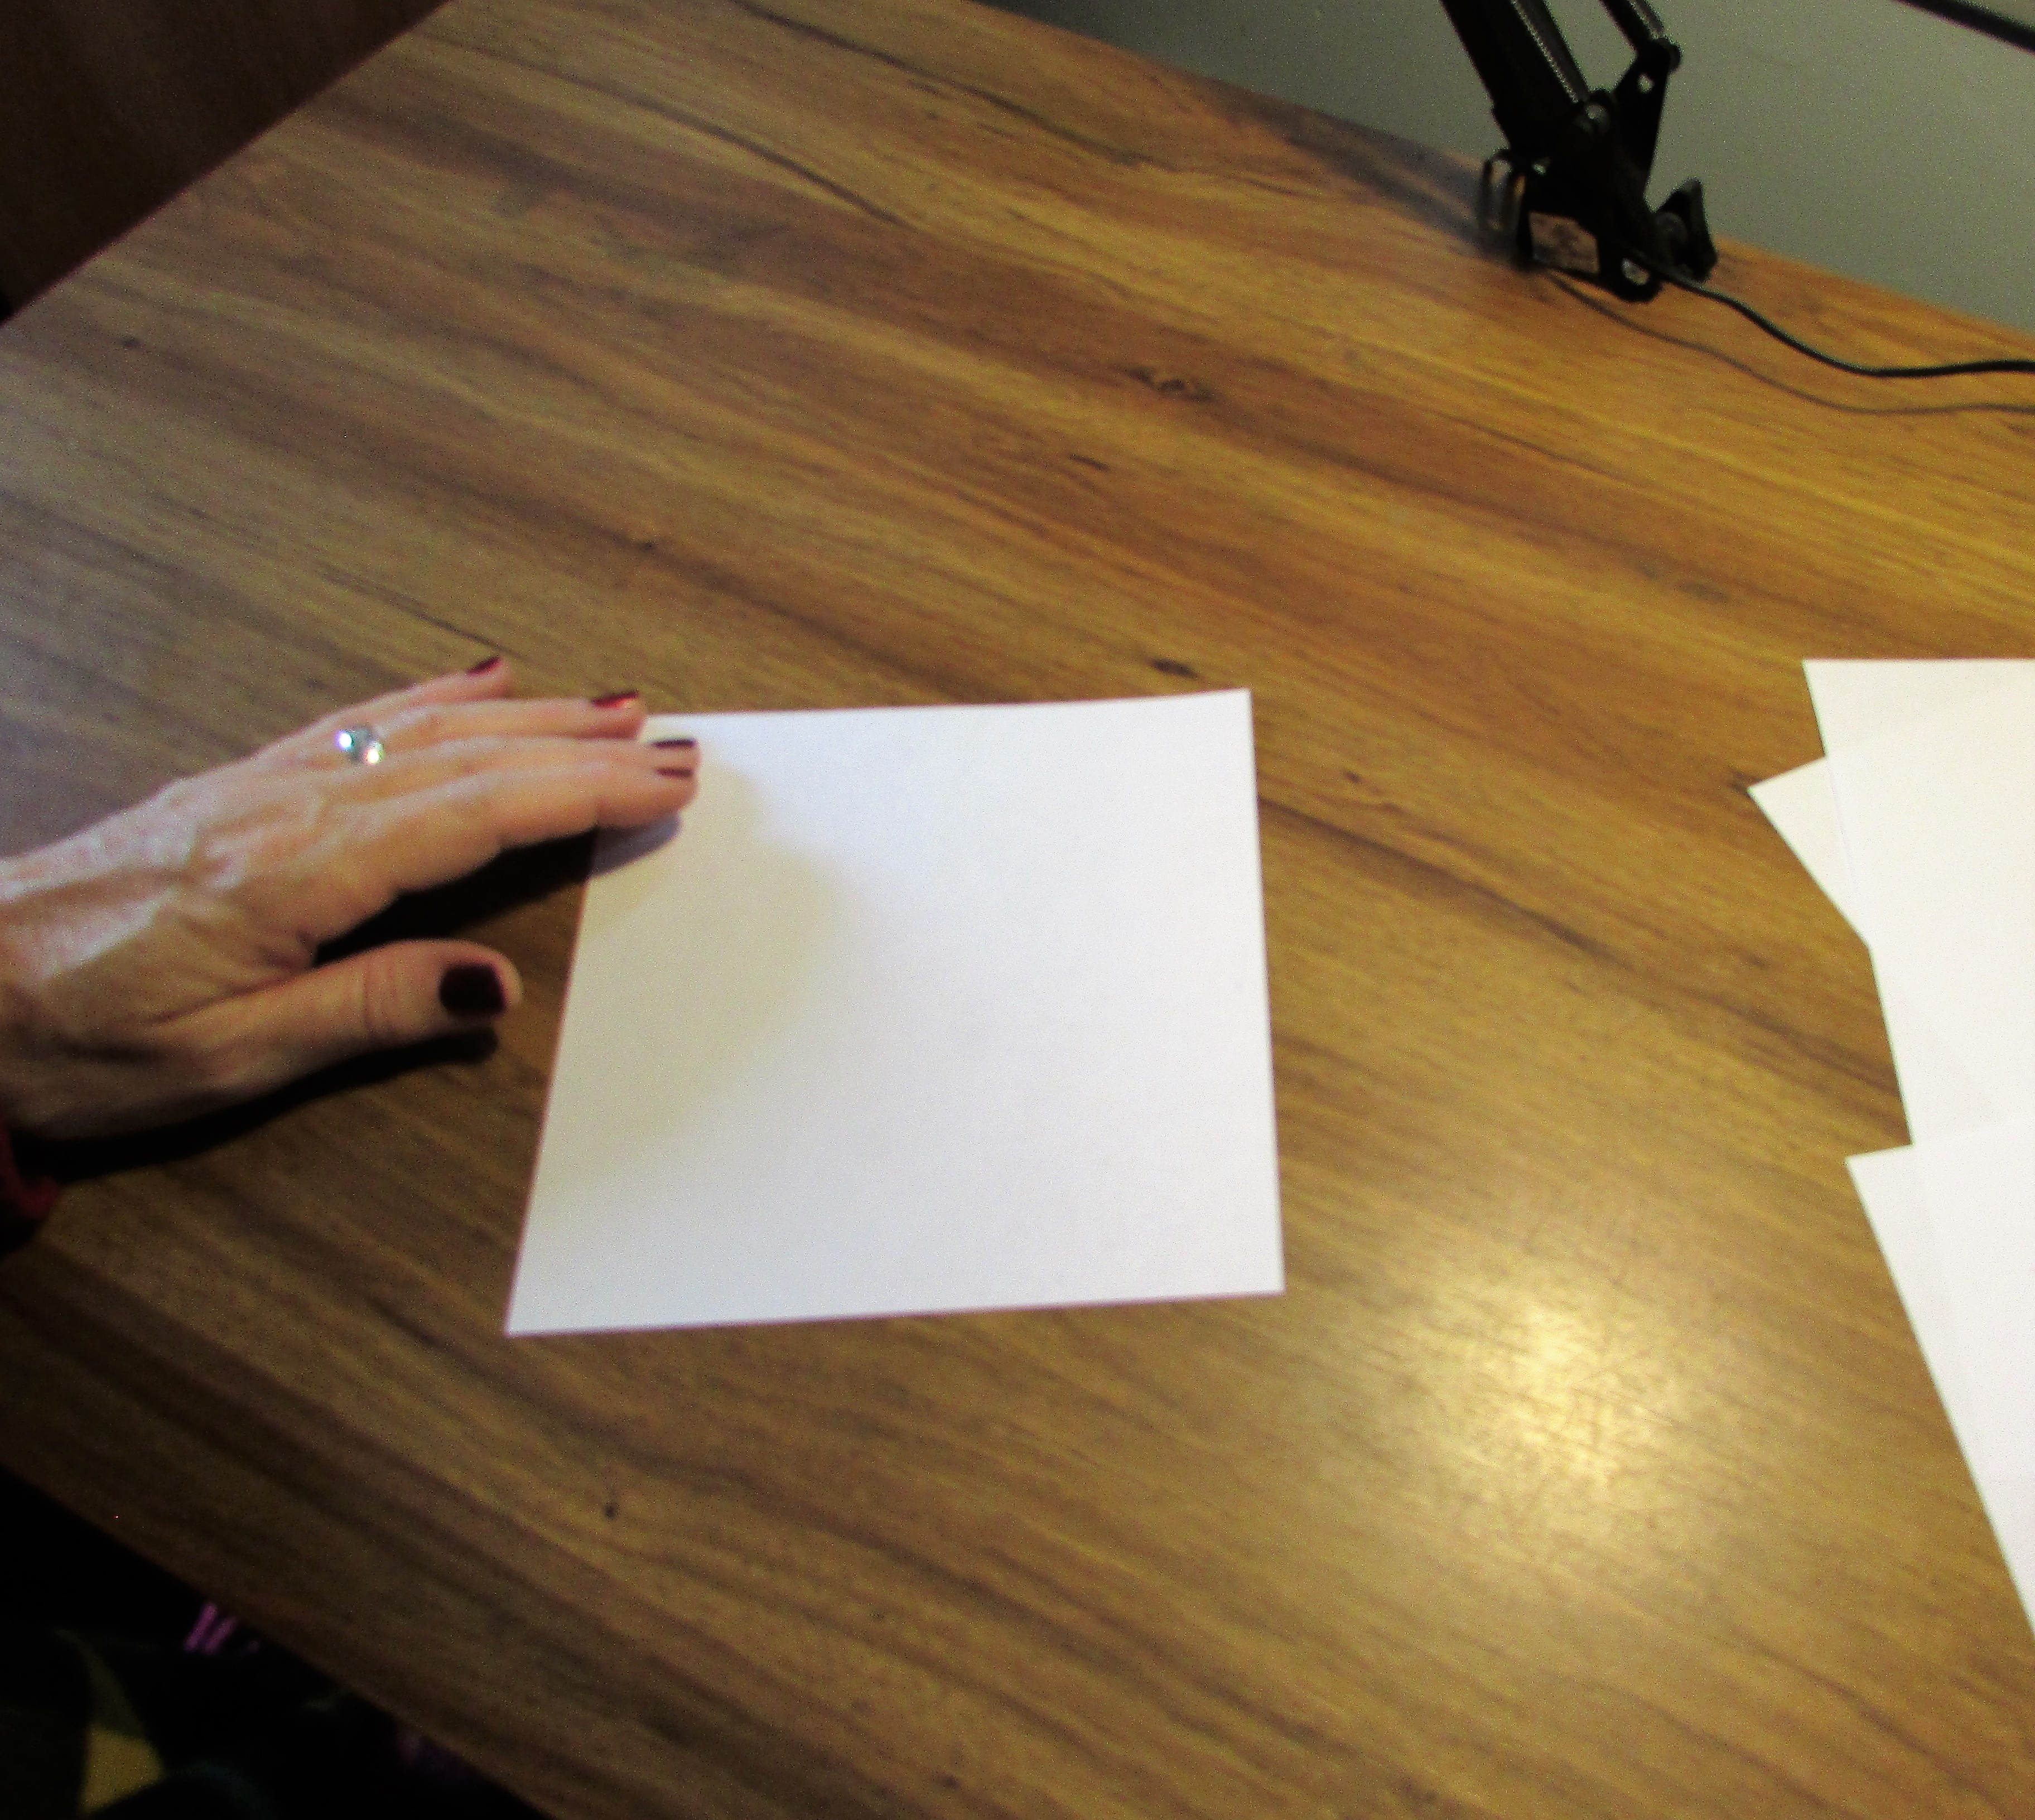
Fold the square into a triangle shape by matching catty-corners, or in more modern terms, opposite corners.
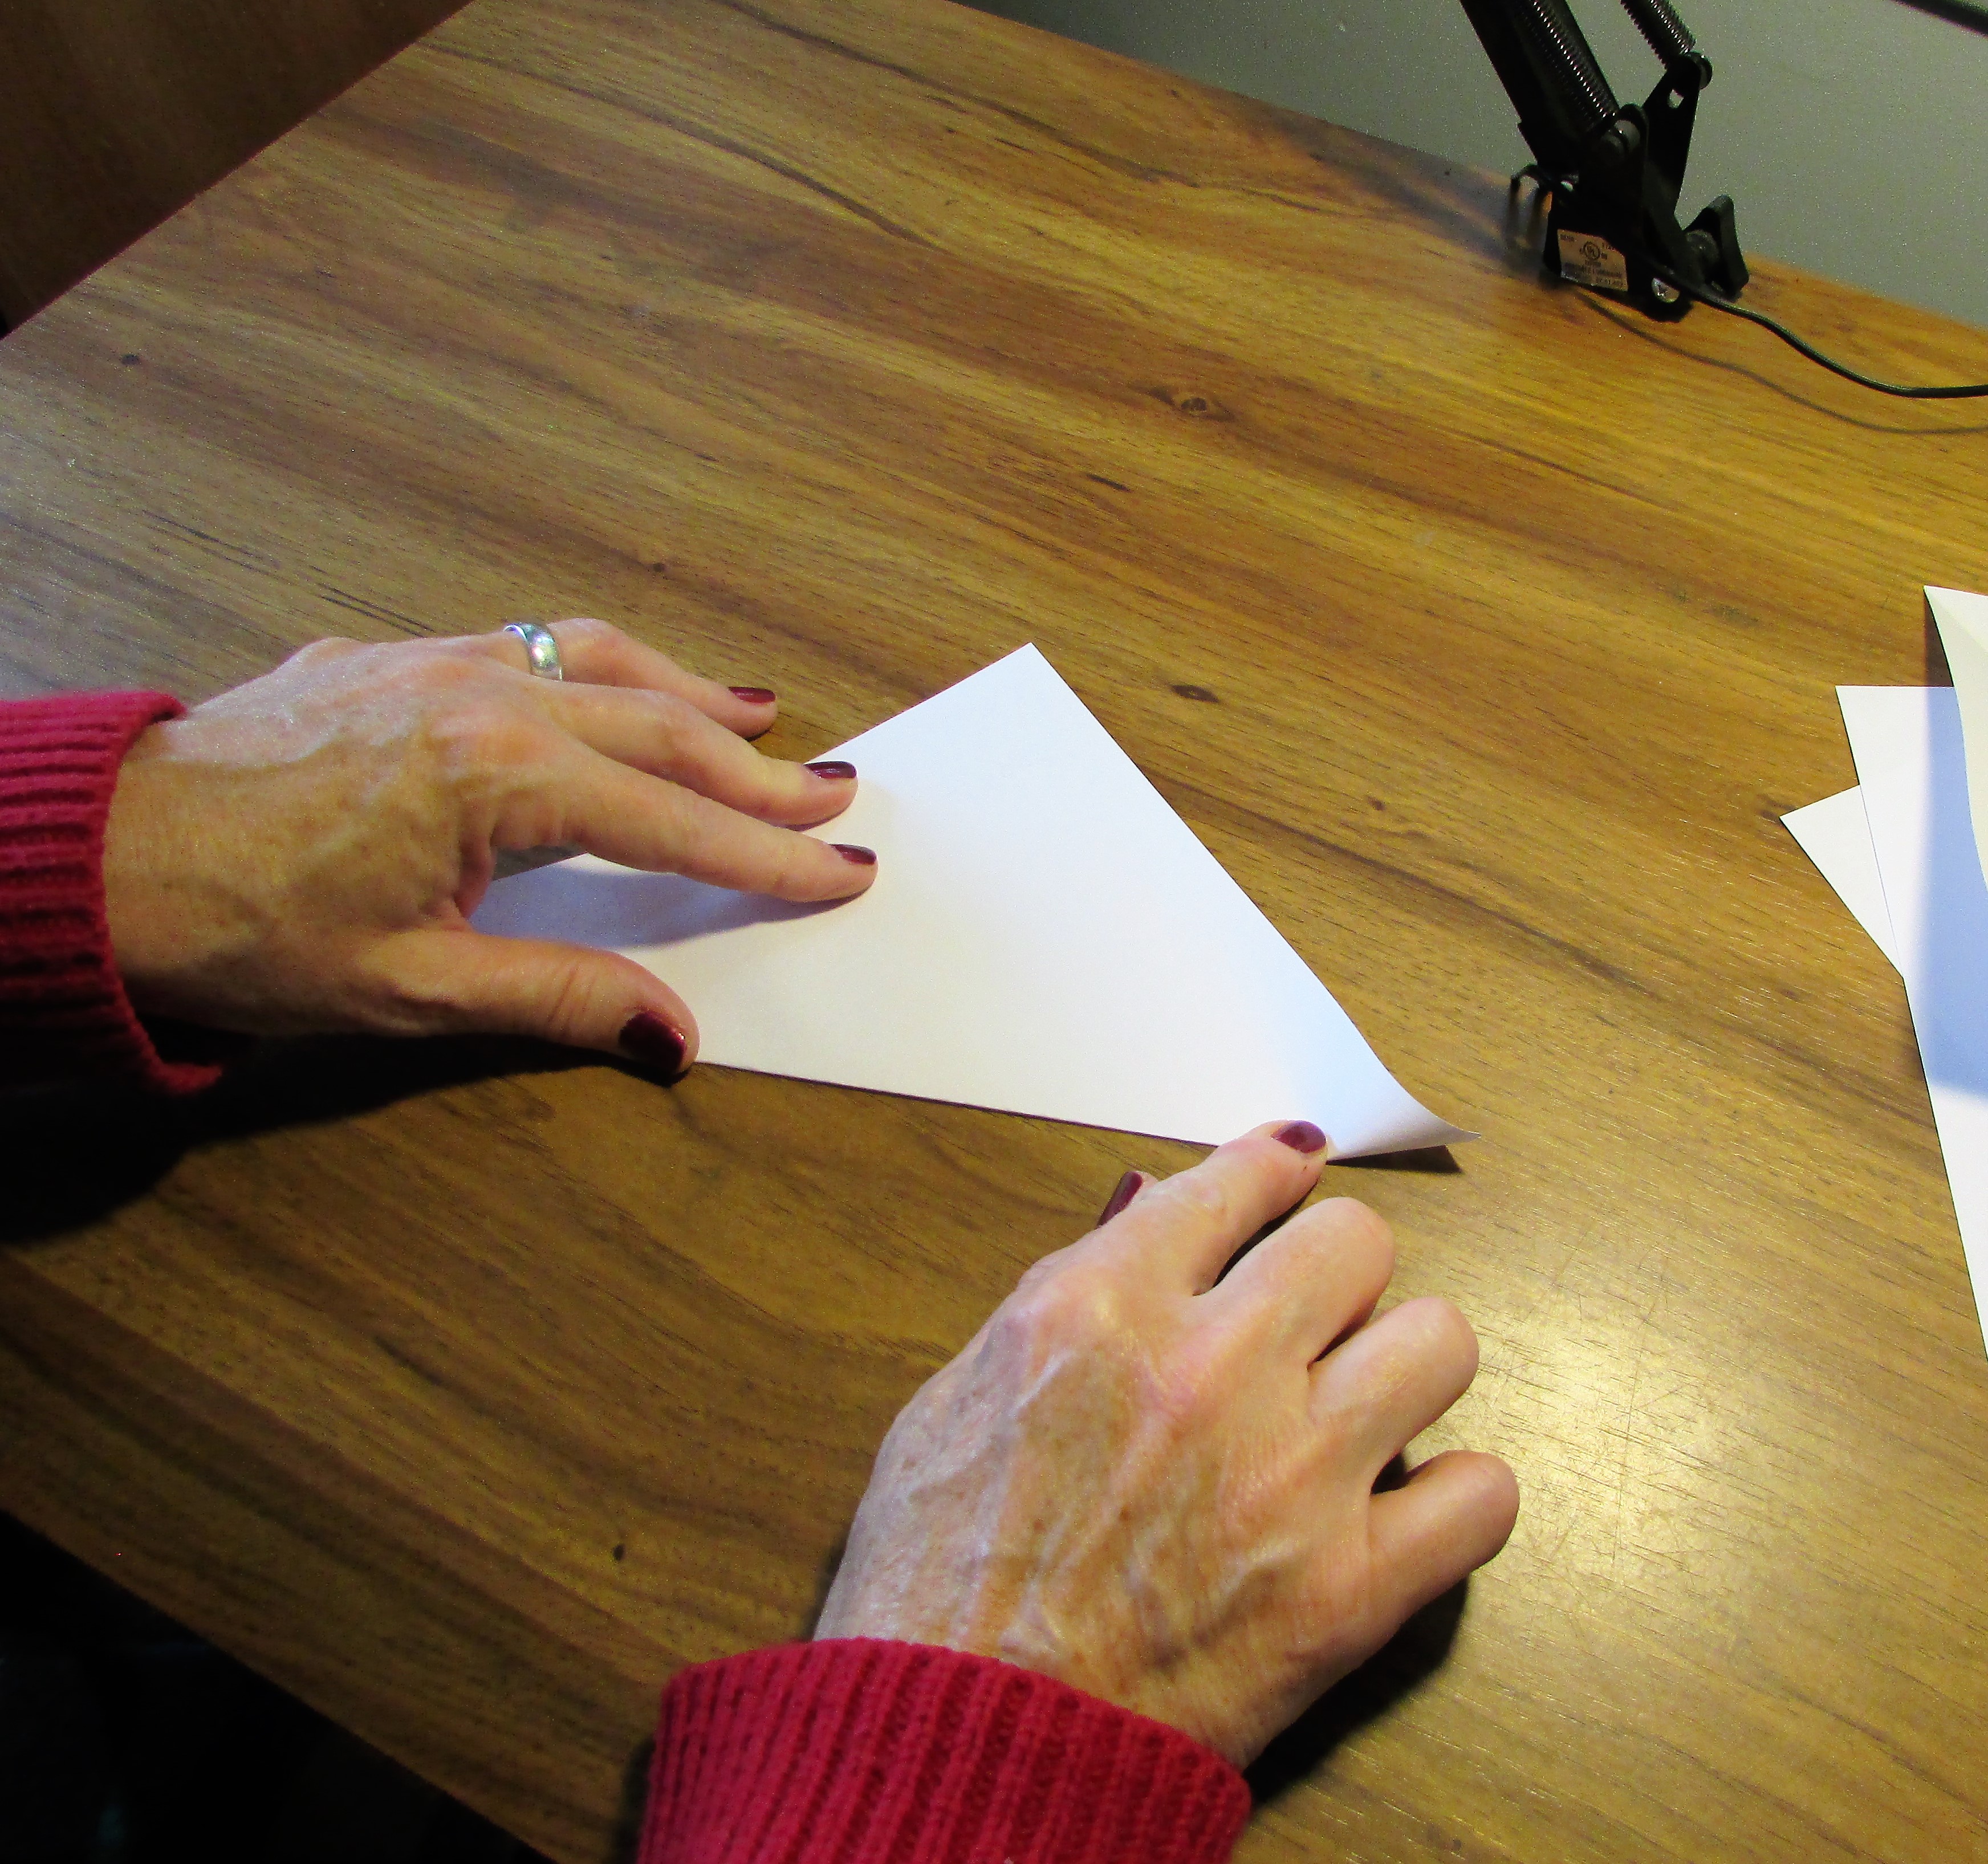
After the first fold is complete, using the corners on the long side of the triangle, fold the paper corner to corner once more.
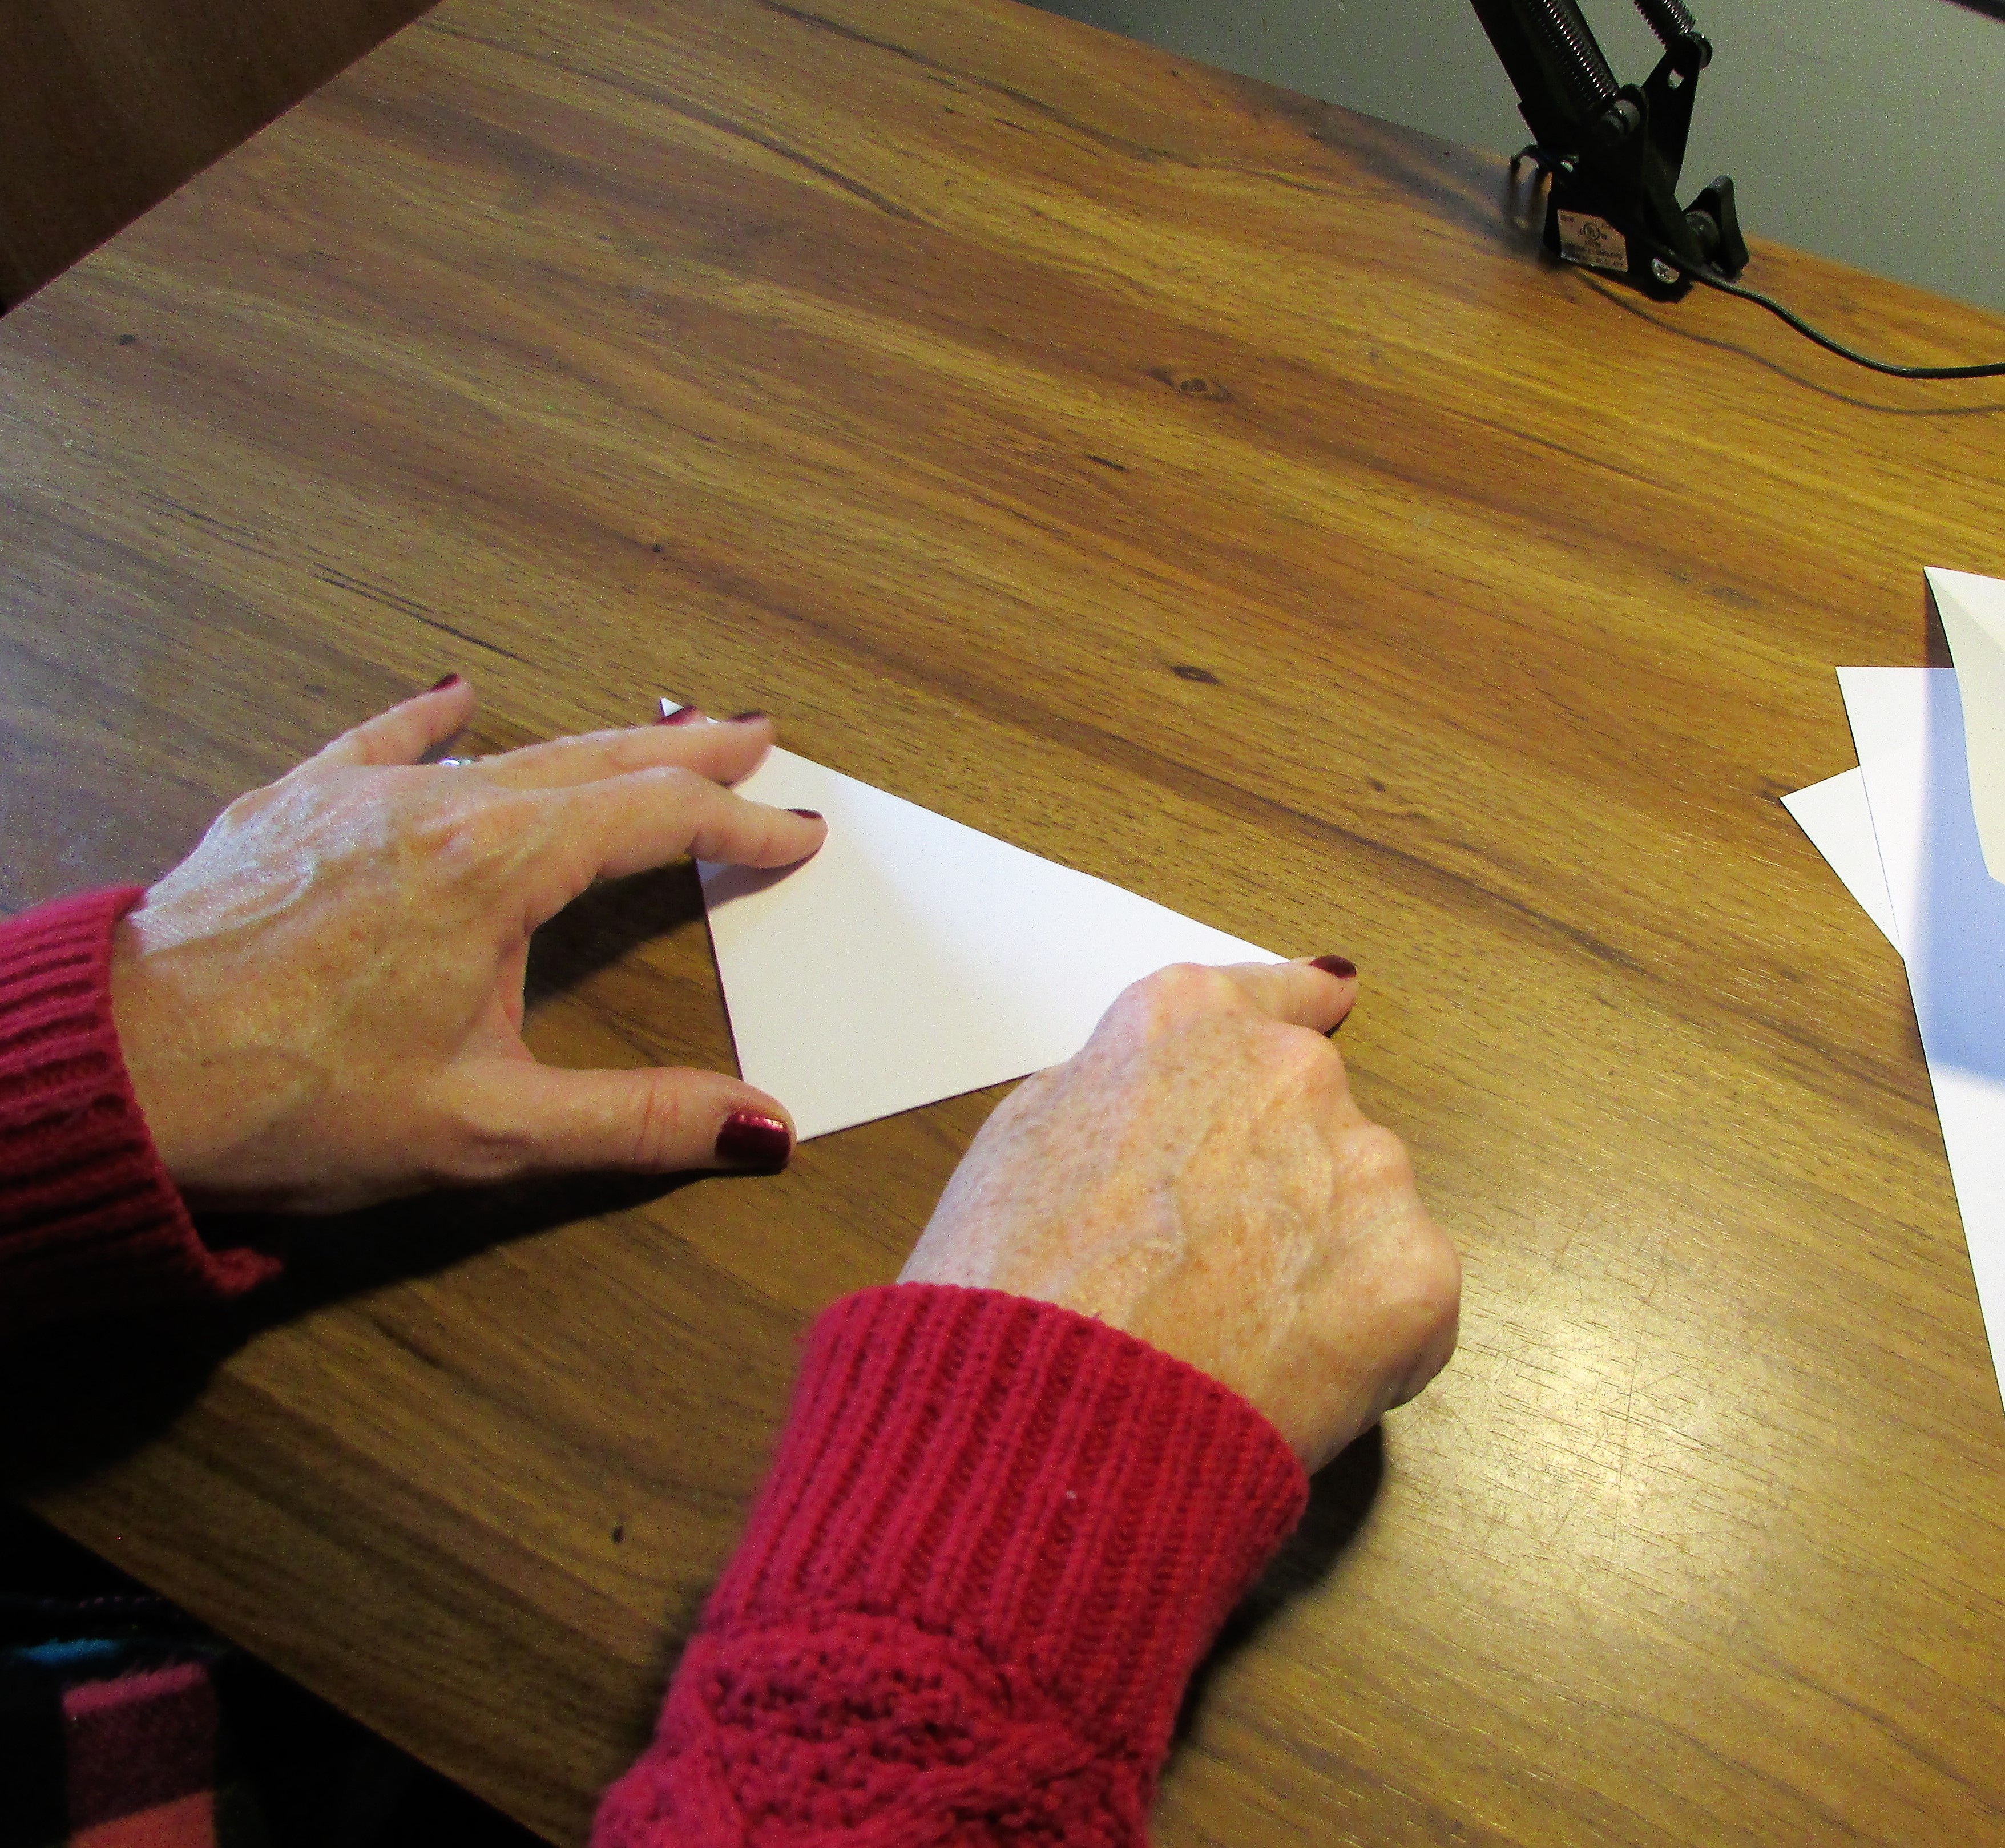
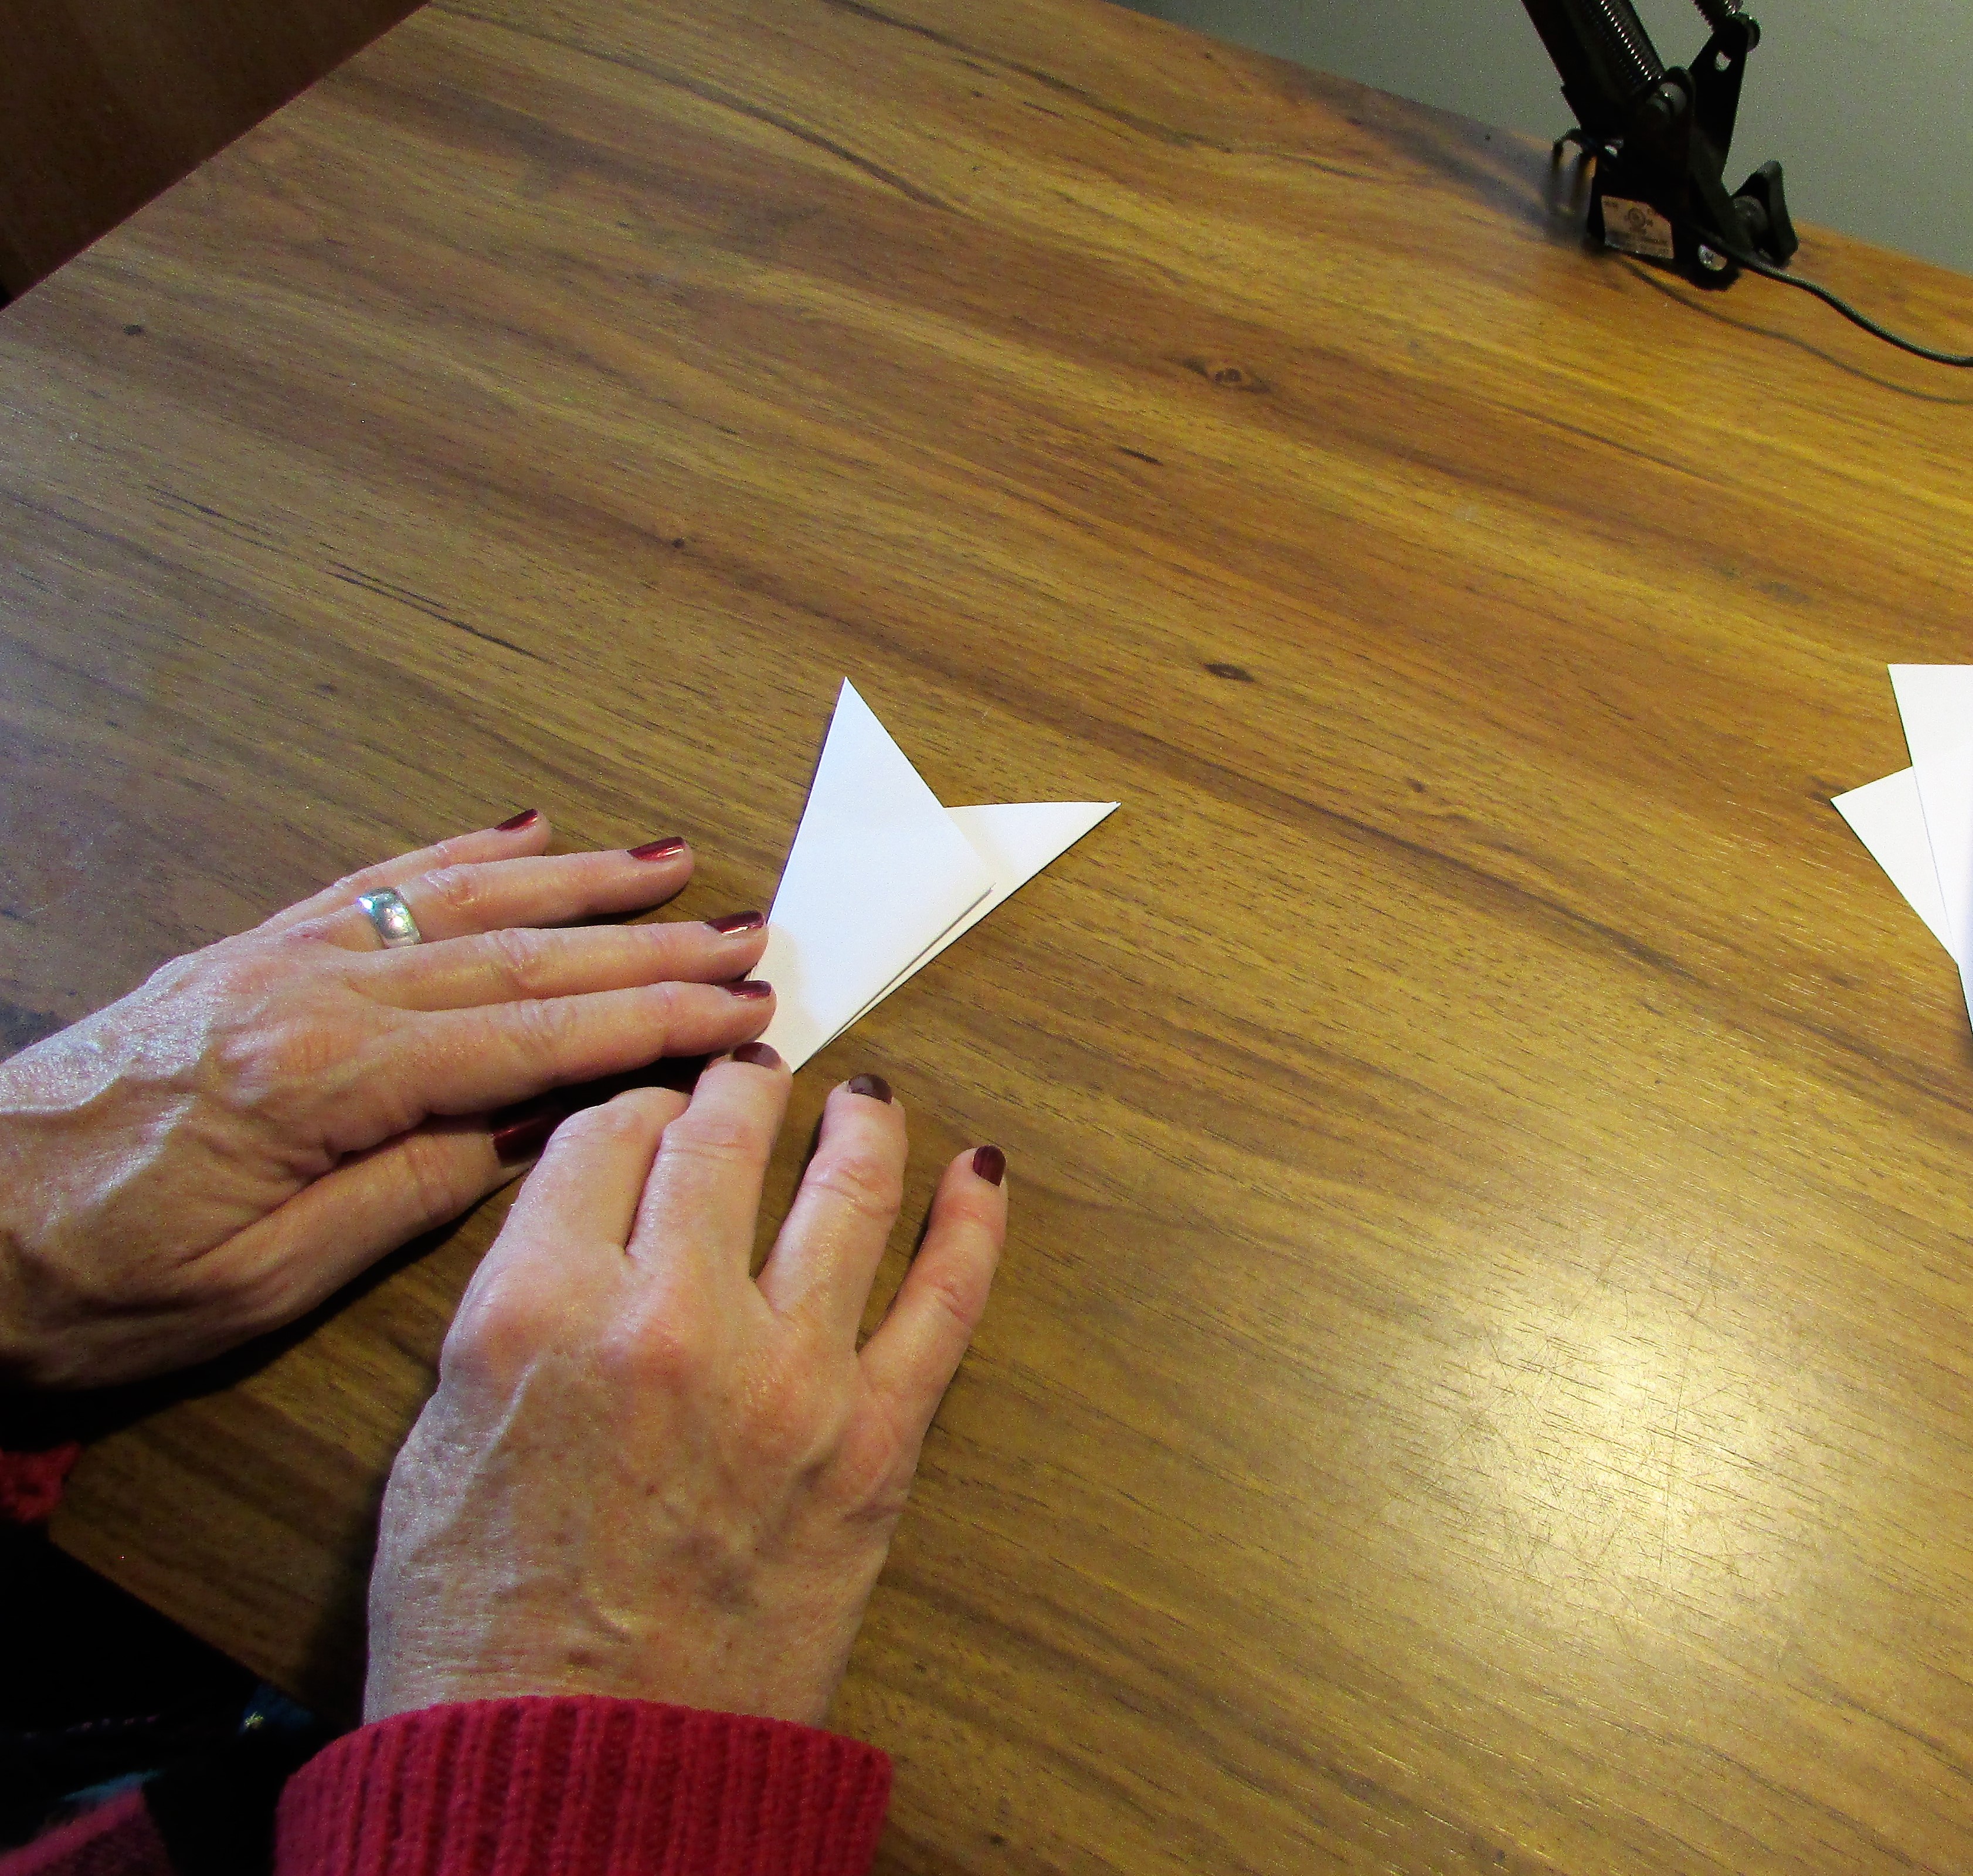
This next part is a little tricky. Let the longer side of the triangle face away from you. Bring up the right corner and fold it about a third of a way from the middle. Turn the paper over and repeat this step. You will have an accordion folded piece of paper with two bunny-type ears if you have folded it correctly. If this step is confusing watching the video at the bottom of the post will help.
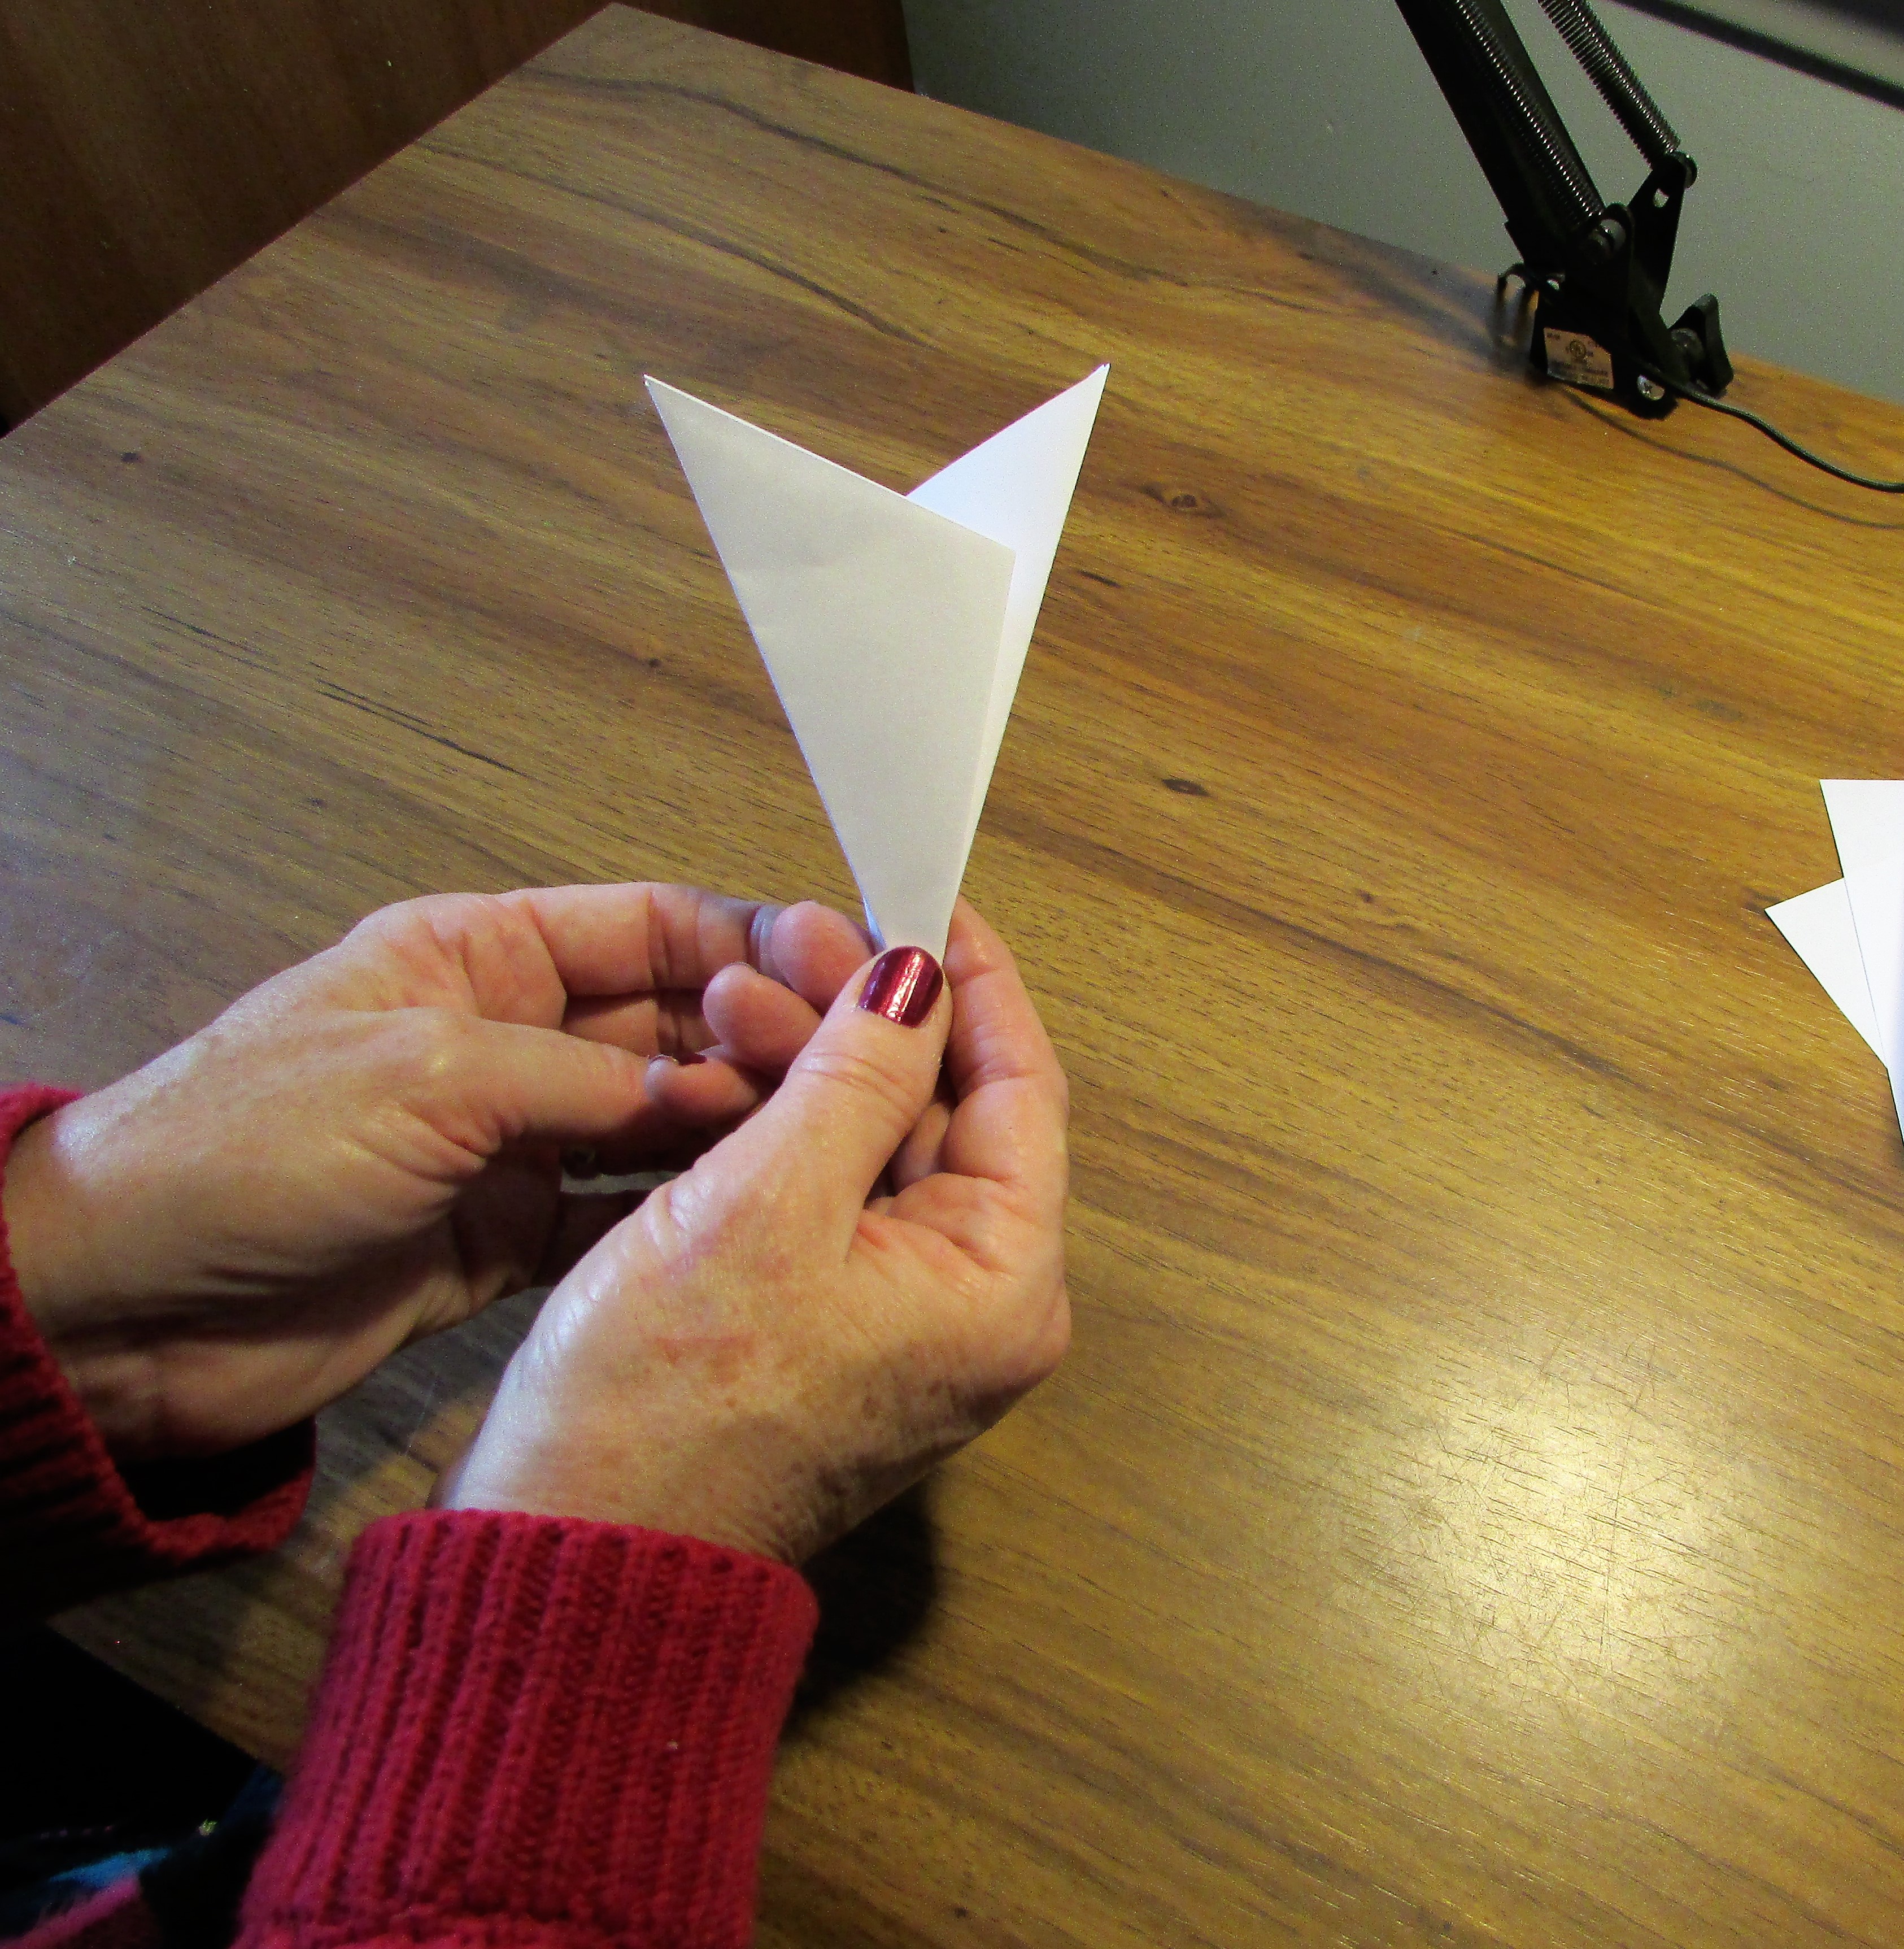
After I fold the triangle into this shape, I trim the ‘ears’ off leaving a cone shape. This does not have to be perfectly rounded, you will be cutting into it.
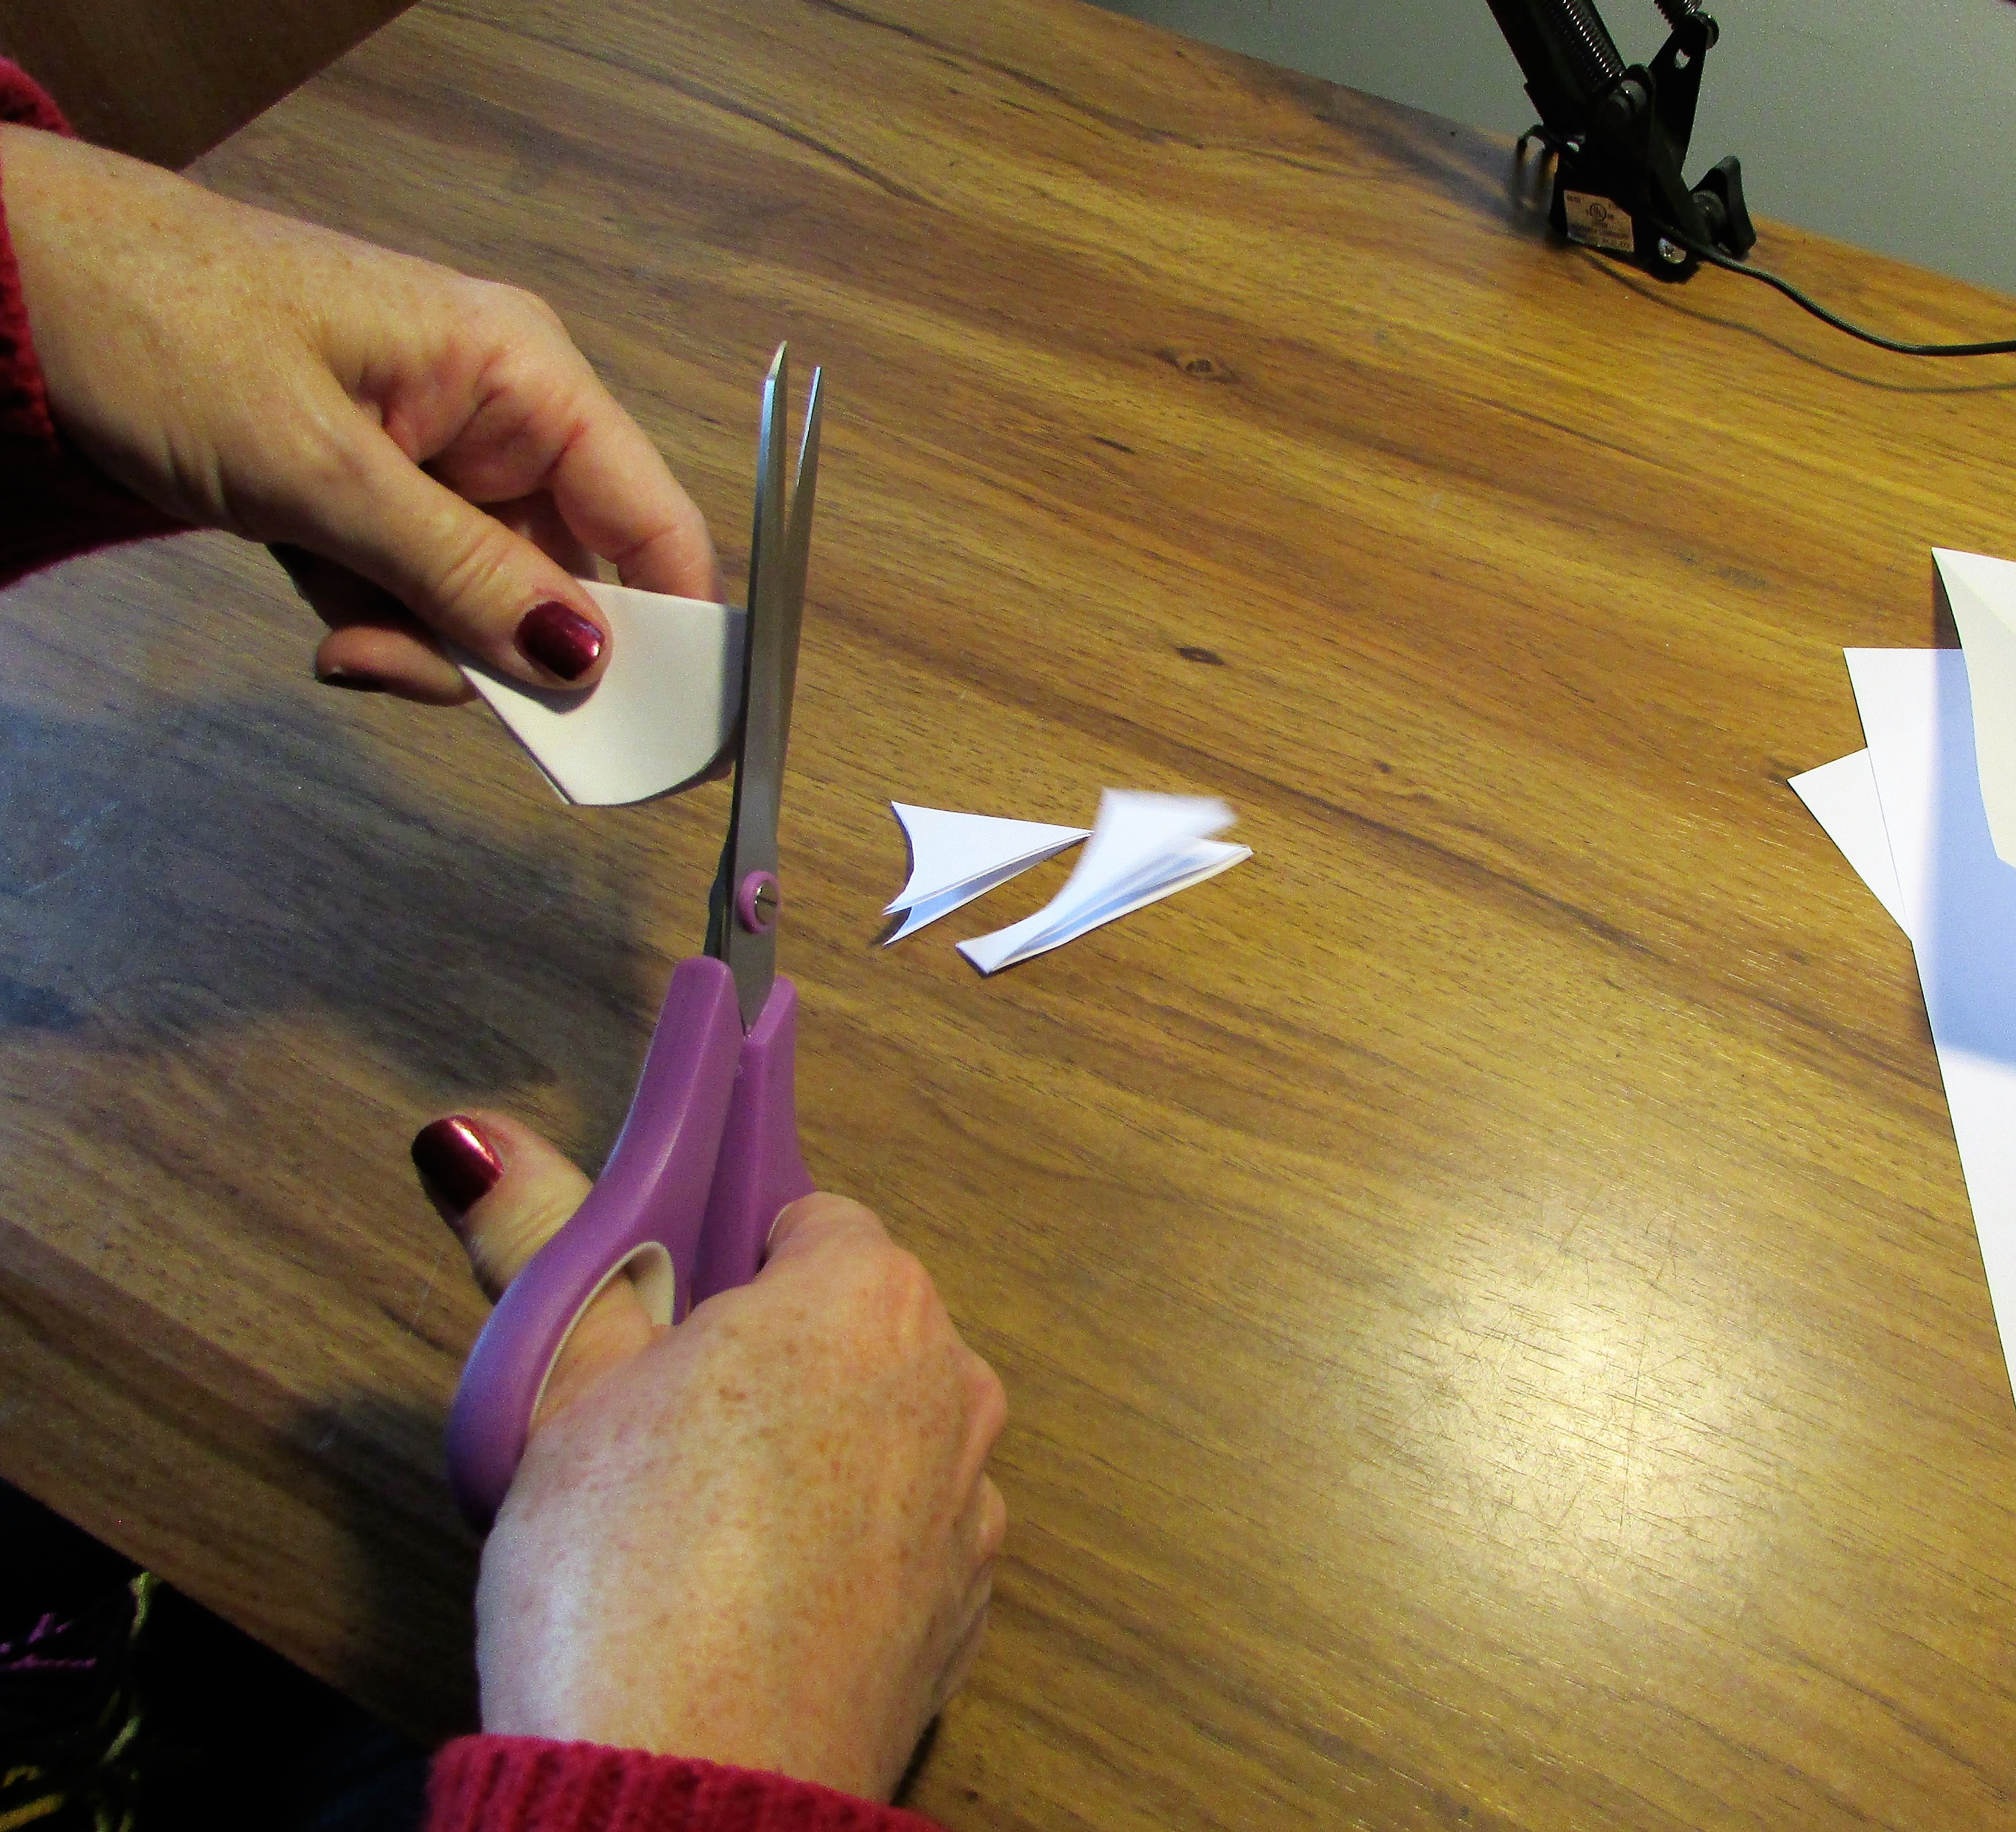
* Important * You must always leave a bit of the folded sides intact to keep the snowflake whole. Don’t worry if you accidentally cut one and have it fall to pieces…it’s only paper after all.
Begin cutting your snowflake. Try to use both rounded cuts and straight snips. The combination of round and straight will give your snowflake a natural look. After cutting, open up, and prepare to be amazed by your beautiful handiwork.
I might be slightly stretching the challenge subject of passages/paths to consider walking alongside the ocean and bay a pathway, yet my way has a water border and dry sand on the other side. I walk on the wet, hardened area swept over by the waves. On further reflection, I think of walking along the ocean, a definite path.
The first photograph is one of my favorite places, Fortescue, New Jersey, along the creek that flows into the Delaware Bay. This area is a popular spot to fish. Again, I found the photograph quickly because it is set aside as a scene I would like to paint.
Another favorite area is Strathmere, New Jersey. We walk to the point across from Corson’s Inlet State Park. The beach has large cordoned-off areas for the shore birds that raise their young in the sandy stretches beyond the reach of the waves.
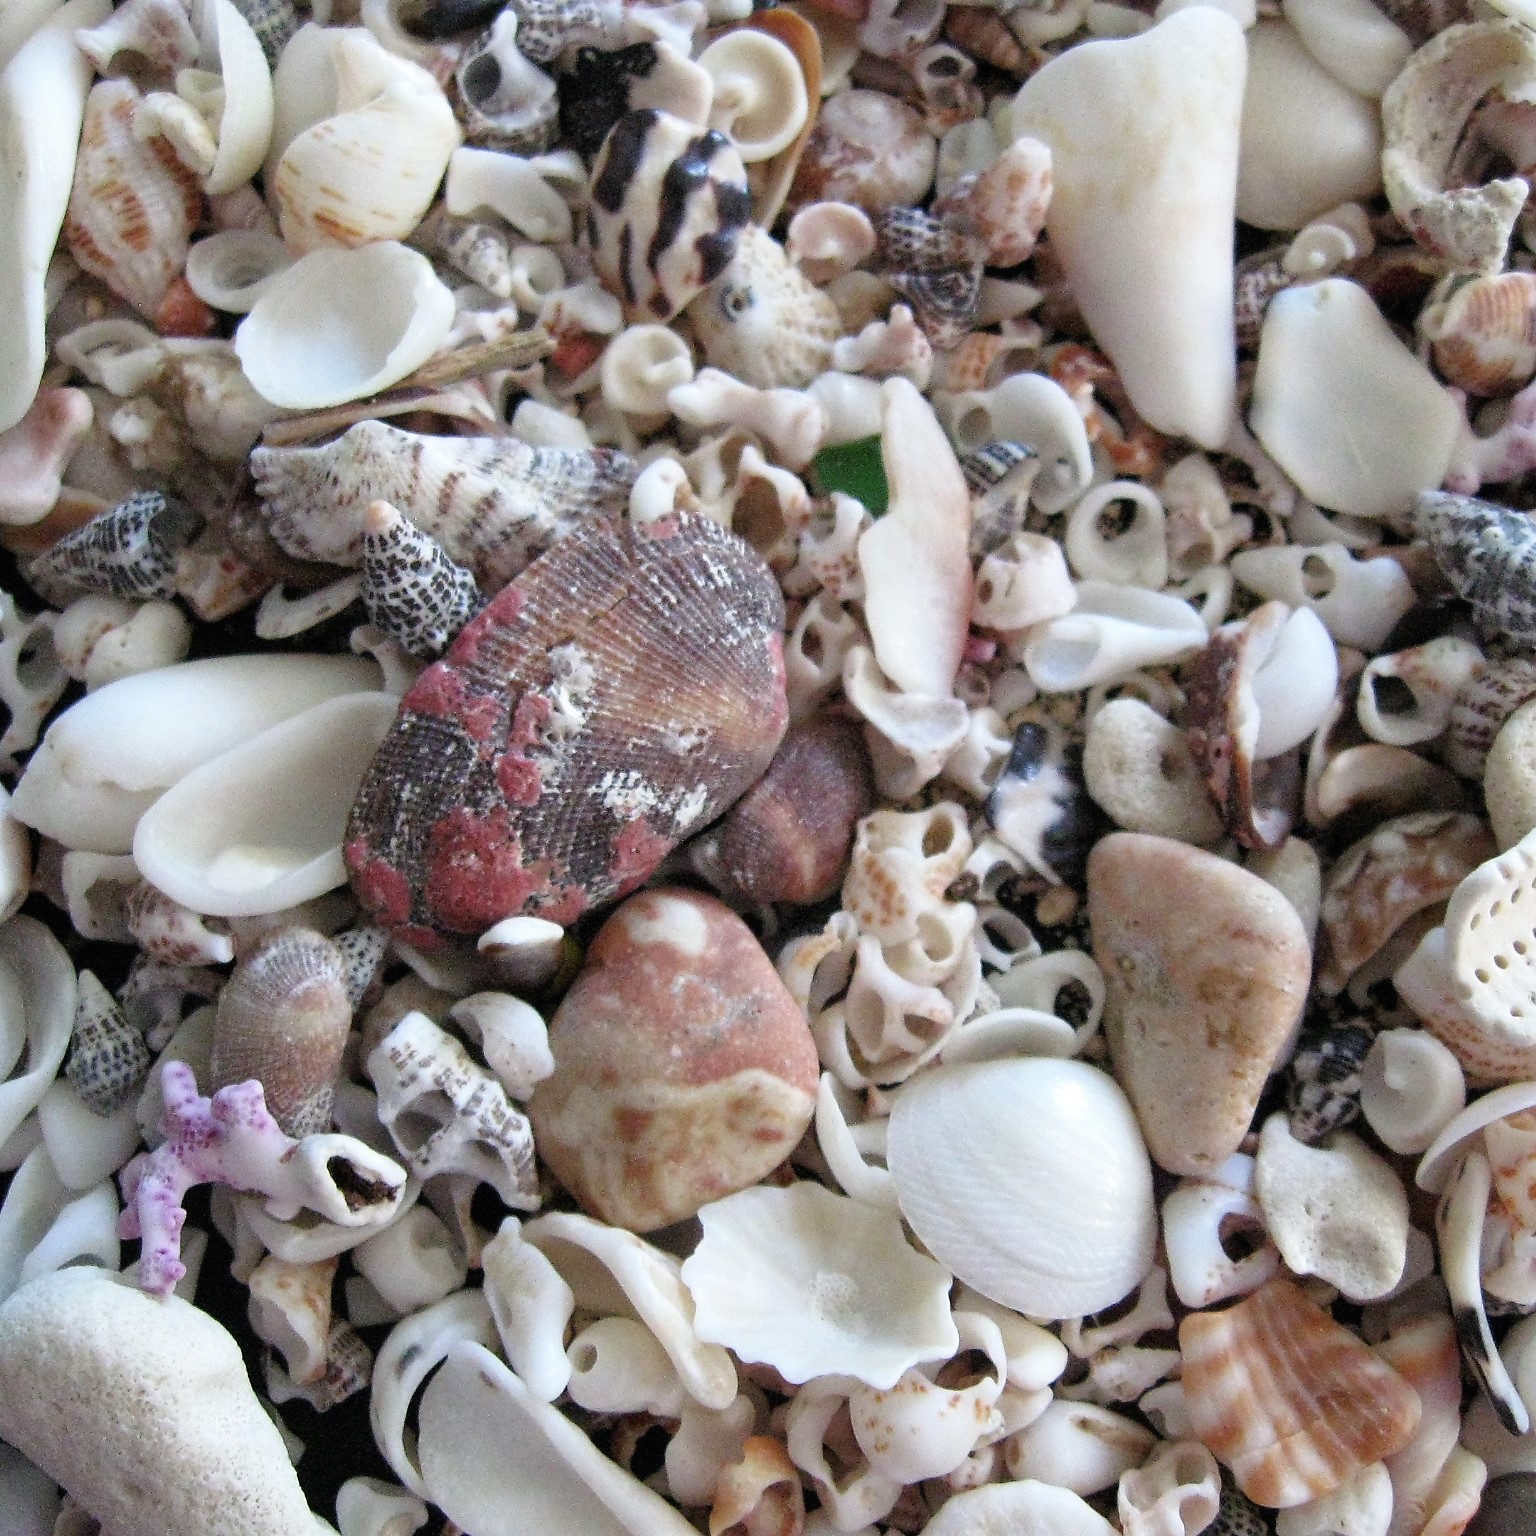
Whatever beach I visit, I collect an assortment of ocean treasures. I keep them in baskets and jars, paint them, craft with them, and have them in my living room as decor. Today, I created a decorative basket with a few. I especially like the piece of seaglass on the front. I found the glass with the small oyster shell firmly attached. I imagine that oyster had quite a whirlwind life while it was alive, tossed around in the waves with its piece of glass host. The small shell included on this piece is a cat’s paw collected on Sanibel Island.
On the subject of Sanibel, I’m including a clip of one of my favorite YouTube Channels: SWF Beach Life. This clip includes Sanibel Island. I love her channel; it is so relaxing and fun to live through her as she gathers beachy treasures. On a scale of 1 – 10, I give this YouTube channel a definite 10. If you feel stressed, or are just interested in seashells, check out this channel.
I enjoyed a quick walk on this second morning in January. The air, crisp with cold, was stimulating, waking me up and opening my eyes to the beauty in the winter landscape. The limbs and twigs of the trees against the chilly sky are God’s sculptures raising their arms toward the heavens. I could almost imagine them beginning to sing.
I searched for dandelion cones with fluff emerging from their tips. I am partial to dandelions; in fact, I have named 2024 my year of the dandelion. I want to be as productive and as resilient as this beautiful plant.
What do I love about dandelions? Perhaps it’s the color and shape. The flower reflects the Sun. I admire the resilience of dandelions. They will bloom wherever they can and grow lushly, even within the cracks of the street and sidewalks. Just today, I photographed this determined plant thriving in the smallest of spaces between the curb and the blacktop. I have read recently that one dandelion plant can produce up to 2,000 seeds. I hope to be as productive as the dandelion and spread as much GOOD NEWS as possible.
Here’s a fun project to do with children. You can string the unopened pods of dandelion seeds onto a piece of thread, and within 24 hours, they change and open up into perfect spheres. It’s so easy, and if you choose the right place, they will reflect the sunshine and glow and bring a touch of magic into the room. The photos below show the process. So much fun!
The candy is light enough not to break the string but heavy enough to give it a bit of weight. I love bringing a touch of whimsy to winter days.
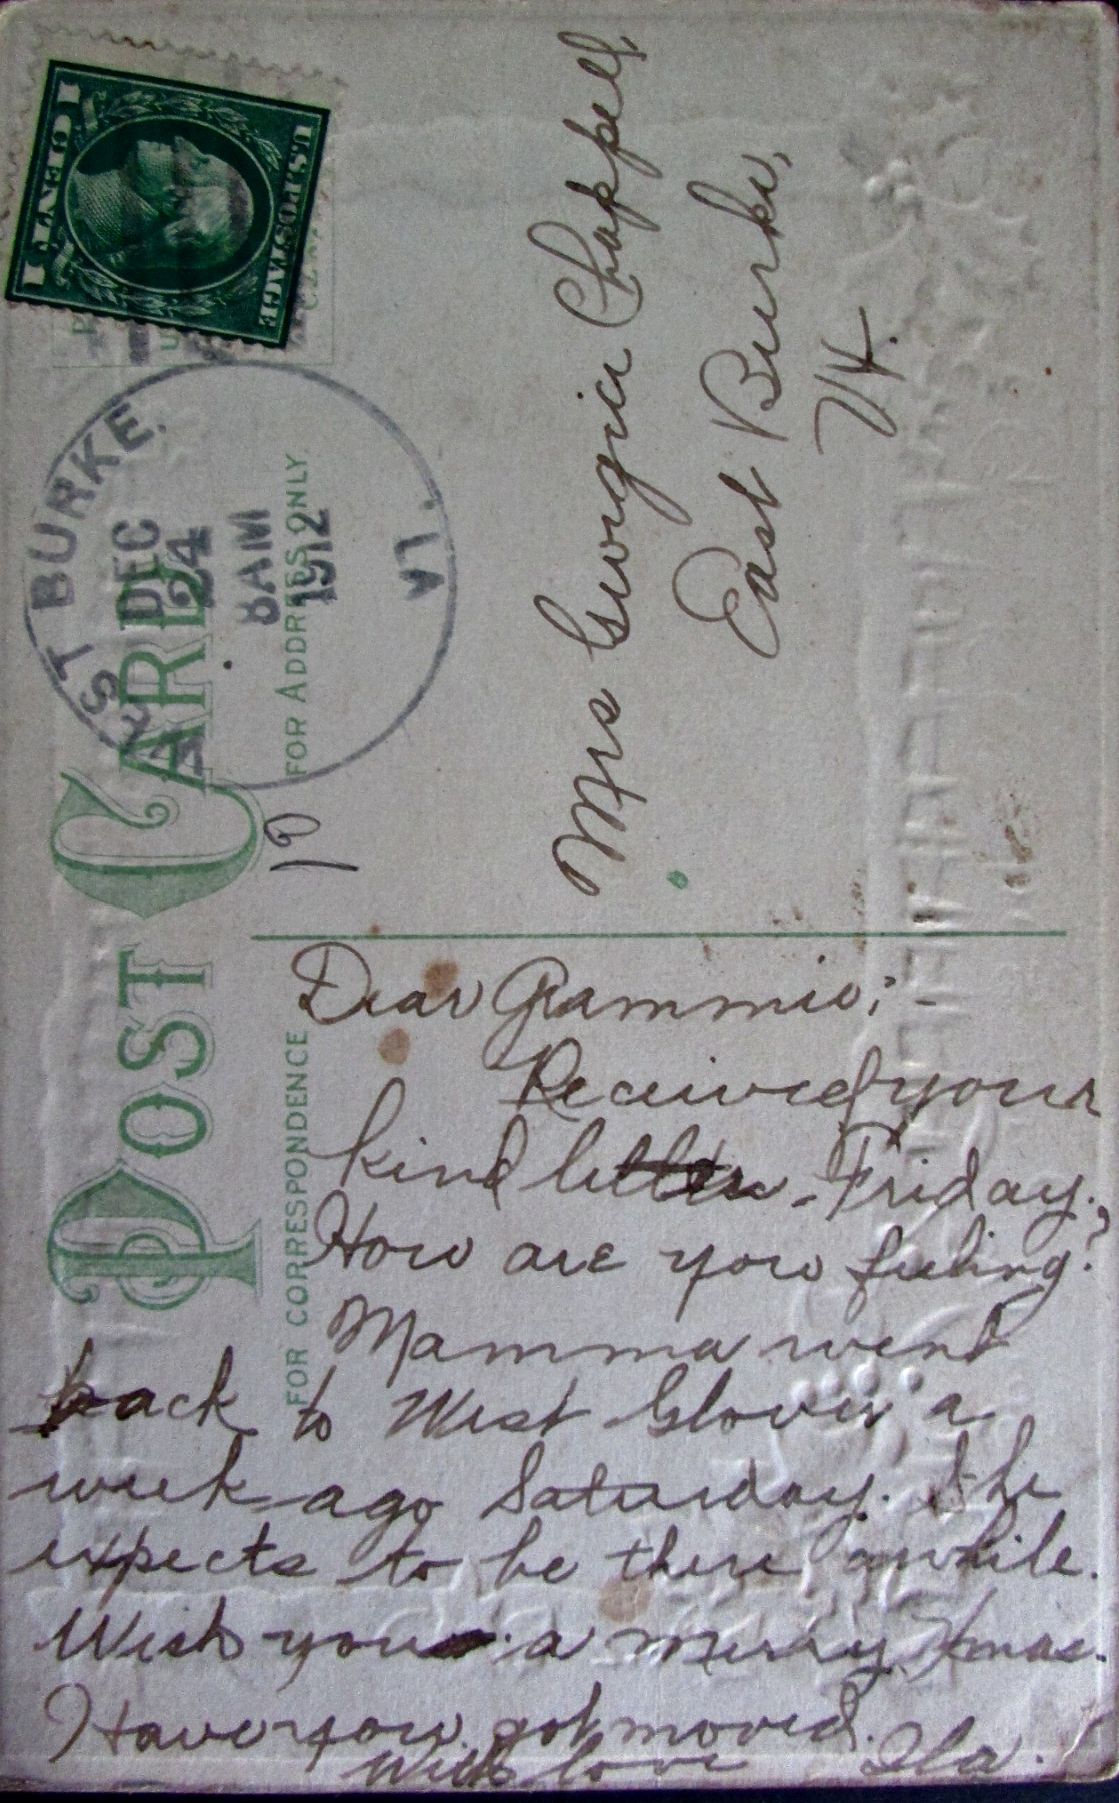
I enjoy finding ways to display my vintage postcards. I searched my file box and found over a dozen Christmas or New Year’s themes. The artwork on the postcards is often exceptional. However, they range in age from 100 – 120 years old and must be protected from too much exposure to light.
I used some cardstock I had on hand and cut it to 4.5 x 6.5 inches, giving me a half-inch border around each postcard. Glue and tape are definitely banned from attaching the postcards to a display. Instead, I used a paper trimmer and made small slits near the corners. I then gently inserted each postcard in two of the slits, creating a double-sided display for two postcards on one piece of cardstock.
A piece of twine attached through small holes is enough to keep such a featherlight piece of vintage art in place.
I’ll leave the display out for about two weeks, then place them in their file and back in the dark closet. It’s fun to take them out now and then read the old-fashioned, cramped messages. I enjoy daydreaming about the people who wrote them and imagine what course their lives might have taken.
We’ve had fun hiding the decorated shells over the past few days. On the weekend we went to Red Bank Battlefield in National Park and hid two shells, One in this cannon, another on a stack of cannonballs. I think both were most likely found, but only one was posted on the Jersey Shore Shells site. I was thrilled it was found, most likely by two small children we saw playing on the cannon later that day.
After the battlefield we walked beside the Delaware River and hid a pressed flower shell on the steps leading up the bank.
I also hid two shells in Fortescue while my husband fished. One was found and posted, the other on the sand was probably found too, not everyone who finds the shells posts to the Facebook group. That is okay with me, just the thought of someone feeling happiness when they find the shell is so worthwhile.
I’ve created a few more this week, I must admit, while I should have been doing chores. I am especially enjoying using pressed flowers with them. I found some decorating kits on sale for only $2.00 at Michael’s Craft store this week. Oh happy day! More fun on the way. Grandchildren and creative adults will be here on Sunday to celebrate Father’s Day. I’m going to have shells and decorating supplies on the tables for anyone who wants to paint and glue.
If you want to join this group, or just lurk a bit, the group is public: Jersey Shore Shells
Tomorrow, I will hide at least two of these shells, decorated with decoupage and pressed flowers. I belong to a Facebook Group called Jersey Shore Shells. I had so much fun painting the outside of them white and decorating them. On the back of each shell is a little laminated piece of paper with this message-
HELLO! I’M SO GLAD YOU FOUND ME…KEEP ME, OR HIDE ME AGAIN, WHATEVER YOU CHOOSE TO DO WITH ME IS PERFECT. IF YOU CAN, POST A PHOTOGRAPH OF ME AND WHERE YOU FOUND ME ON FACEBOOK GROUP: JERSEY SHORE SHELLS. THANKS.
I will update with part two after I hide them tomorrow. Maybe I will hide all four, maybe just a couple. So much fun. To answer your question, yes, the shells came from the Jersey Shore, a little town called Strathmere, between Ocean City and Sea Isle City. Although, they are from the Jersey Shore, they can be hidden anywhere.
Broken Bits Part 1demonstrated how to create a necklace out of small pieces of shell that are broken or have a small hole in the middle. I still have cups and bins full of very similar pieces. Another way to use these bits, and other small shells, is to make an OCEAN portrait with them. In this case, a heart filled in with bits and bobbles from the sea.
A glue gun was my method for attaching the shells. It was quick, relatively painless, and was ready to hang as soon as the last shell was in place. Goop glue, would have been a good choice too, but it takes a long time to dry, has a strong (perhaps dangerous) odor, and is expensive. The downside of the glue gun is the fact that I will be pulling spider web type strings from the finished heart for years.
I have gone back to the project after I thought it was completed and filled in gaps. I also found I enjoyed placing a double layer of shell or sea glass in some spots. Most of all, it was so much fun, and almost free.
What do you do with the broken bits in life? Sometimes you can make them into something beautiful.
In Jamaica, I found so many broken bits of shells. Not much in the way of intact seashells make it onto the beach in Montego Bay, but, being a bit of a scavenger, I had an idea. Why not fashion these bits of shell, many with a ready-made hole, into a necklace? A year or two ago I did just that!
Of course, when I returned to Jamaica in March of this year, I gathered even more. I will update when I decide what I make next.
Cee has the topic SMALL for her Fun Foto Challenge. I thought these bits and pieces fit right in.
Over many Christmas seasons, I created several of these small trees with my mother. In fact, the first trees we created were from an idea she had seen and mentioned to me as something we could do together. Precious memories. Thanks Mom, I miss you.
To create the trees, you will need:
Wet Floral Foam, moistened as per directions on package
A knife, or as I used, an old credit card
A waterproof container, heavier and smaller than the foam works best. If the container is larger than the wet foam you will need to anchor it in with some type of waterproof tape.
Evergreen cuttings, holly, other greens still alive outdoors. Cut a larger amount than you think you will need cut into 3 – 4 – 5 inch pieces, too much is better than running outdoors in the middle of the project to cut more. The list of greens I used: pine, myrtle, holly, ivy, butterfly bush, unknown evergreens, ground pine, and nandina.
Optional: dried flowers, beads, glitter, etc.
I used dried flowers with mine, strands of green beads, and small twigs lightly touched with glitter glue.
This is a throwback post, and also a craft that’s been around for countless years. Since the time of paper and scissors, adults and children alike have been cutting paper snowflakes for windows and gift packages.
I cut over a hundred every year for my windows. I’ve included a how-to video with this post, but I have tweaked my snowflakes over the years, and want to share a new tip or two.
The most important tip I want to share is to cut many different sized snowflakes. The snowflakes on my windows look more interesting if they are not uniform in size. I use squares of computer paper cut into a variety of sizes, four inches to eight, and everything in between. As long as you have a square and do the folding correctly, your snowflakes will be a success.
As always, the best way to store paper snowflakes is inside a book until you are ready to use them. Here is a true story and a tip too. Write down what book you place them in and where that book is kept. I lost dozens and dozens of finished snowflakes a year or two ago. I found them months later in the “safe” place I had stashed them.
To finish off the snowflakes, press them between sheets of wax paper with an old iron you reserve for crafts, or to preserve your iron and board, encase them in several layers of newspaper and press them in wax paper. When you pull the wax paper away, your snowflakes will have a protective layer of wax to keep off the condensation winter windows often form.
As I related in Cladonia cristatella Part I, I searched for British Soldiers in hopes of creating a gift for my friend Sherry. I planned to encase the British Soldiers I collected, along with pressed Queen Anne’s Lace, in resin.
Instead of the two-step pour and mix variety, I chose the softer, one-step product. I purchased Blue Moon Studio charm molds, UV resin, and a small UV light from a local craft store. The products were expensive, but I was lucky and found them on sale.
The directions in the package were simple. When followed, they yielded perfect results. The resin, as indicated, dried in two minutes under the UV light. One plus was the ‘on’ button on the UV light; when pushed the light stayed lit for only a minute. This helped me avoid over-drying the resin.
The charms popped right out of their molds. Beautiful! I couldn’t believe I crafted something so tiny.
I gave the charms a bit more time in UV light and placed them in natural sunlight for a few hours. One final thought on finishing the charms. After I placed jump rings in the hole created by the mold, I strung the charms on a polyester necklace.
The polyester retained wrinkles from the packaging. I dampened the strand and hung it on the clothesline with a large weight. This straightened the necklace out in a few hours.
My tips after using Blue Moon Resin Products:
When I first tried to pour the resin from the bottle into the molds, I could not get the product to flow.
Why didn’t I remember most liquid in bottles come with an inner seal? After a bit of frustration, unnecessary squeezing, and muttering to myself, I took the cap off, felt sheepish when I saw the seal, peeled it away, and of course, no problem at all afterwards.
I did wipe the interior of the molds with a bit of rubbing alcohol before using them.
Tweezers are a definite must for placing the Cladonia and Queen Anne’s Lace in the poured resin.
I would never use the resin indoors as it dries under the UV light. Even on the porch, the smell in the air became noxious. Next time, I will be aware of the strong odor beforehand and move away.
I wish I remembered to thoroughly examine the poured resin before curing. After drying, I discovered a few trapped air bubbles. The directions state you can pop air bubbles with a straight pin before curing. When cured, they are a permanent part of your project. I plan to have a magnifying glass at the ready when I create my next project, and of course a sharp pin at the ready to pop those bubbles.
Shiny metallic paint and glitter prompt me to create Christmastime art. This year I came upon a paint by FolkArt called Color Shift. I’ve been pleased with FolkArt paints in the past and Color Shift did not disappoint me.
The area above my Christmas village needed some color. A quick Christmas painting was my intent. I painted the background bluish-black to depict a nighttime sky. After the background was complete, I realized the composition needed something to break up the darkness by accentuating the outer edges. I didn’t want to spend a lot of time fiddling around with a complicated border. Hmmm, what to do?
Stenciling, or printing with an object seemed a good idea for a quick border. Outdoors on my lawn lay exactly what I needed, fallen leaves from my Bald Cypress tree. I also gathered a few ‘holey’ oak leaves while walking around the neighborhood. More on that later.
The Color Shift paint worked perfectly. Fluid enough to fill in the lettering without clumping, yet thick enough to dip my Bald Cypress leaves into for printing. (The paint looks a bit faded in this photograph, but it is only intense sunlight beaming across my work area.)
I needed a randomness of mind when I painted the stars. This is an artistic area I struggle with when painting. I find I quickly become uniform in design when painting a large amount of subjects such as stars or dots. The oak leaves came to my rescue and forced me to leave left brain logic behind and create with the bold randomness of the right side of my brain. I used the holes of the leaves to paint the stars. The pattern on the leaves, created by hungry bugs, quickly depicted the scatter of stars I wanted in the background. I’ve used this technique in the past and once again I found success using leaves as a stencil.
I also indulged the child within me and glittered the trees, top to bottom, with glittery balls and stars. The glitter, very fine in texture and easy to use, was found in the local dollar store in gorgeous colors. So much fun. This project was easy and under twenty dollars. The Color Shift paint was a bit pricey, but any other metallic paint could be used in its place.
At this time of year many farm markets are closing down until Spring. After the pumpkin and Christmas tree season is over, large gourds are on sale for next to nothing in our area. Recently, I bought two large goose neck gourds, and one apple gourd, for $1.00 each.
I already have two bird houses created with gourds hanging in my garden. If you look closely, you can see the swirl of twigs inside, brilliantly constructed by small birds.
I’m not sure if the babies made it to maturity. There are small chipmunk/squirrel bites around the entrance. We also had a wily black snake in that area of the garden this year. While I was happy to have the small rodent population kept in check, I once caught the four/five foot long snake hanging out in the pine trees. From that vantage point it would have been possible to get into the gourd bird houses. I will have to come up with a solution to the snake and chewing problem before the birds begin building nests again. (I’ll make sure to update with any results I find.)
I use bath puffs to hang the gourds for drying. When you cut the inner tie the puff opens up into a long tube.
Knot one end of the tube. Place your hand over the stem as you slide the gourd into the tube or the sharp edge will create holes. Knot the other end of the tube and hang your gourd on a hook outdoors. It will become moldy on the outside in a few weeks, and begin drying on the inside. This is normal.
Dried gourds are a natural and inexpensive material for creating crafts of all kinds. If you find a good sale give bird house-making a try.
The first rose to bloom in my 2021 garden was ‘Blue Lagoon.’ This beautiful rose is one of my oldest bushes, and is so large, I have to trim it to keep it off the back wall of the house. It is very disease resistant, and best of all, the flowers are sweetly fragrant.
The fragrance makes it a perfect choice to add to my Grain Alcohol Springtime blend. Last year, I wrote of using Vodka to extract the fragrant floral oils from flowers. I had a bit of success, however, the immediate results of using the higher proof Grain Alcohol has been truly exciting. Unfortunately, the color of the petals is also extracted. At this time, because of the mix of many colors, the Grain Alcohol is a muddy brown, but the scent, oh my, the scent is sublime.
I only use flowers that are edible, or that I have researched as non-poisonous. There are some beautiful fragrant flowers that I don’t use. Lily of the Valley is an example of a fragrance I like, but the plant is toxic, and isn’t something I want to take a chance with in my extraction. Skin can absorb the oils in the extraction so anything that is edible seems to be a safer choice.
The pink of the petals will disappear in two days. The fragrance in the flower will transfer in the same amount of time. I’m eagerly awaiting the blossoming of honeysuckle in our area. I will work on this jar until the end of May and then begin a ‘Summer’ jar of fragrant flowers.
This week my grandsons and I created stained glass Easter eggs from waxed paper and crayons. The process mustinvolve the participation of an adult.
SUPPLIES
To start, I tore away the crayon paper and chopped them into bits with a large knife, much as if I was chopping nuts. The crayons chop easily, but also fly about a bit. Children can create their own crayon bits by tearing away the paper and sharpening the crayon into fragments. This method takes quite a bit of time. Since I planned on creating three dozen eggs it was easier for me to prepare in advance.
Egg cartons are the perfect container for the chips.
I used a cookie cutter as a pattern, several egg patterns can be found at this link: Egg Patterns. Our eggs are about six inches in length. This was an easy size to handle and large enough to display the colors and patterns.
In retrospect, I wish I had traced with something other than a marker, but can’t think of what might withstand the heat of the iron and still show up for cutting. The process causing a bit of steaming and light smoke to fill the room. It’s a good idea to have some sort of ventilation when you begin (kitchen fan or a slightly open window) If anyone has a good idea for tracing please let me know via the comment sections below and I will edit the post to include your ideas. Thanks!
The boys scattered chips of crayon into the pattern with small measuring spoons. It’s best to limit each eggs choice of color to three, any more than that and you get a muddy look.
An adult needs to complete the next step. Fold over the waxed paper or cover with another sheet. If you are using a good iron cover with newspaper. Since I used a craft iron that is specifically used for messy crafts, I ironed directly on the waxed paper so I could see the progression of the melting. Here’s a step by step look at the bits melting into the finished design.
At this point lay the egg aside to completely dry. This only takes a minute or two. When it is cool and the wax hardened, cut the egg out with scissors.
I hang my eggs by using glue stick on the back and placing them directly on the windows. The glue dries clear, and upon removal is easy to wipe away with a wet washcloth before cleaning your windows with Windex.
We found using a large amount of chips equaled a vibrant, colorful egg. To create a more pastel appearance, such as the last egg featured below, use less chips.
Here a few samples of our Easter eggs. I hope you will give this beautiful craft a try.
Dollar Tree still has dozens of hair ties. You can also substitute rubber bands. I can sew, but with everything I am doing in the garden I’d rather not. This is a great tip for making a stand-in mask during the Covid-19 crisis. You can use a bandana or fabric if you have a stash on hand. Even a shirt, cut into a square, a sheet, or a pillowcase…any type of covering is better than nothing…and remember…wash after just one use to get rid of germs.
The weather has warmed up. The birds are beginning to nest. It’s time to create a few birdhouses out of the gourds I’ve been drying throughout the winter.
I bought two large varieties in late Autumn, and grew the small one myself. They hung from my porch rafters through the colder months and grew some interesting molds on their surfaces. After brushing them with a light bleach solution, and leaving them in the sun for a few hours, I began my crafting.
I cut a small hole with a craft knife, pushing it in carefully at tiny intervals. Removing the seeds was easier than I had anticipated. I used a paint paddle, swished inside a few times, and all the seeds and fluff fell out. Two holes at the top were easy to drill for the hanging wire. I also drilled several small holes in the bottoms to allow any collected rain to drain out. To stop larger birds and squirrels from raiding the nests, I used my glue gun and glued a border of pennies around the opening. I like the way the copper sets off the color of the gourds.
I placed one birdhouse on a tripod of sticks near my back window, two are hanging on thin twigs. I am hoping the close proximity of the house, and the thinness of the twigs will keep squirrels from tampering with the houses. I’ll update later in the season.