Projects – Milk Carton Greenhouse

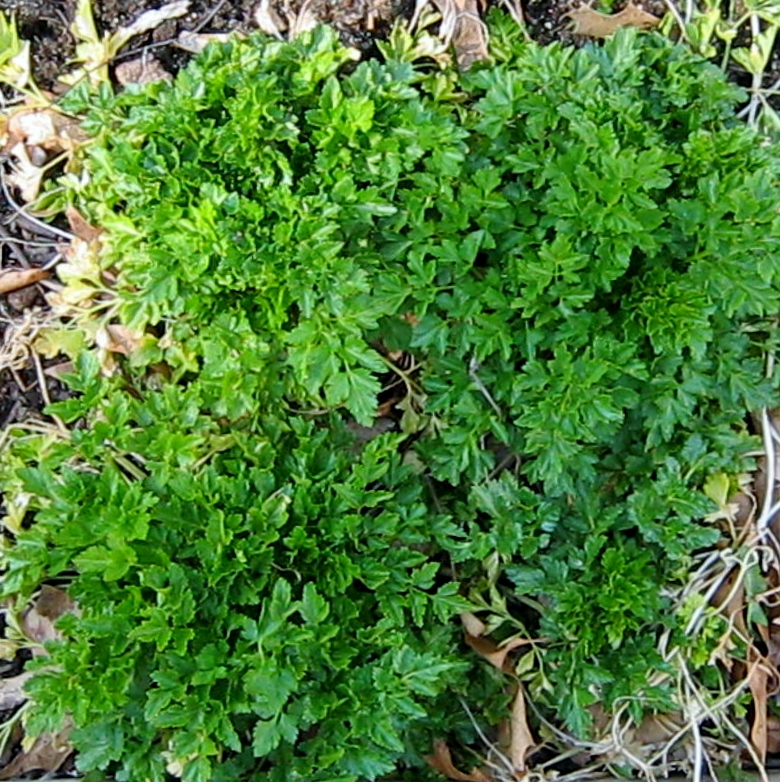
I’m re-blogging this post because it was a successful project. The lettuce grew on all through the winter, and while I didn’t eat many sprouted leaves mid-winter, it grew luxuriantly in the early days of Spring. The leaves were ready to harvest and eat before any other lettuce I planted. Black-seeded Simpson is one of my all-time favorites. The flavor is excellent and the color is gorgeous, a beautiful lime green.

Today, as I washed out yet another milk carton I wondered if I should use it or recycle. Recycling lost out as an idea formed. I cut the bottom of the carton off and decided to use it as a cloche. I found some unused seed, Black Seeded Simpson Lettuce, and went out into the garden. I cleared away some leaves, set down a one layer square of a paper napkin as my guide, and lightly sowed the seed. I also added a bit of organic potting soil beneath the napkin and lightly covered the seed with the same. A little water, the carton pushed a few inches into the soil, and the project was complete. From idea start to finish less than a half hour spent.

I added a beautiful beach rock to the top to hold it steady. Now, we’ll see how it goes…hopefully in two weeks or so I can use the sprouted leaves in salad, and in a few weeks more harvest the larger leaves. I’ll keep the blog updated.

Project – Rock & Wire Display

IMG_8617

This is a fun and easy project for children or adults. If you have a favorite rock on hand use it to display photographs, postcards, a favorite quote, or as I did above, craft a few letters to celebrate the season.

Directions:

Cut a piece of wire to about 12 to 15 inches.  I used some copper wire I had on hand. Remember the end of wire is sharp and can easily puncture your skin, take it as fact from someone who has done so many times. 😦

Choose your rock. I had several beach rocks on hand, I sprayed them with a glossy layer first, and then wrapped the wire around the bottom and twisted to secure. When I was sure the wire would hold on, I twirled the remaining wire around a pencil. When I reached the end I turned the last two swirls upwards and pinched them together. Voila, a perfect photo display holder. This is easy enough for children to do. A pipe cleaner would also work for very young children. Fun!

Projects – Pressed Leaves

Blog Leaves

It’s not too late to press a few Autumn leaves for crafts and Thanksgiving table scatter. They look lovely hung from mantels or chandeliers. They make great place cards. Write the names of your guests on them with metallic felt-tipped markers. Encase within pieces of glass, seal edges with copper tape or decorative duct tape and use as trivets for your holiday table. Have fun!

Project – Photographing Spider Webs

blog 029

Spider webs photograph well in the subtle light of morning sunshine.  A good way to highlight the silken strands even more is to douse the surface of the web with a fine spray of water. A cleaned out hairspray bottle works great. Larger spray bottles will have droplets that are too large, and their size and the force with which they are propelled will tear the web.

blog 043

Spider web with sprayed-on dewdrops. Lovely!

blog 051

Project – Beading a Blouse

beading 008

I recently beaded a blouse. Since I am only an occasional beader, there are a few tricks I use to make the project flow easier.

If you are creating a pattern, sort the beads into individual, shallow containers. Make sure the needle you are using is thin enough to go through each bead style. Since a touch of the thread could show at the ends of the beads make sure it matches the color of the fabric you are beading.

beading 003

It’s easier to get a perfectly spaced bead if you have a pattern on the fabric to follow. On my blouse I was able to follow the holes in the eyelet and get a nicely spaced beading row. Working on cotton fabrics is easier than attempting to bead slippery polyesters. Silks also look great with beading, but will mar a bit easier if you must remove a bead.

beading 002

Most important, start with a small project before you attempt something with hundreds of beads.

beading 001

Project – Mop Painting/Summer Fun

blog 012

A good outdoor activity for children is mop painting. Start out by purchasing inexpensive mops at the dollar store. Next you will need to round up some food coloring or other paints. Acrylics will work for older children, but due to the EXTREME messiness of the painting, a water soluble paint is a better choice for younger kids, opt for watercolors or washable tempera.

blog 014

Three colors are plenty, choose primary red, blue and yellow. These colors will blend and create the secondary colors.

blog 015

Gather three deep containers. Add water and large dollops of paint or food coloring. Combine the water and paint with the mops.

blog 023

Freezer paper is the perfect canvas. A large clipboard is a good choice for stabilizing the paper. If you don’t have a clipboard any hard, flat surface will do. Lean your board and paper against a pole or chair. Remember, this is a messy project, stay away from anything you don’t want to be splattered.

blog 027 - Copy

Now for the fun part, dunk the mops, drain excess water back into the container, and throw that paintbrush mop like a spear at the paper. Oh my, what fun we had creating these works of art.

blog 037 - Copy

Dribbling is also a great way to add paint. We found that the secret to beautiful paintings was to leave about a quarter of the paper white. Too much paint and all the pretty marbling and blending colors combine into an unattractive tan or brown.

blog 053

Beautiful! What a great effect. We decided our finished paintings would make terrific wrapping paper. I will iron it when it is dried out completely and roll it onto the cardboard tubes.

blog 048

Can you tell we had a good time?

blog 052

A final word of advice: have a place for washing off prepared before you start. A wading pool filled with bubble bath worked great for us.

Follow Me on Pinterest

Project – Seashell Mobile

OLYMPUS DIGITAL CAMERA

My cousin visited from out west this Spring. We spent a glorious day on some local beaches saving horseshoe crabs that had upended themselves and collecting sea glass and shells. I love the project she created with her finds, a seashell mobile, complete with a piece of ceramic turned into sea glass by the waves. I’m inspired! I was meaning to sort through my shells, but the thought of making one of these mobiles will give me a bit more incentive. So pretty!

myrna 002

Collecting shells and saving overturned horseshoe crabs.

A good friend drilled the shells for my cousin. Use a thin drill bit with any type drill you are comfortable using. Notice the wooden block beneath the shell. If you don’t wear glasses put on a pair of safety glasses. Use fishing line to put the mobile together. This is a great project for shells, sea glass and other beach finds you might have collected over the years.

OLYMPUS DIGITAL CAMERA

Peculiarities and Projects – Hanging Basket Hook

001

In the photograph above you might think you are looking at a typical hanging basket…and you are of course! Look a little closer at how the basket is hung and you might see the purpose behind this “Peculiar” post.

002

Yes, what you are looking at is a gigantic fishing lure. I found this a few years ago while beach-combing. After I carefully picked it up off the rocks of the Block Island coastline, I dropped it into my collecting bag. It hung alone from the rafters of my porch ceiling for a few years, a reminder of a happy day. This year, however, while looking for the ever elusive S-hook for attaching my hanging baskets to the chain, I came up with the idea to use the lure. It worked great, but just to be on the safe side I wound a bit of floral wire around it too. I’m very pleased with my unique hook!

003

Projects – Honeysuckle Tower Trellis

birthday boy 024

Years ago, in fact, twenty-two years to be exact, my youngest son and I cut thorny vines from our local woods to use in crafting wreaths. I was a stay-at-home Mom and often sold my pressed flower cards, and other natural woodland designs at craft shows. Since our Mid-Atlantic woods are over run with an invasive species of vine called Roundleaf Greenbriar, we made good use of the abundance and twisted them into wreaths. It is not an easy process, but since the materials were free, and ready-made wreaths expensive, it was worth the effort.

A good article about this thorny vine can be found here: Roundleaf Greenbriar

Most of the vines we used were between three to five feet long. This size is manageable to cut and carry home. We popped the long thorns off with our thumbs. (Yikes! I can’t believe we did this without gloves and have lived to tell the tale. If I make any in the future I will certainly wear gloves.) Once all the thorns were removed we twisted the vines into wreath shapes. They dry beautifully in the sun, rock-hard and quite durable, turning a lovely pale tan color.

birthday boy 025

I am trying to get rid of clutter around the house, and recently unearthed them again. I decided I must use them or throw them out. I found the perfect project! A unique trellis for my vining honeysuckle bush. I tamped three long bamboo stakes into the ground with a mallet, slipped the wreaths over the stakes, and pushed them down until the pressure held them in place. I am really happy with the way my tower turned out. I’m thinking of going back in the woods and gathering a few vines to make interesting  tomato cages. Where are my gloves? 🙂

Follow Me on Pinterest

Projects and Planting – Growing a Mango from Seed/Beginning

blog 006

Yes! It’s messy. Yes! If you’re not careful you might slip and cut yourself or the seed you are trying to extract from the Mango pit. Here’s how I prepared my mango seed for planting.

1. Find and enjoy a delicious and ripe mango. The variety I planted was a Champagne Mango. In my opinion the most delicious type of mango I have ever eaten.

2. Soak the pit in water for about 24 hours. As you can see I had several pits to use. Did I say I LOVE mangoes? 🙂

birthday boy 020

3. After soaking, I snipped a bit of the pit side with my pruning sheers, then zipped the edge away. I’ve also seen videos where people have cut the side of the mango with scissors. Either way, once cut or zipped, you must open the mango with your fingers. Be careful not to nick or harm the tender seed inside.

blog 008

4. I once again soaked the husked seeds and then potted them up in potting soil.

I have seen Youtube videos that tell you to plant the pit and wait for it to split and grow. This would be the more natural approach. I am hoping to jump-start the growth by removing the pit first.

Follow Me on Pinterest

Project – Simple and Elegant Centerpiece

001

My youngest grandson recently turned one year old. For the birthday celebration his mother created these ivy bowls as centerpieces with shells, glass pebbles and starfish. I think they are lovely and elegant. I am happy to have one to keep as a remembrance of the day.

Follow Me on Pinterest

Project – Salvaged Brick Planting

birthday boy 013

A few months ago while beachcombing I found this old, interesting brick. Sometimes when I find objects on the sand or in the waves I will take them home hoping that inspiration will eventually come to me. This time, I had a good idea as to how I would use the brick. Finally, I had the plants, the time, and the want-to to accomplish my project. I began by closing off the bottom of the holes with squares of screen.

birthday boy 015

I added potting soil and six portuluca plants. The plants pouted a bit at first, but even so, I was happy with the results.

Follow Me on Pinterest

Project – Plants in the Fishpond

002

Each year, I usually spend close to twenty dollars on pond plants. Often they are puny specimens, easily killed off by the cold, small, and overpriced. The typical price for water lettuce and hyacinths is over three dollars apiece. This year, not wanting to waste my money,  I gathered up every cutting I had rooting in water. I also raided the philodendrons I had in the betta bowls.  I ended up with a good variety: curly willow, coleus, spider plant babies, arrow philodendrons and the plainer heart-leafed variety. I potted these in plastic pots with a coffee filter over the drainage holes, a few large heavy rocks, and plain unfertilized potting soil. I added the rooted cuttings, covered them with more soil, and added an inch of sand on the top. I placed these in my pond on top of overturned terracotta pots. It’s been about two weeks and other than a bit of sunburn they seem to be thriving. I’ll update later in the summer.

Follow Me on Pinterest

Project – Flower pot with Butterfly

001

I love this precious keepsake my daughter-in-law created for me this past Mother’s Day.  She painted my grand-daughter’s toes and feet and pressed them to a terracotta flowerpot. “Voila!” A keepsake for Nanny. I love it!

Follow Me on Pinterest

Project – Scarecrow

I noticed a bunny last week calmly sitting inside the borders of my Square Foot Garden. Grrrr….I decided to create a scarecrow. First I used two fence posts and hammered them into the ground. I cut off the toe of a pair of black socks, padded the posts a bit with plastic bags and slid the socks over the bottom portion.

074

I twisted a tomato cage into a torso shape, and attached it to the fence post legs. An old peasant skirt easily fit over the bottom of the cage. 

078

I filled a trash bag with leftover autumn leaves. I used the bag to stuff the tomato cage torso.

080

An old Halloween decoration was the perfect topper for the torso and legs.

081

I covered the head with a plastic bag.

082

I covered the bag with a piece of flesh colored fabric duct-taped in place.

083

I slipped a stocking over the head to create a smooth surface for the face. An old shirt finished up the outfit.

084

Permanent markers made creating a face very easy and fun.

085

An old headband held the blue yarn hair in place. Ahem, no jokes please, the scarecrow is the one on the right.

086

She reminds my husband and me of Jamaica and San Andres. We named her the Rasta Raga Girl. I hope she lasts long enough to keep the bunnies, squirrels and chipmunks out of the garden.

090

A little secret. I used a few of my grandsons very, very wet diapers under her skirt to give her an authentic smell. Giggle…giggle. I had a lot of fun creating this sweet scarecrow.

Projects – Mushroom

099

I found this interesting green bowl at a yard sale this past weekend. I was immediately taken by the color and the petal-like quality of it’s edges. I thought of the empty concrete stand in the ivy patch. It once held a lovely birdbath, and then a gazing ball. I had hoped to make something new out of it and finding this bowl helped me achieve my goal.

blog 011

Isn’t it lovely? I am very pleased with the result.

Project – Repurposed Grill Lid

blog 007

When your gas barbecue has grilled its last burger or steak, repurpose the lid into a fire pit. Enclose the lid within brick or another fireproof stone. Make sure the top is level and fits the circumference of the lid. It’s as easy as that. Sharpen a twig and get out your marshmallows and hot dogs. Happy Smores to You!

Project – Birdhouse

boys and blog 020

When I hang a new birdhouse in my yard it is often filled by a nesting wren. I love wrens. After one has claimed the new house for a home the air is soon filled with trills, chattering and even scolding sounds when I venture too near. A week or two ago as I cleaned last year’s birdhouse, I noticed the seams of the roof had warped and widened. I knew if I left it in place the wrens would have to deal with a very leaky roof.

Blog April 052

Happily, my local craft store had a special on birdhouses, and since I have plenty of acrylic craft paint on hand, adding two new birdhouses to the yard only involved a few dollars and a bit of time.

Blog April 054

I was happy to see the bottoms of the birdhouses were attached with screws rather than nails. The birdhouses should be cleaned out before the start of the nesting season.

birdhouses 001

I coated the birdhouses with primer. In the past I have used acrylics on the bare wood, but I had the primer on hand and wisely used that first. I was pleasantly surprised to find that by using primer I only needed one coat of the more expensive acrylic paint.

boys and blog 020

I finished the houses and hung them in place by using four screw eyes on the roof and doubled floral wire.

boys and blog 021

Most important for me was protecting the entry to the house from gnawing predators. This has been quite a problem for me in the past. I hammered in a ridge of heavy staples around the edge of the doorway. This should discourage the attempts of the most feisty of squirrels or chipmunks.

Update: April 24, 2013 – SUCCESS! This afternoon I heard the singing  and trilling of a wren. Sure enough, when I investigated, all the “wren-talk” was sounding from the trumpet vine bush shown in the first photograph. I spied a wren perched atop the house with a small stick in her mouth…definitely nest-making material. O Happy Day! The new birdhouse will have a resident wren family. 


Projects and Plants – Update/Geraniums, Coleus and Tomatoes

Blog April 030

The geranium plants I overwintered in the cold garage are growing amazingly well under lights in my basement. Several of the leaves are full-sized in only three weeks of warmer temperatures and intense light. Hooray!

Original post and how-to found here: Geraniums Reborn

Blog April 026

The coleus seeds I carefully sowed with a wet pencil tip have grown well, and have never experienced damping off disease.

How to sow small seeds without waste: Planting Small Seeds – Coleus

Blog April 039

The tomatoes I sowed in recycled juice containers have also steadily grown in my back window. I thinned them out a week ago, and was able to save a few of the extra tomato seedlings in recycled coffee cans.

Check out the original post here: Hanging Tomato Gardens

Blog April 043

Projects & Plants – Square Foot Garden Update

Easter 001

SQUARE FOOT GARDEN 

I had a lot of success last year with my square foot gardens. To conserve even more space, we have decided to build this year’s garden a bit larger than the recommended 4 x 4. It will stand in back of the two square foot gardens already in place. Yesterday, it warmed up a bit, and we headed out to pick up two bales of vermiculite, two bales of peat moss, and bags of compost, mushroom soil and aged horse manure. We also added some of my own compost to the mix. I can’t wait to water it, let it settle for a day or two, and begin to plant.

Here’s a link to the blog of Mel Bartholomew, the creator of the Square Foot Garden Method: Link to Mel Bartholomew’s Blog

birdhouses 002

I’ve had a few of my very late planted Autumn crops over-winter. Below is a picture of the parsley I was able to use all winter.

birdhouses 003

I’ve heard that if parsley goes to seed or develops a stalk the taste will become bitter. I’m going to leave these four plants I grew from seed in their square, and if, and until, they grow bitter tasting, they have a home in my square foot garden.

birdhouses 004

A few brussel sprout and broccoli plants also lived through our winter. I’ll give these hardy individuals a chance to bear fruit too. Here’s a link to my Square Foot Garden of 2012: Square Foot Gardens 2012

Follow Me on Pinterest