Pots & Pans – Winter Squash Soup

IMG_8436

I love cream soups. Creating them is definitely an exercise in self-nurturing. This week I was pleased to come upon a display of winter squash in a bin at the grocers. At only ninety-nine cents each, how could I go wrong in experimenting with a new variety? I chose a brightly-hued orange squash. The shape and size reminded me of a small pumpkin.

To prepare the squash for soup, I sliced it in half. Be very careful cutting through winter squash. It is extremely hard-skinned, and the knife could easily slip out and cause you harm. I usually pierce the squash with a paring knife and gently, but firmly wiggle my way around. An alternate method is to cut off the ends, and with a larger knife, cut the squash directly in half.

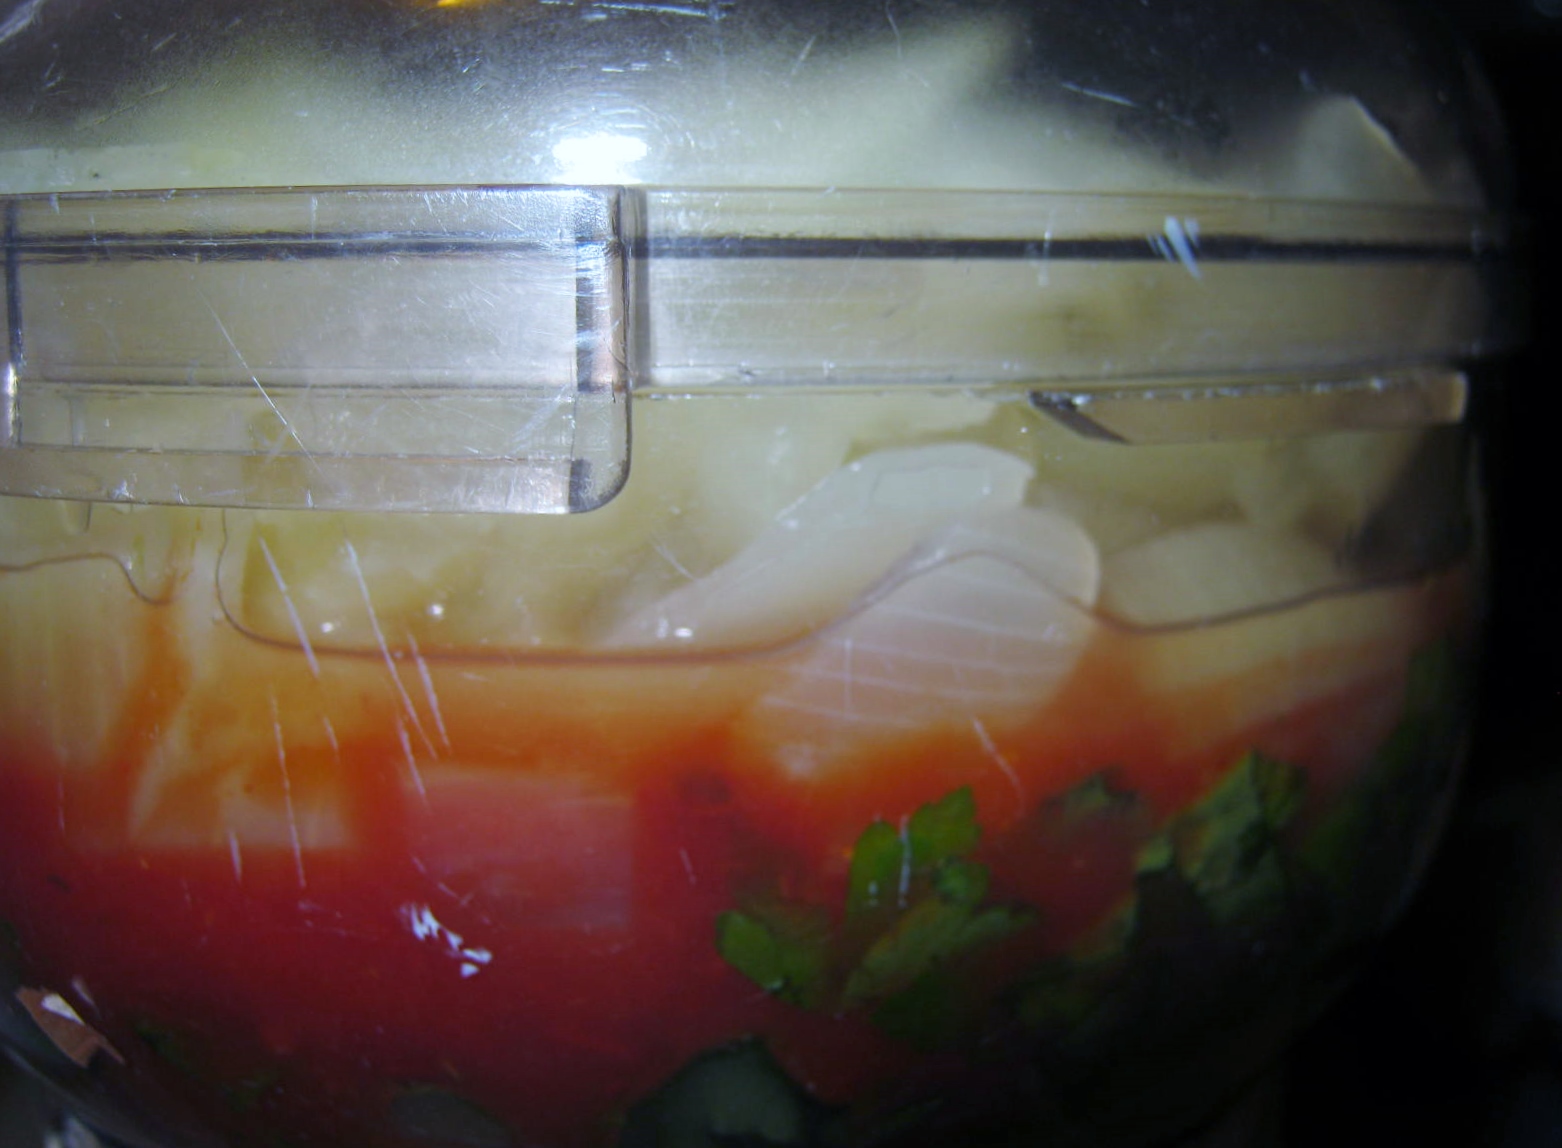
Place the squash in an ovenproof glass dish, mine has a matching lid. Add about a 1/4 to 1/2 inch of water in the bottom. Place your onion and other spices alongside the squash. Cook in a 350 degree oven for 50 to 60 minutes. The squash is ready to use when a skewer easily pierces the skin and interior. Take care when removing the lid, the steam can give you a nasty burn.

IMG_8438

Flip the squash over. I cool the squash, uncovered, for about an hour. Using a metal spoon with a hard, thin edge, I scoop out the interior close to the skin. Discard the outer shells.

IMG_8440

Place squash and onion in a blender or food processor. Add 2/3 – 1 cup of milk, cream or broth. I used 1/3 cup of buttermilk and 1/3 cup of milk. I also added a teaspoon of brown sugar for sweetness. You could use maple syrup, sugar, other natural sweeteners, or nothing at all. A squeeze of lemon and a dash of garlic powder were also added to the blender. Puree all the ingredients together. Pour into a saucepan and heat. Do not bring to a boil. Salt and pepper to taste. A dash of cinnamon adds even more appeal. Enjoy!

IMG_8442

Here are the ingredients I used. I recommend using an onion in place of the shallot. The shallot has a nice flavor, but did not blend easily and left little bits of purple skin in the finished soup.

Winter Squash Soup (makes 1 serving, ingredients easily doubled)
1 Small Winter Squash
fresh or dried herbs
1 small onion or shallot

Cut Squash in half, half or quarter an onion. Place in glass pan with 1/4 to 1/2 inch of water in bottom. Strew fresh or dried herbs over ingredients. (I used thyme and parsley with a dash of oregano.) Cover. Bake in 350 degree oven for 50 to 60 minutes. Cool completely.

Place ingredients in blender or food processor. Add additional spices. I used some garlic powder, salt and pepper. I also added a teaspoon of brown sugar and a squeeze of lemon.

Add 2/3 – 1 cup of liquid. (Milk, buttermilk, cream or broth) Broth will create a thinner soup. Heat in saucepan and serve. (Do not boil)

It’s easy to experiment with cream soups. They are good base for combining flavors you enjoy. Add little bits of herbs and spices as you blend. You never know what kind of heavenly concoction you might create.

Pots & Pans – Quick and Easy Pumpkin Bundt Cake with Drizzle Icing

IMG_8064

This quick and easy bundt cake can be created with a box cake mix. Pillsbury Perfectly Pumpkin is available August through January in most larger grocery stores.

Cake
Pillsbury Perfectly Pumpkin Cake Mix
4 eggs
1/2 Cup oil
1 Cup Water
1 pkg Instant vanilla pudding
1/2 tsp baking powder
1 tsp vanilla

Combine ingredients well. Mix until blended, 2-3 minutes.

Topping
4 tsp sugar
1 1/2 tsp cinnamon
1/8 tsp ground cloves
1/8 tsp ginger
1/8 tsp nutmeg
1 cup chopped nuts,  (walnuts or pecans are good choices)

( I leave the nuts out as we have a grandchild with an allergy to tree nuts. The cake is just as delicious without any nuts in the topping)

Grease and flour (I used Pam instead) sides of bundt pan and sprinkle 1/3 of topping in bottom of pan. Add 1/2 of cake batter. Sprinkle on rest of topping and the rest of the batter. Bake 50-60 minutes at 350 degrees. The cake is delicious without any added icing. Freezes well.

IMG_8063

I used this Pumpkin Bundt Cake as a birthday cake and wanted to dress it up a bit, but was very short on time and energy. I used a can of Duncan Hines Creamy Vanilla Icing as a drizzle by heating it in a glass bowl in the microwave for 5-8 seconds, stirring, and then heating for 5 seconds more. I added a bit of food coloring and the icing was ready to drizzle over the cake. This can be done by allowing the icing to drip from a spoon, or you can do as I did and place the icing in a small zip top baggie, clip a very small hole at one corner and squeeze the icing out through the opening. This technique is much more controlled than just letting the icing run off the spoon.

The cake was pretty and festive, and best of all, becomes even better tasting a day or two after it is made. Here’s a clip about a bundt cake from “My Big Fat Greek Wedding.” The funny thing is I look very much like the poor woman trying to explain the “bundt” cake. Funny!

https://www.youtube.com/watch?v=WPvO53JHnmY

Pots & Pans – Applesauce

IMG_8060

Apples are plentiful at this time. I thought I would try to create a bit of applesauce with a few that were becoming a bit mealy. I peeled and sliced the apples. Instead of sugar, I added about five strawberries I had on hand for flavor and sweetness. I added a bit of water, about a 1/4 cup, and a squeeze of some type of citrus. I brought this to a boil and simmered lightly until the fruits were soft and on the verge of falling apart. A hard stir, and just like that I had my applesauce. It is absolutely delicious. The applesauce will keep for about three days in the fridge. A sprinkle of cinnamon is also nice.

IMG_8062

Pots and Pans – Carrot-Ginger Soup

IMG_7947

Oh my how this soup made my spirit sing! Have you ever taken a mouthful of pure sunshine? This soup is just that good and so beautiful in appearance. The carrots add subtle flavor and color, the ginger warmth and depth, the lowfat milk a nice touch of creaminess. I found and adapted the recipe in an old cookbook that gave the credit for the soup to the Junior League of Pasadena. I adapted it to my own taste and pantry ingredients. It’s easy and took under an hour to prepare, and also has the added bonus of being low in calories.

CARROT GINGER SOUP

1 TBS butter
1 lb carrots, peeled and sliced thin
1 medium onion, chopped
1 14 – 16 ounce can chicken broth (or 2 cups homemade broth)
1 1/2 tsp. shredded orange peel
3/4 tsp ground ginger
1 1/4 Cup (10 ounces) lowfat (2%) milk
salt and pepper to taste
can be garnished with a fresh parsley sprig

Melt butter in saucepan. Add carrots and onion & 4 tbs water. Cook over medium heat for about 15 minutes until the vegetables begin to soften. Check and stir often to prevent burning.

Stir in one cup of the broth, orange peel and ginger. Lower heat and simmer for 20 minutes or until the vegetables are fork tender. In blender or food processor, puree the saucepan ingredients. Transfer back to the saucepan and add remaining broth and lowfat milk. Heat on low heat until warm, stirring as needed. Salt and pepper as needed. Enjoy.

Pots and Pans – Easy Rice Pudding

I often have quite a bit of rice left over when I include it in favorite recipes. A good way to use it up is make rice pudding.

IMG_7317

I don’t know where this recipe came from, so I don’t know who to credit. I think it is probably one of those very basic and timeless recipes that doesn’t have an author.

RICE PUDDING

2 – 2 1/4 cups of cooked rice
3 cups of milk
1/2 cup of sugar
1/8 tsp salt
1/4 – 1/2 cup raisins (optional)
1 tsp vanilla extract

Combine first four ingredients in saucepan. Bring to a boil. Lower heat to a simmer and add vanilla and raisins. Simmer, stirring often, for 30 – 45 minutes, or until all the milk is absorbed. Remove from heat…stir several times as it cools. Sprinkle on cinnamon if desired. I like to eat mine warm or at room temperature. My husband prefers his cold. Refrigerate any leftover pudding. Eat within a day or two. You will have plenty to give away!

Rice Pudding jpg

Quick Tip – Leftover Rice can be frozen. I package one cup portions in snack-sized zip bags and store in a freezer safe container.

IMG_7313

Pots & Pans – Soup in Summertime/Italian Pasta & Bean

Even though it’s summertime, when the air conditioner cools the house to Autumn-like temperatures, I will get a hankering for soup. This was the case last night. I found a recipe for ‘Italian Pasta & Bean Soup’ tucked away in a stash of recipes. I have dozens upon dozens of these clipped out recipes in various places in my home. Every now and then I will pull one out and give it a try. I changed the recipe up a bit when the jar of chicken stock I was planning to use lost it’s bottom. (Don’t ask…a bit of broth leaked out, but it could’ve been much worse.) I had to choose between running to the store or making a broth of my own without any chicken thawed out. I decided to use some scraps of onion I had in the freezer, and a few stalks of fresh celery and carrots. I threw in a bouillon cube and ‘Voila,” I had a broth.

You can find the Woman’s Day recipe here: Woman’s Day Italian Pasta & Bean Soup

IMG_6659

Here’s a photograph of mine and the changes I made to the recipe.

6 Cups of cold water
Onion, Celery and Carrot Scraps
1 -2 Beef or Chicken Bouillon Cubes
1 1/2 Cups Bowtie Pasta
1 15 oz can cannellini beans (drained and rinsed)
1 14.5 can diced tomatoes (I used Hunt’s Basil, Garlic & Oregano)
Several leaves of fresh parsley chopped/you can use a bit of dried if you don’t have fresh
Salt and Pepper to taste

Bring water and vegetable scraps to a boil. Simmer for about a 1/2 – 1 hour. Strain away all solids and discard. Add a bouillon cube/cubes to broth.
Bring broth to a boil once more, add bowtie pasta and simmer at medium until cooked al dente, about 8 minutes. Add beans, tomatoes and parsley. Heat through for about two minutes and serve. I sprinkled my soup with packaged grated 4 cheese pizza cheese. It was so delicious, I added a bit more cheese halfway through my meal.

QUICK TIP – The Woman’s Day recipe calls for cooking onion and garlic to add to the soup. I was able to skip that step by adding tomatoes flavored with herbs. This soup was light and had a bright flavor. Next time I might add a squeeze of lemon for an even brighter tasting broth.

Produce & Pots and Pans – Beets!

beets 5

I have eaten beets throughout my life, but in my time as a cook, I don’t recall using beets fresh from the farm market. If I have attempted at some point in my life to prepare them for a meal,  they must’ve been such a disaster, I blocked it from my memory. 🙂

•Beets are high in many vitamins and minerals. Potassium, magnesium, fiber, phosphorus, iron; vitamins A, B & C; beta-carotene, beta-cyanine; folic acid. …
•Beets cleanse the body. …
•Beets help your mental health. …
•Beets are used as a stomach acid tester. …
•Beets are a high source of energy.
~ Fullcircle.com

This week, when I saw a bundled bunch of beets in the farm market for a good price, I thought, ‘Why not?’ Beets are full of vitamins and minerals, and are something different to serve with meals…at least in our house. I often make RED BEET EGGS as a side dish, but use canned beets for that recipe.

Because I am sensitive to red food coloring, I wanted to try a red velvet cake recipe of some kind using the beets as the coloring agent. I found a link for a good Red Velvet Beet Cupcake. Yummy, Healthy Easy’s Blog – Red Velvet Beet Cupcakes. This recipe turns out well and has great directions for roasting the beets in the oven.

beets 1

I roasted an extra beet and devoured it when it was cool. Delicious! I will be roasting beets for our dinners in the near future.

beets 2

Roasted beets processed according to the cupcake recipe directions. What a yummy pink the beets created.

I modified the recipe a bit to suit what I had on hand, substituting cake flour, apple cider vinegar for white vinegar, sugar in place of stevia, and dark chocolate cocoa powder in place of regular. The use of the dark chocolate is probably why there is no trace of the red beet color in my cupcakes. I also did not use food coloring as this was the point in me using the red beets.

beets 3

Simple Cream Cheese/Sour Cream Frosting

  • One 8-ounce package reduced-fat cream cheese, such as Neufchatel
  • 1 1/4 cups confectioners’ sugar
  • 1/4 cup sour cream

beets 4

Blend together with beaters until smooth. I like to refrigerate these cupcakes to keep the frosting fresh.

Delicious…give this recipe a try, easy and healthier than boxed cake mix.

Follow Me on Pinterest

Produce, Pots and Pans & Product – Plums, Cheesecake Cupcakes & Peas in a Pod

IMG_4916

The choices in the supermarket were slim this week for sampling a new fruit or vegetable. There were a few novelties such as dragonfruit, but at 7.99 each, I passed on this one. I chose instead yellow plums. I’ve eaten golden plums in the past, but these were a brilliant lemon yellow when I purchased them. I set them on my windowsill to wait for them to ripen. Little did I know they would sunbathe and “tan” to a beautiful coral color. The flavor was delicious, but since plums are rather an ordinary fruit I wanted to do something different with them. I decided to stew them down until just tender, caramelize them and sprinkle with coarse salt.

IMG_4920

I didn’t have a recipe to follow. I peeled the plums since they were imported (possible unknown pesticides) and sliced them. I added a bit of water to the saucepan and lightly simmered the fruit until they were barely soft. At this point I added brown sugar and cooked them until the water and sugar became syrupy. I turned the heat off and sprinkled with coarse salt and let everything cool.

IMG_4921

I decided to make my recipe for cheesecake cupcakes and place the cooled plums on top. The recipe calls for a vanilla wafer, but I used half an oreo, minus the cream, in the bottom of the cupcake liner. The recipe for cheesecake muffins follows:

CHEESECAKE CUPCAKES

6 Oreos halved, cream removed
2 8 oz Cream Cheese (softened)
1/2 Cup sugar
1 tsp vanilla
2 eggs
Fruit Preserves ( I used my carmalized plums)

Preheat oven to 350 degrees. Place cupcake liners in 12 regular sized muffin tins. Cover bottom with Oreo half. Combine cream cheese and sugar in bowl. Beat until well combined. Add eggs and vanilla. Beat again until blended and without lumps. Scoop into muffin tins. I use an ice cream scoop. Fill about 3/4 full. Bake for 25 minutes…a few minutes longer if they are too loose in the middle. Chill in the fridge. Top with preserves.

IMG_4918

IMG_4919

IMG_4923

I also top with chocolate chips when hot. These melt and create a chocolate disc on top.

IMG_4929

IMG_4930

These are super easy, delicious, and low in sugar. I can’t say they are low in calories, but they are VERY good!

The adorable Peas in a Pod Salt and Pepper Shakers in the first photograph in post can be found at Amazon.com. I bought several of them at Christmas and everyone who received a set loved it.

Pots & Pans – Amish Piggies in a Blanket

IMG_4927

Once in a while I stumble upon a meal that is so yummy in appearance, I have to disengage my “Eating Healthy” rule and give into the joy of bacon or other unhealthy food. This week the food that enticed me was “Piggies in a Blanket,” purchased at the local Amish Market.

The sweet Amish lady at the counter told me to bake the piggies at 375 degrees for one hour. I did so, and my husband and I were really pleased with the taste. Even better, they were very inexpensive. I bought the piggies in a blanket premade, but they would be easy to put together. The inner layer is loose sausage shaped into a half sausage shape. The next layer is stuffing, packed tightly around the sausage and held in place with tightly wrapped bacon. I baked the piggies uncovered for an hour. They bacon got a little dark, and dried out a tad, so next time I will cover the pan for about a half hour, and uncover for the final half hour. The bacon keeps the inside moist. Delicious!

Pots & Pans – Twice on Tuesday/Pumpkin Cookies

It’s a perfect day for a rerun blog post. Many people bake these delicious cookies during Thanksgiving and Christmas. I bake them whenever the craving for pumpkin grabs ahold of me. They are delicious and the pumpkin makes them very nutritious. They are perfect with a cup of coffee or tea. Enjoy!

My Grandmother Broadwell always baked these amazing pumpkin cookies for family and friends. I can’t bite into one without thinking of her. Every year, especially around the holidays, I bake up a batch or two. They are scrumptious, and best of all pumpkin is loaded with vitamins.

Pumpkin Cookies

Sift together:

2 Cups flour

1 teaspoon baking powder

1 teaspoon baking soda

1 teaspoon cinnamon

1/2 teaspoon salt

Cream together:

1 Cup shortening (I use butter)

1 Cup sugar

1 Cup pumpkin (canned)

1 egg

1 teaspoon vanilla

Optional:

1/2 Cup nuts, and/or 1/2 Cup raisins

Mix together. Add nuts or raisins if desired. Bake in a preheated oven at 350 degrees for 10 – 12 minutes.

While the cookies are baking make up your frosting.

3 Tablespoons butter

4 Tablespoons milk (2% is okay)

1/2 Cup brown sugar

Heat this and bring to a boil. Stirring constantly, cook for 2 minutes taking care not to burn. Cool. Add 1 Cup powdered sugar (add more if needed, icing should not be thick, but rather runny) Add 3/4 teaspoon of vanilla and spoon over cookies.

Follow Me on Pinterest

Pots & Pans – Bobby Flay’s Soup

IMG_4530

In the January issue of Food Network Magazine you will find a terrific recipe for Bobby Flay’s Spanish Chorizo, Kale and Cranberry Bean Soup.

I cooked up a batch of this soup last week and it was delicious and hearty. I did make some changes though. I used leftover sparkling cider in place of the wine. I also substituted chicken cutlets, marinated for several hours in a strong vinegar, olive oil and spice solution, in place of the chorizo. After I baked the chicken and cut it into small cubes, I added it to the soup for a minute or two before serving. Next time I will use boneless thighs, the breast meat became a bit dry.

I also cooked the beans and kale separately to cut the cooking time for the other vegetables down a bit. When everything was cooked through I combined the ingredients in a big pot. Scrumptious!

Pots & Pans – Fidget Pie

IMG_4399

One of my goals for 2015 is to sort through all the outdated magazines I have stored in my closets. Some issues of Victoria are over twenty years old. I know there is a market for vintage magazines, but I have been down that road in the past, and it’s not worth the aggravation to me. Instead, I’m determined to take a look at each page before I recycle them.

At night, while watching television, I do double duty and leaf through the contents. The beautiful photographs are fading, but there are still good ideas to be found. One of these is a recipe for “Fidget Pie.”

IMG_4461

There are only a few ingredients in Fidget Pie, a fact I love, and better yet, it is a good way to use leftover ham.

•1 pound potatoes, peeled and thinly sliced (about 3 and I use Yukon Gold)
•Salt and pepper to taste
•4 chopped fresh sage leaves or 1/2 teaspoon dried sage
•1/2 teaspoon ground nutmeg
•3 cups diced cooked ham (12 ounces)
•1 medium onion, thinly sliced
•1 pound cooking apples, peeled, cored and sliced (about 3)
•1 1/4 cups chicken broth or stock
•Pastry for single crust 9-inch pie

Preheat oven to 425 degrees F. Butter a deep, 2 quart casserole. Layer potato slices in the bottom of the casserole. Season with salt, pepper, sage, and nutmeg. Continue layering and seasoning. Cover with pie crust. Cut vents for steam to escape. (I used premade piecrust) Bake at 425 for 15 minutes ( I added 15 more minutes to this and covered with foil for those minutes, I find potatoes take longer to get soft than most people realize. Remove foil for last hour.) Lower the temperature to 350 and bake for 45 minutes more.

I used a deep dish and did not need to put it on a tray to catch overflow and drips.

IMG_4464

A good step by step recipe with lots of tips can found at Welcome Company.

The pie smelled sensational while it baked. The juices did stay very thin as the recipe suggested. Will I make it again…you bet! It is a delicious meal for a wintry night. The recipe is also very budget friendly.

IMG_4465

Pots & Pans – Red Sauce Recipe

IMG_4297

I thought this would be a great time to share my favorite red/spaghetti sauce recipe. (Recipe at bottom of post) Years ago, I began experimenting with a good recipe I had found on the Internet. My family rated it a thumbs-up. Over the last decade I have adapted and changed it many times, until the recipe is my own.

The brand of tomatoes, jarred sauce and tomato paste has little to do with the finished recipe. Use your favorite brands, or what is on sale. If my local supermarket has a $1.00 a can sale on crushed tomatoes, I will buy as many as a dozen at a time. You see, the secret for my sauce isn’t in what brand I buy; the secret is in the onions.

I live with a husband who absolutely will not eat much of anything that has chopped pieces of onion in the recipe. I’ve learned how to cook without having pieces of the “offensive” onions in the finished dish. Sometimes that means using onion powder, or in the case of my spaghetti sauce, pulverizing the onion.

First, I chop the onion and “sweat” it. I’ve found that cooking the onion down in oil adds a harsh taste none of us likes. Although it goes against most advice on how to sweat an onion, I use water instead of oil. I gently heat the chopped pieces on a very low setting, in a non-stick pan, with a lid on to keep the moisture in.  Stir often until the onions are translucent and soft.

In the meantime, add all sauce ingredients to a LARGE crock pot or an equally large cooking pot. The ingredients will almost reach the brim of the crock pot. You can cut easily cut the recipe in half, or even in thirds. I like to use fresh herbs, but dried will do just as well.

While you’ve been mixing the ingredients the onions should have softened. Remember to lift the lid and check them during the sweating. You don’t want them to have too many crispy edges. Excessive browning will add a bitter taste to the sauce.

IMG_4303

Place cooked onions inside a food processor, add a cup of the sauce you have mixed. Blend them until they are completely liquified. This is the secret! The onions exude sweetness and flavor into the sauce when they are blended. Add this mixture to the sauce and whisk together.

Now simmer the sauce for 2-3 hours on low in the crock pot, or at the lowest temperature possible on the stove top. When the sauce is finished I FREEZE* it in quart sized jars or in BPA free containers. The mixture usually makes 6 – 8 quarts. If you like meaty spaghetti sauce, add up to 3 lbs browned hamburger to the sauce after you blend and add the onion mixture. I prefer the sauce without the meat.

*Frozen liquids expand. Leave at least a 1 1/2 inch cushion of space at the top of your containers.

RED/SPAGHETTI SAUCE RECIPE

2 large or 3 medium onions chopped (sweated until soft and blended
with sauce in food processor)
3 29 ounce cans crushed tomatoes
3 24 ounce jarred spaghetti sauce
3 6 ounce cans tomato paste
3/4 C sugar
3 tsp garlic powder
3 tsp dried basil, or several leaves fresh chopped
1 1/2 tsp black pepper
1 1/2 tsp red pepper flakes (more if you like very spicy sauce)
1/1/2 tsp salt (You can add more as you adjust the taste)
1 1/2 tsp Italian Seasonings (or a blend of fresh oregano
parsley, marjoram)
* Optional 3 lbs browned hamburger for a meaty sauce.
(If you add hamburger, red sauce mixture must be heated 1/2 at a time.
The amount of sauce will be too large for one crockpot to handle)

Mix together, heat for 2-3 hours on lowest temperature. See directions & tips above.

(This recipe easily reduces by half or thirds)
6 – 8 quart canning jars. Freezes well.

Pots and Pans – Penguin Appetizers

I repost this every year because they turned out so CUTE! They’re delicious too…

022

These adorable penguin appetizers were a big hit at Christmas dinner yesterday. Peel and cut carrots into medallions, cut a notch out of each medallion for the feet which automatically creates a beak to place in the large end of a small pitted black olive. Using a large pitted black olive, cut a small slit in the front, open and place about a quarter teaspoon of cream cheese inside. (I used the already softened variety of cream cheese in a tub) It helps if you shape the cream cheese a bit on a plate or wax paper before you place it inside the olive. Take a toothpick, insert through head, into the larger cream cheese body and into the feet with the notch pointing frontwards. So easy, not expensive, and so much fun!!!

I found this idea on Pinterest. Click here to visit Pinterest

I wish I had taken a photograph of my little flock, but in the busyness of the day became distracted and forgot. They are even cuter when you have a dozen or more standing at attention on a serving plate.

Follow Me on Pinterest

Pleasures & Pots and Pans – Meyer Lemons

IMG_4110

Finally, after years of reading and hearing about the superiority of Meyer Lemons, I finally spotted a display of the elusive citrus fruit in my local supermarket. Perhaps they have been there before, and I passed right by them, thinking the yellowy-orange fruit were unripe tangerines, but this time the sign over them caught my eye. I snapped up three of the beauties even though they were steeply priced at 1.00 each.

What did I do with them? Well first, being me, I created still life compositions for photographing all over my house.

Lovebirds lemon.jpg

The next thing I did was search out a good recipe to use them in. I found the winner at Tutti Dolci All Sweets Blog: Meyer Lemon Cloud Cookies. I followed the directions as written. The cookies were easy to mix up and bake, and delicious as a lemony cloud…really! The one thing I would change would be to double the recipe. Why make only twenty cookies when forty cookies would be just as easy and almost as quick?

The cookies would most likely be scrumptious using a regular lemon too. Happy Baking!

Pots and Pans – Plantains

IMG_3794

I didn’t experience eating plantains until I visited Jamaica. I have since learned to cook them as a side dish/dessert for family and friends. Plantains have good fiber content. They have more vitamin C and A than bananas, are a richer source of B-complex vitamins, and provide minerals such as iron, magnesium and phosphorus. Plantains contain more potassium than bananas. Cooking Plantains is an easy and rewarding task. The only additional ingredients I use are two pats of butter and some brown sugar.

Step One

Slice plantain on the diagonal.

IMG_3795

Step Two

Melt two pats of butter in pan.

IMG_3797

Step Three

On medium heat begin to fry in the butter. Brown on each side and check tenderness with a fork.

IMG_3800

Step Four

Sprinkle brown sugar over plantains. Don’t be alarmed if the brown sugar falls between the slices and bubbles up on the pan. This gives the edges a crispy crunch of sweetness. Cook only until sugar is dissolved and begins to firm up a bit.

IMG_3803

Serve and eat warm…very delicious!


IMG_3805

Pots & Pans with a Quick Tip – Martha Stewart’s Pumpkin Cheesecake Pie (With Detours)

martha steward

Last week I received my November issue of Martha Stewart Living Magazine. The cover photograph immediately intrigued me, and I promised myself I was going to attempt to make each one of the pies featured.

Pumpkin Cheesecake Pie with Gingersnap Crust

IMG_3771

Detour Number One – I didn’t count out the 23 required gingersnaps, choosing instead to process them in my small food processor, measuring out about a cup and a half to two cups as the cookies crumbled. Since I have made many cookie crusts I know this is a good ratio for a medium thickness. I also cut back the sugar to one tablespoon; gingersnaps are sweet enough on their own. I followed the rest of the recipe instructions as written.

IMG_3772

Detour Number Two – I own a very small food processor. I realized the impossibility of processing all the filling ingredients at one time, so I opted to use my mixer instead. I had no problems substituting the mixer for the processor. I followed the filling instructions as written. The Pumpkin Cheesecake baked perfectly!

IMG_3775

Detour Number Three – No one in my family likes meringue topping on a pie. Although it looks pretty, the ingredients and the time involved in whipping it up would be a total waste. Instead of the meringue I used large marshmallows masquerading as an elegant topping.

IMG_3777

Quick Tip – To give the marshmallows a prettier appearance I cut them in half and notched the edges.

IMG_3779

I placed them, cut side down, on a piece of parchment and toasted them in the toaster oven. Ah, lovely…they began to brown and give off the aroma of campfire marshmallows. I took them out when they deepened in color to golden brown.

IMG_3782

I placed the whole tray in the freezer and let them harden. Believe me when I warn you touching them right out of the oven will firmly attach them to your finger or the knife you are using. When they were fairly frozen, I flipped them and let the sticky underside harden in the freezer.

IMG_3783

The marshmallows turned out to be a pretty good stand-in for the meringue.


IMG_3784

I also left a portion of the cheesecake edge bare.

IMG_3785

The marshmallows are cute, but I prefer whipped cream on almost all the pie I eat.
Whoops! Almost forgot to mention the taste of the pumpkin cheesecake is fabulous! Definitely a recipe to keep. The recipe is on the Martha Stewart Living Website – Pumpkin Cheesecake Pie with Gingersnap Crust

Pots and Pans – Jam Breakfast Bars

IMG_2509

I love the site Budget101.com, another terrific site is:

Grocery Budget 101

I recently tried one of their recipes: Jam Breakfast Bars. I followed the recipe as written, but left the walnuts out of my bars because of a grandchild’s peanut and tree nut allergy. The bars turned out fine without the nuts added. You can find the entire recipe, wonderful photographs, and descriptions here: Grocery Budget 101 Jam Breakfast Bars *

I am very impressed with the information provided by this terrific site. They not only give you the recipe but also great photo directions and break down the cost of making the recipe into dollars and cents. Check it out!

As I was mixing up the topping for the bars, I was a bit apprehensive about the lack of sugar. No problem! The sugar in the jam beneath the topping was plenty sweet.

Here are a few tips I am adding after baking the bars: I taste tested the bars right out of the oven, at room temperature, and cold from the fridge. Surprisingly, I liked them best out of fridge. The jam firms up again, and the bars have a nice texture. I usually prefer baked goods warm but not this time. I also used a 7 x 9 pan instead of the suggested 8 x8, and they bars came out perfect by following the same suggested baking time.

IMG_2498

Don’t be tempted to skip the parchment paper on the bottom of the pan!

IMG_2505

I had to chisel my way through the side of the bars after cooling with a paring knife. The baked jam really adheres to the baking pan. I was SO glad I had followed the directions and used the parchment on the bottom. (No need to grease this way) I am sure that to leave out the parchment would completely ruin the recipe. By the time you scraped the bars away from the bottom of the pan the whole recipe would be crumbled. Next time I bake them I will carefully run a paring knife around the sides while they are still warm.

IMG_2507

After the bars were cool I flipped them out onto a cutting sheet and cut through them upside down. This kept the top of the bars from falling apart during the cutting.

IMG_2510

The bars are sticky so I stored them in the fridge between layers of waxed paper.

IMG_2502

I had everything I needed to make these bars in the pantry except the jam. I used Smuckers Strawberry. In the future I will stock up on jam when it goes on sale and the recipe will be even more budget friendly. Why does costing only pennies per serving somehow make the bars taste even better? Happy Baking! 🙂

* If I don’t know the source of a recipe I use I will include the recipe in my post, if I do know the source I include the link to it in my post. If the link is broken or takes you to the wrong post let me know through the comments section and I will fix it! Thanks.

Pots & Pans – Throwback Thursday/Patriotic Muffins

It’s the perfect time of year to reblog one of my favorite recipes. Fresh fruit is plentiful, and happily, for the Fourth of July blueberries and luscious red strawberries can still be found. I baked a batch of these up last night, and amid my family’s, “yums,” and “ahs,” knew it was time to post the recipe again. Enjoy!

Years ago, many, many years ago, when I was a new bride, my cousin Norma hand-copied dozens of her favorite recipes and put them in a binder as a wedding gift. I have cooked up many of these recipes, but my all-time favorite remains her muffin recipe. It is a very basic recipe that makes about 18 muffins. I have added all kinds of fruits and without fail the muffins turn out. Once in a while, when I am feeling in the need of cooking even healthier, I will use half wheat flour in place of the white. These muffins are good for using the harder strawberries the supermarkets often sell at a great price. The berries soften and the flavor is intensified when they bake. I’ve included Norma’s recipe at the bottom of the post. Happy Baking!

blog 004

Tempting Tip: Always slice a muffin vertically rather than horizontally. That way you get a bit of the muffin top in every bite. Delish! These muffins taste even better when lightly toasted and buttered.

blog 005

Norma’s Muffins (I think I have shared these in a previous post but the recipe is worth repeating)

3 Cups flour ( you can substitute half wheat flour, makes a heartier tasting muffin)

1 Cup sugar

4 tsp baking powder

1 tsp salt

2 beaten eggs

1 Cup milk ( can be 2%)

1/2 Cup salad oil

Mix all ingredients together. Do not over-mix. (causes toughness) The batter will be a bit lumpy. Bake at 400 degrees for twenty minutes. Makes about 18 muffins. The recipe can also easily be halved or doubled.

Pots & Pans & Plants – Crockpots and the Joy of an Herb Garden

IMG_1433

Over the years I have grown herbs, both culinary and medicinal. I use my fresh herbs constantly. During the last few winters I have been able to purchase organic herb plants in the produce section of my local grocery store. I now use fresh herbs year-round.

In the summer I am often busy and need to make a quick meal that will not heat up the house. To cook a delicious and super-easy dinner, I place four turkey legs and a dozen small red potatoes into my crockpot. I add about a cup of water to these ingredients. As the turkey cooks juices will mix with the water and create a delicious broth for gravy. Salt, pepper, a touch of garlic powder, and some wedges of onion complete the meal. Cook on low for 7-8 hours, or at high for 5-6 hours. The house will smell like Thanksgiving even if it’s summertime. An added bonus for me is heaping the top of my food with freshly-picked herbs. The herbs in this photo are: chervil, oregano and thyme. (Sage & parsley are great additions too.) The smell is intoxicating. Happy Cooking!

⭐ This crockpot meal will feed four adults. It is easily halved for two people. The amount of water added should stay the same.

Follow Me on Pinterest