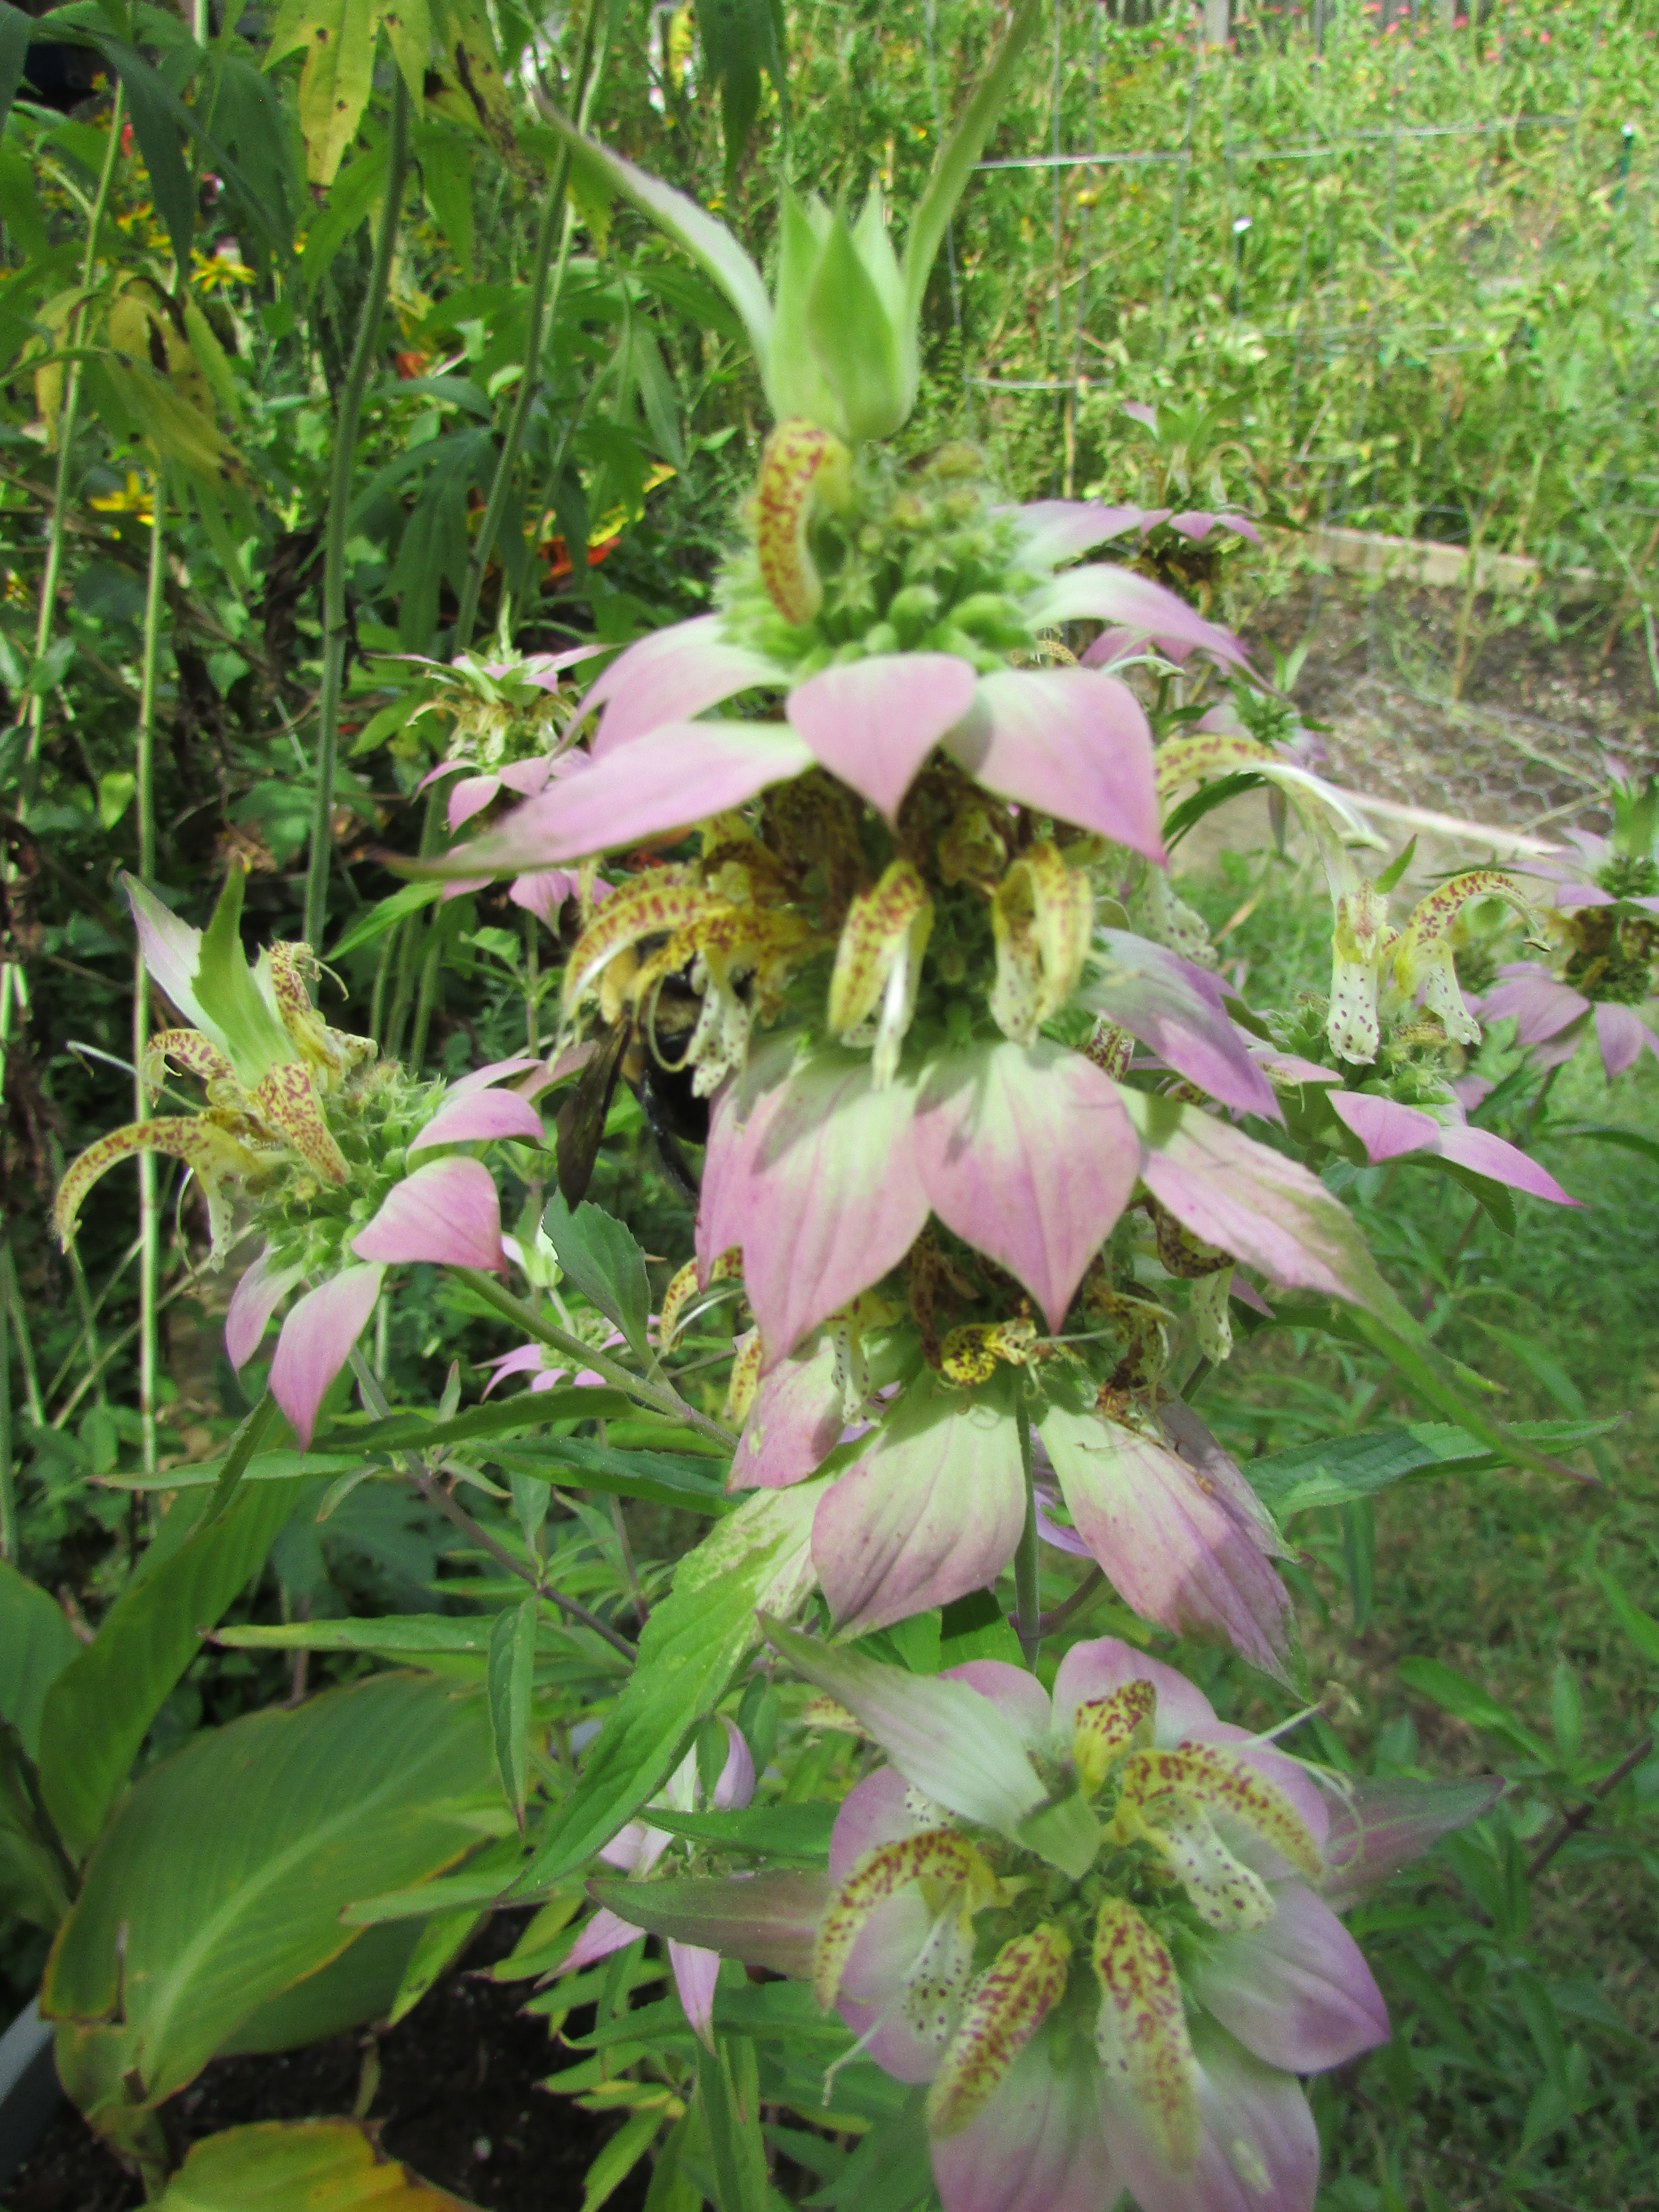
“Monarda punctata is a herbaceous plant in the mint family, Lamiaceae, that is native to eastern Canada, the eastern United States and northeastern Mexico. Common names include spotted beebalm and horsemint. It is a thyme-scented plant with heads of purple-spotted tubular yellow flowers above rosettes of large white- or pink-tipped bracts. The plant contains thymol, an antiseptic and fungicide. It was historically used to treat upset stomachs, colds, diarrhea, neuralgia and kidney disease.” ~ Wikipedia
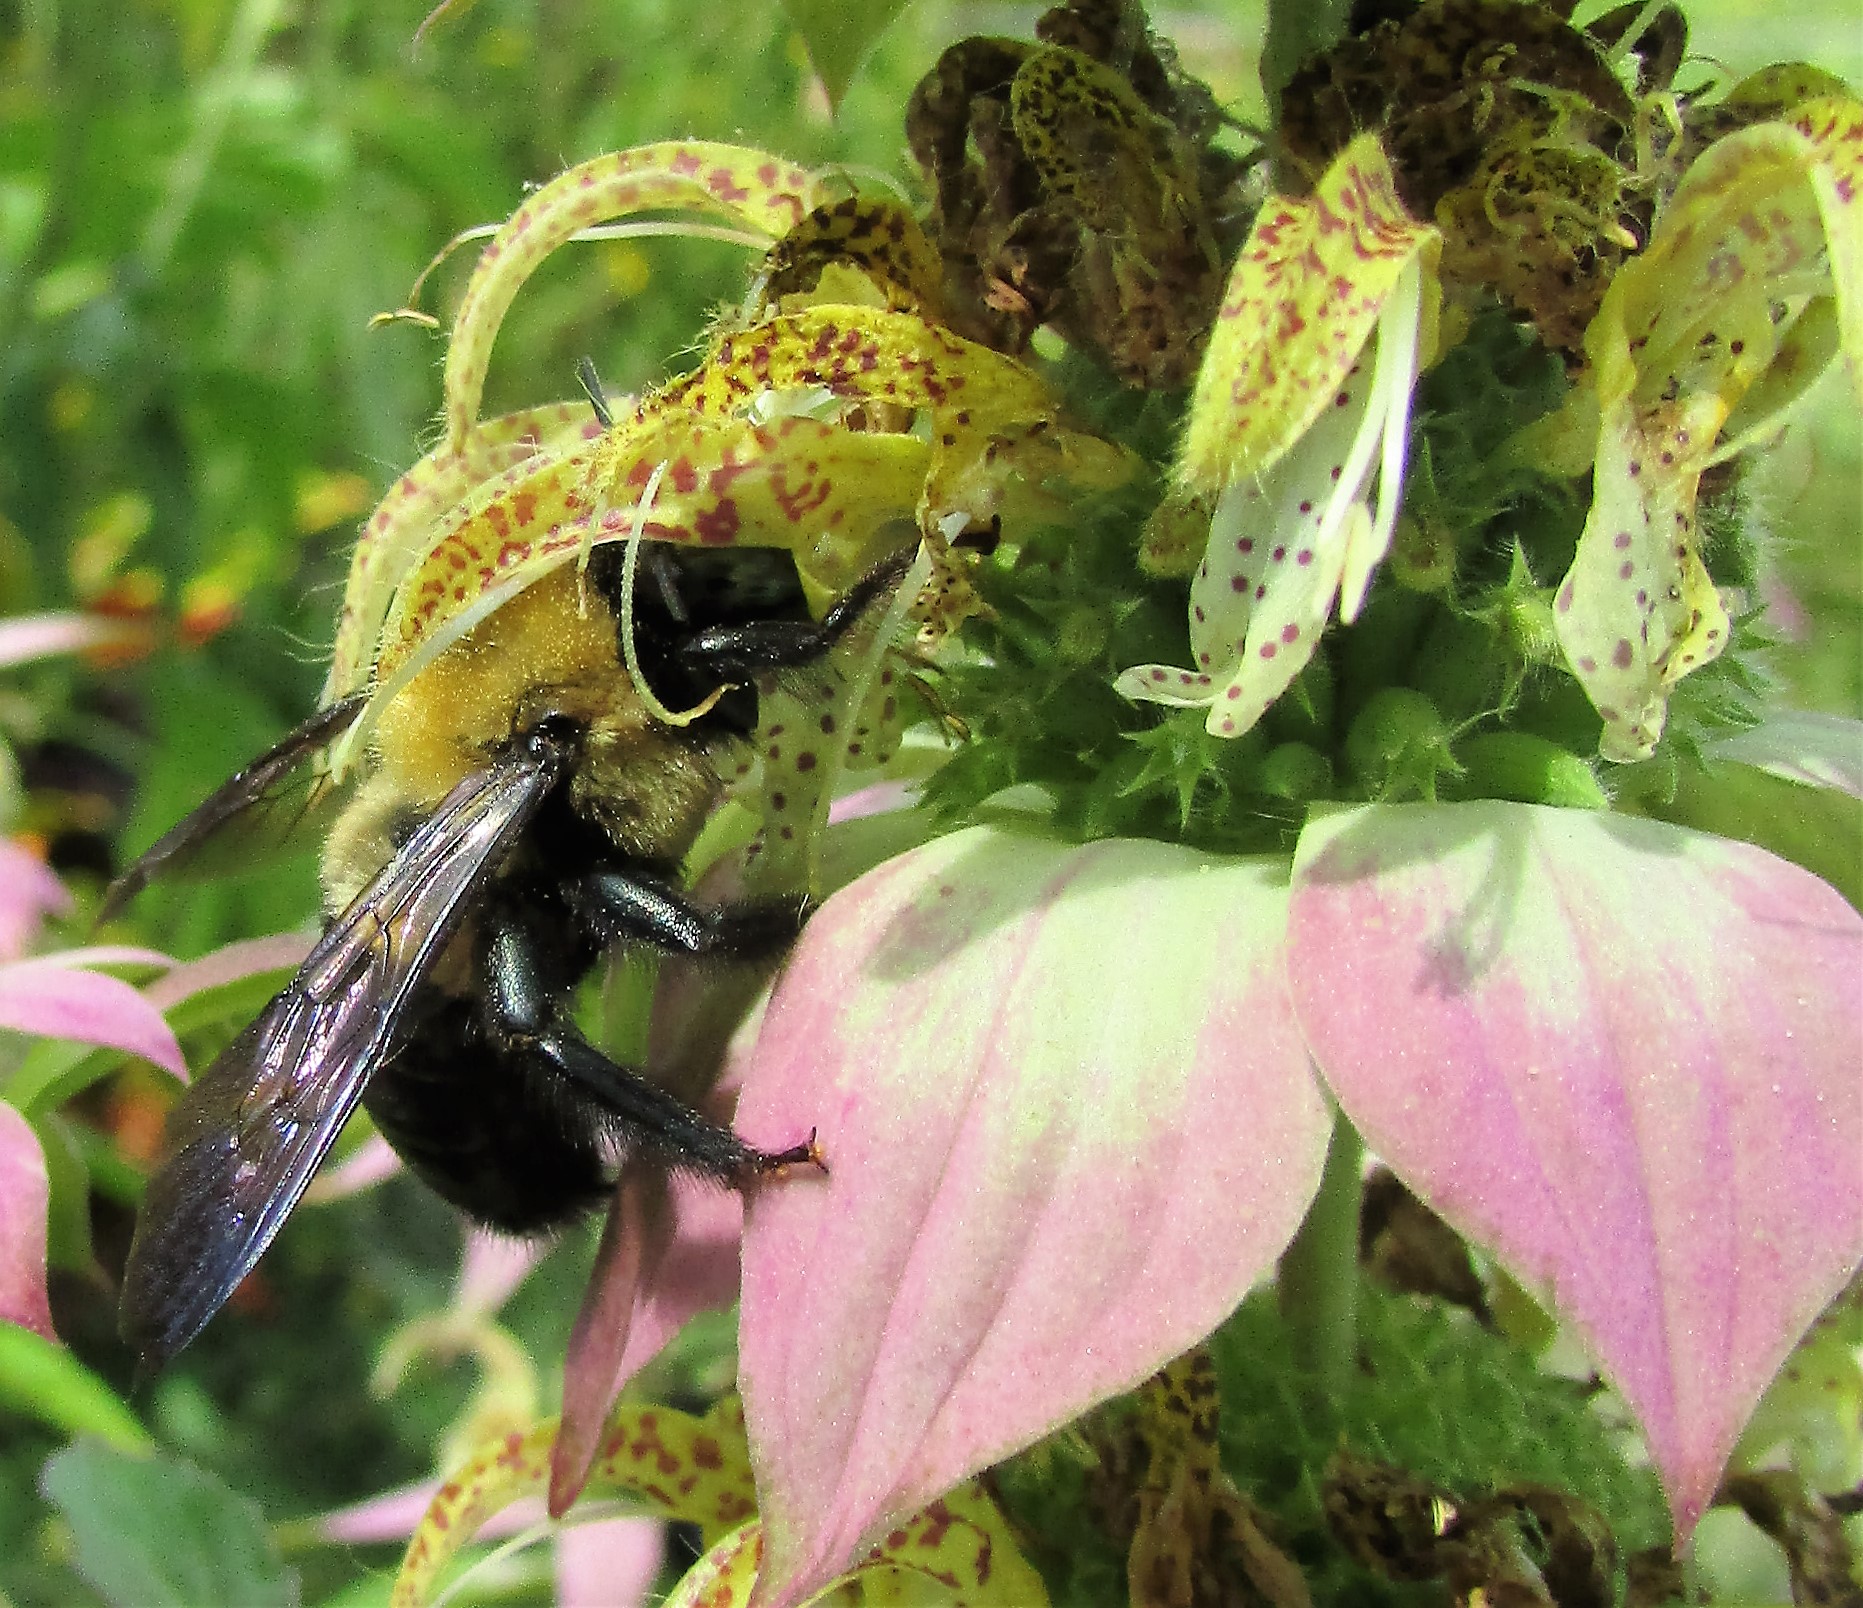
I’ve seen this plant in the wild and found it this year at a local nursery. It is certainly nicknamed correctly…bees love it!
I’ve also seen hummingbirds hovering over the plant.
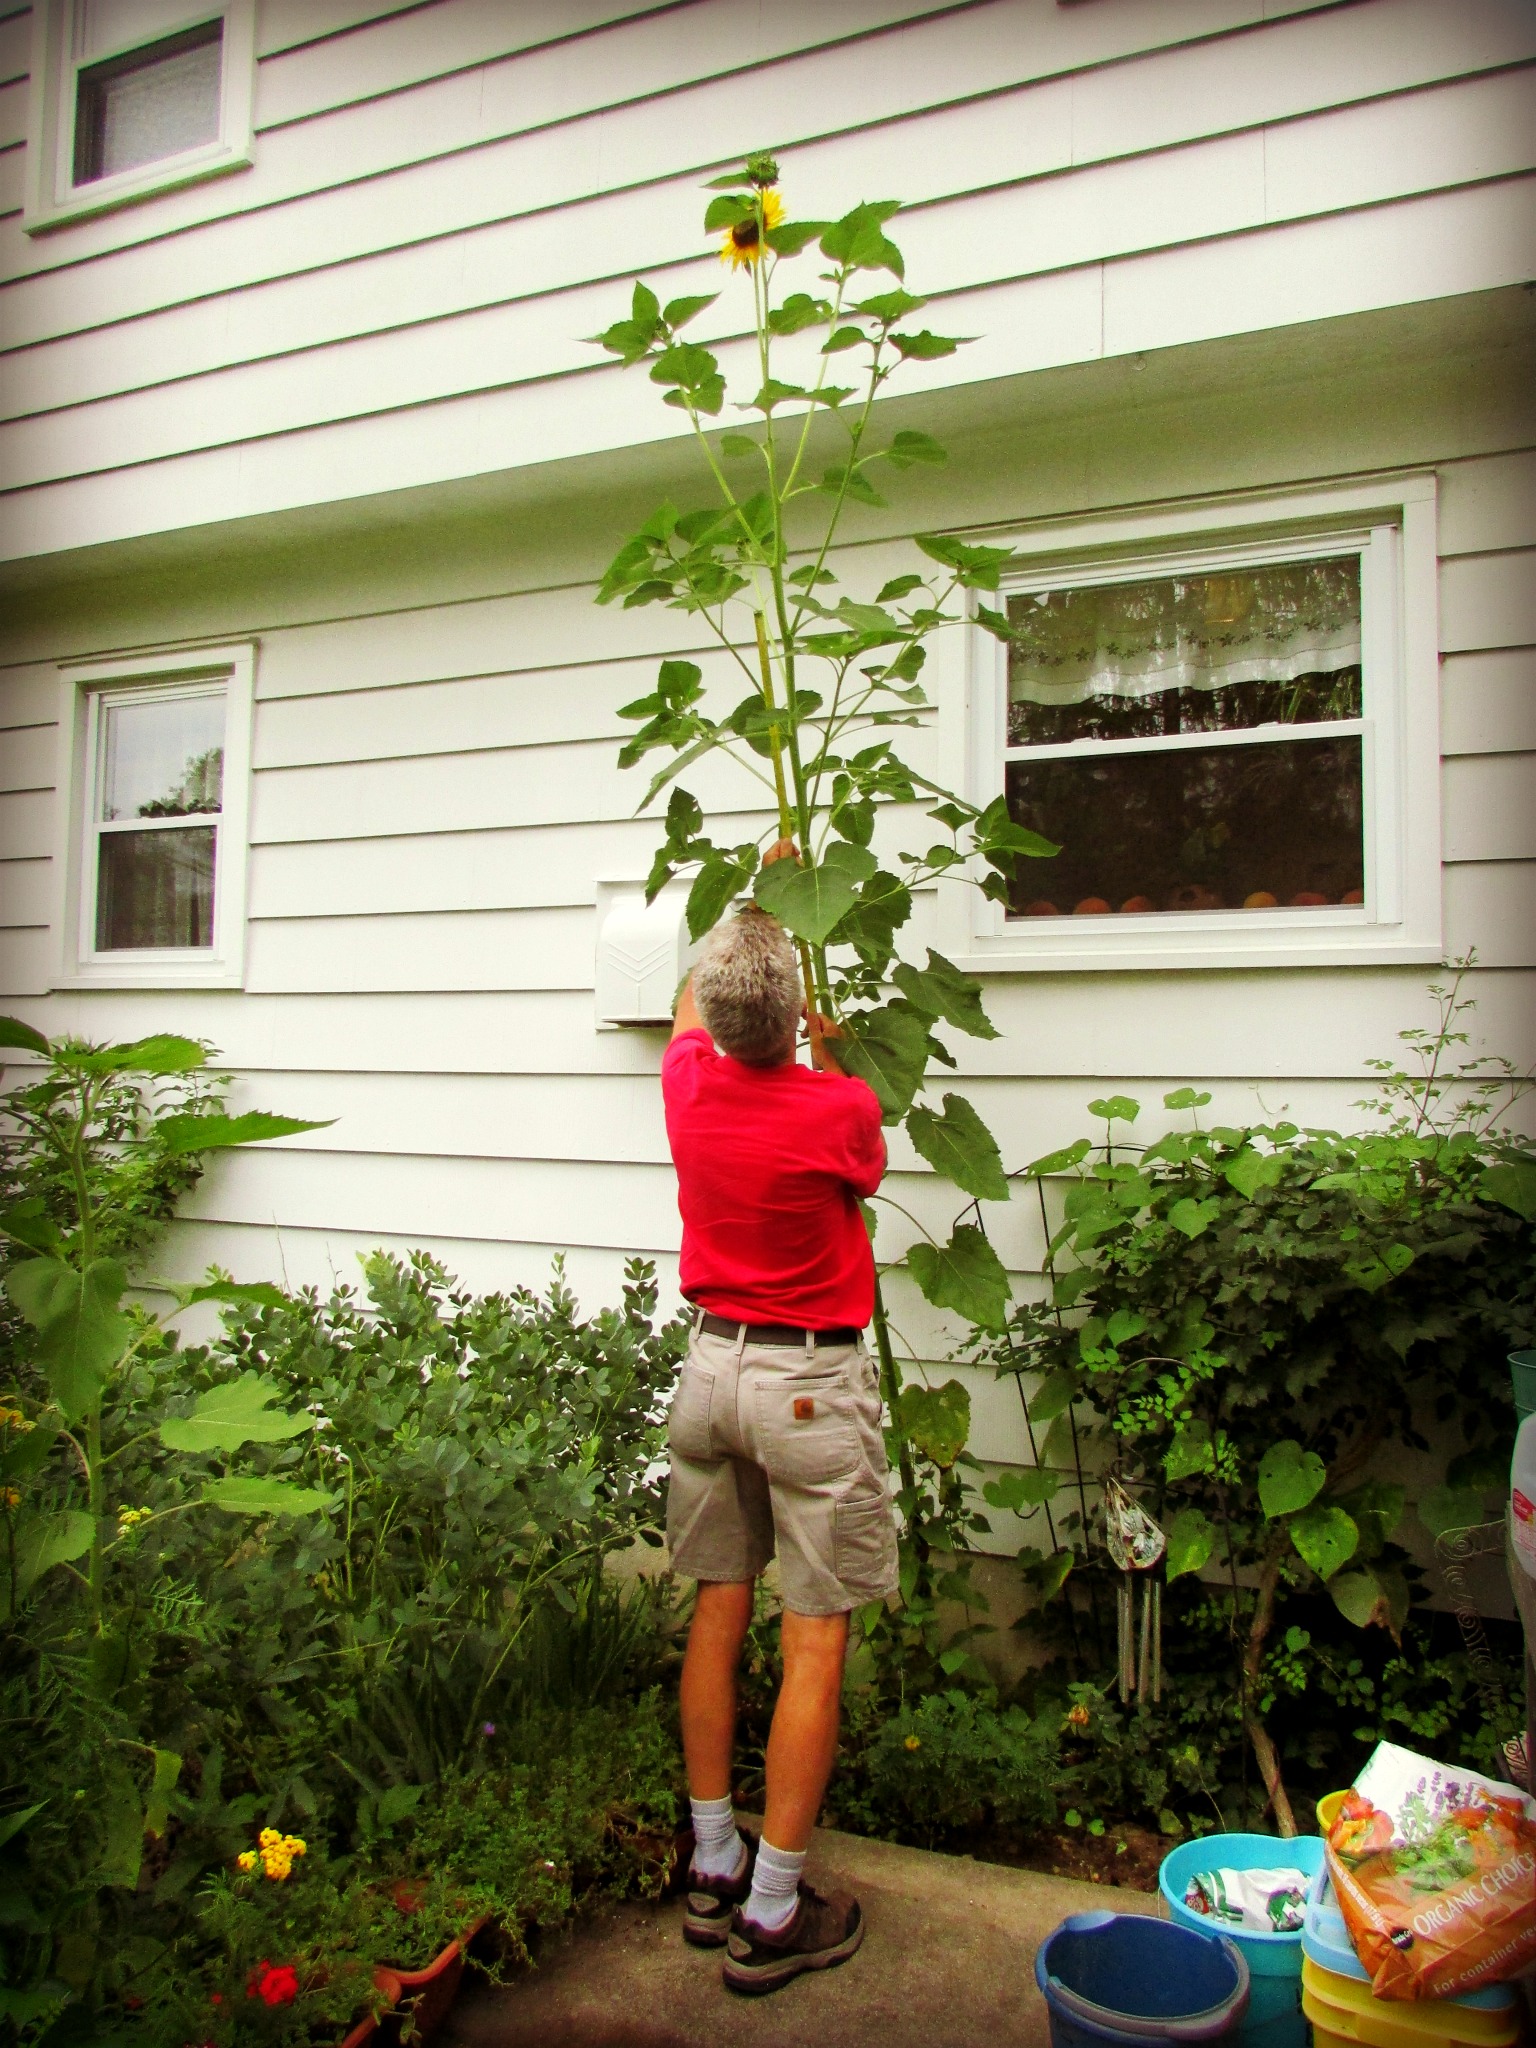
Every year I attempt to grow sunflowers. Quite often, the animals that live in my yard will dig up the seeds before they even sprout. I’ve stopped this natural tendency of the critters by sprinkling chili powder on top of the soil that covers the seeds. Even so, if they sprout, the tender green shoots are a delicacy to chipmunks, squirrels and rabbits, and when I’ve checked the progress of the sunflowers I find them nipped away and ruined.
This year I’ve had a bit more success. The sunflower in the photograph is growing outside my kitchen window. My husband measured it and the stalk was well over eleven feet. The plant is still growing and now has two blooms and many buds. So far, no adventurous squirrel has climbed to the top to bite away the buds and flowers.
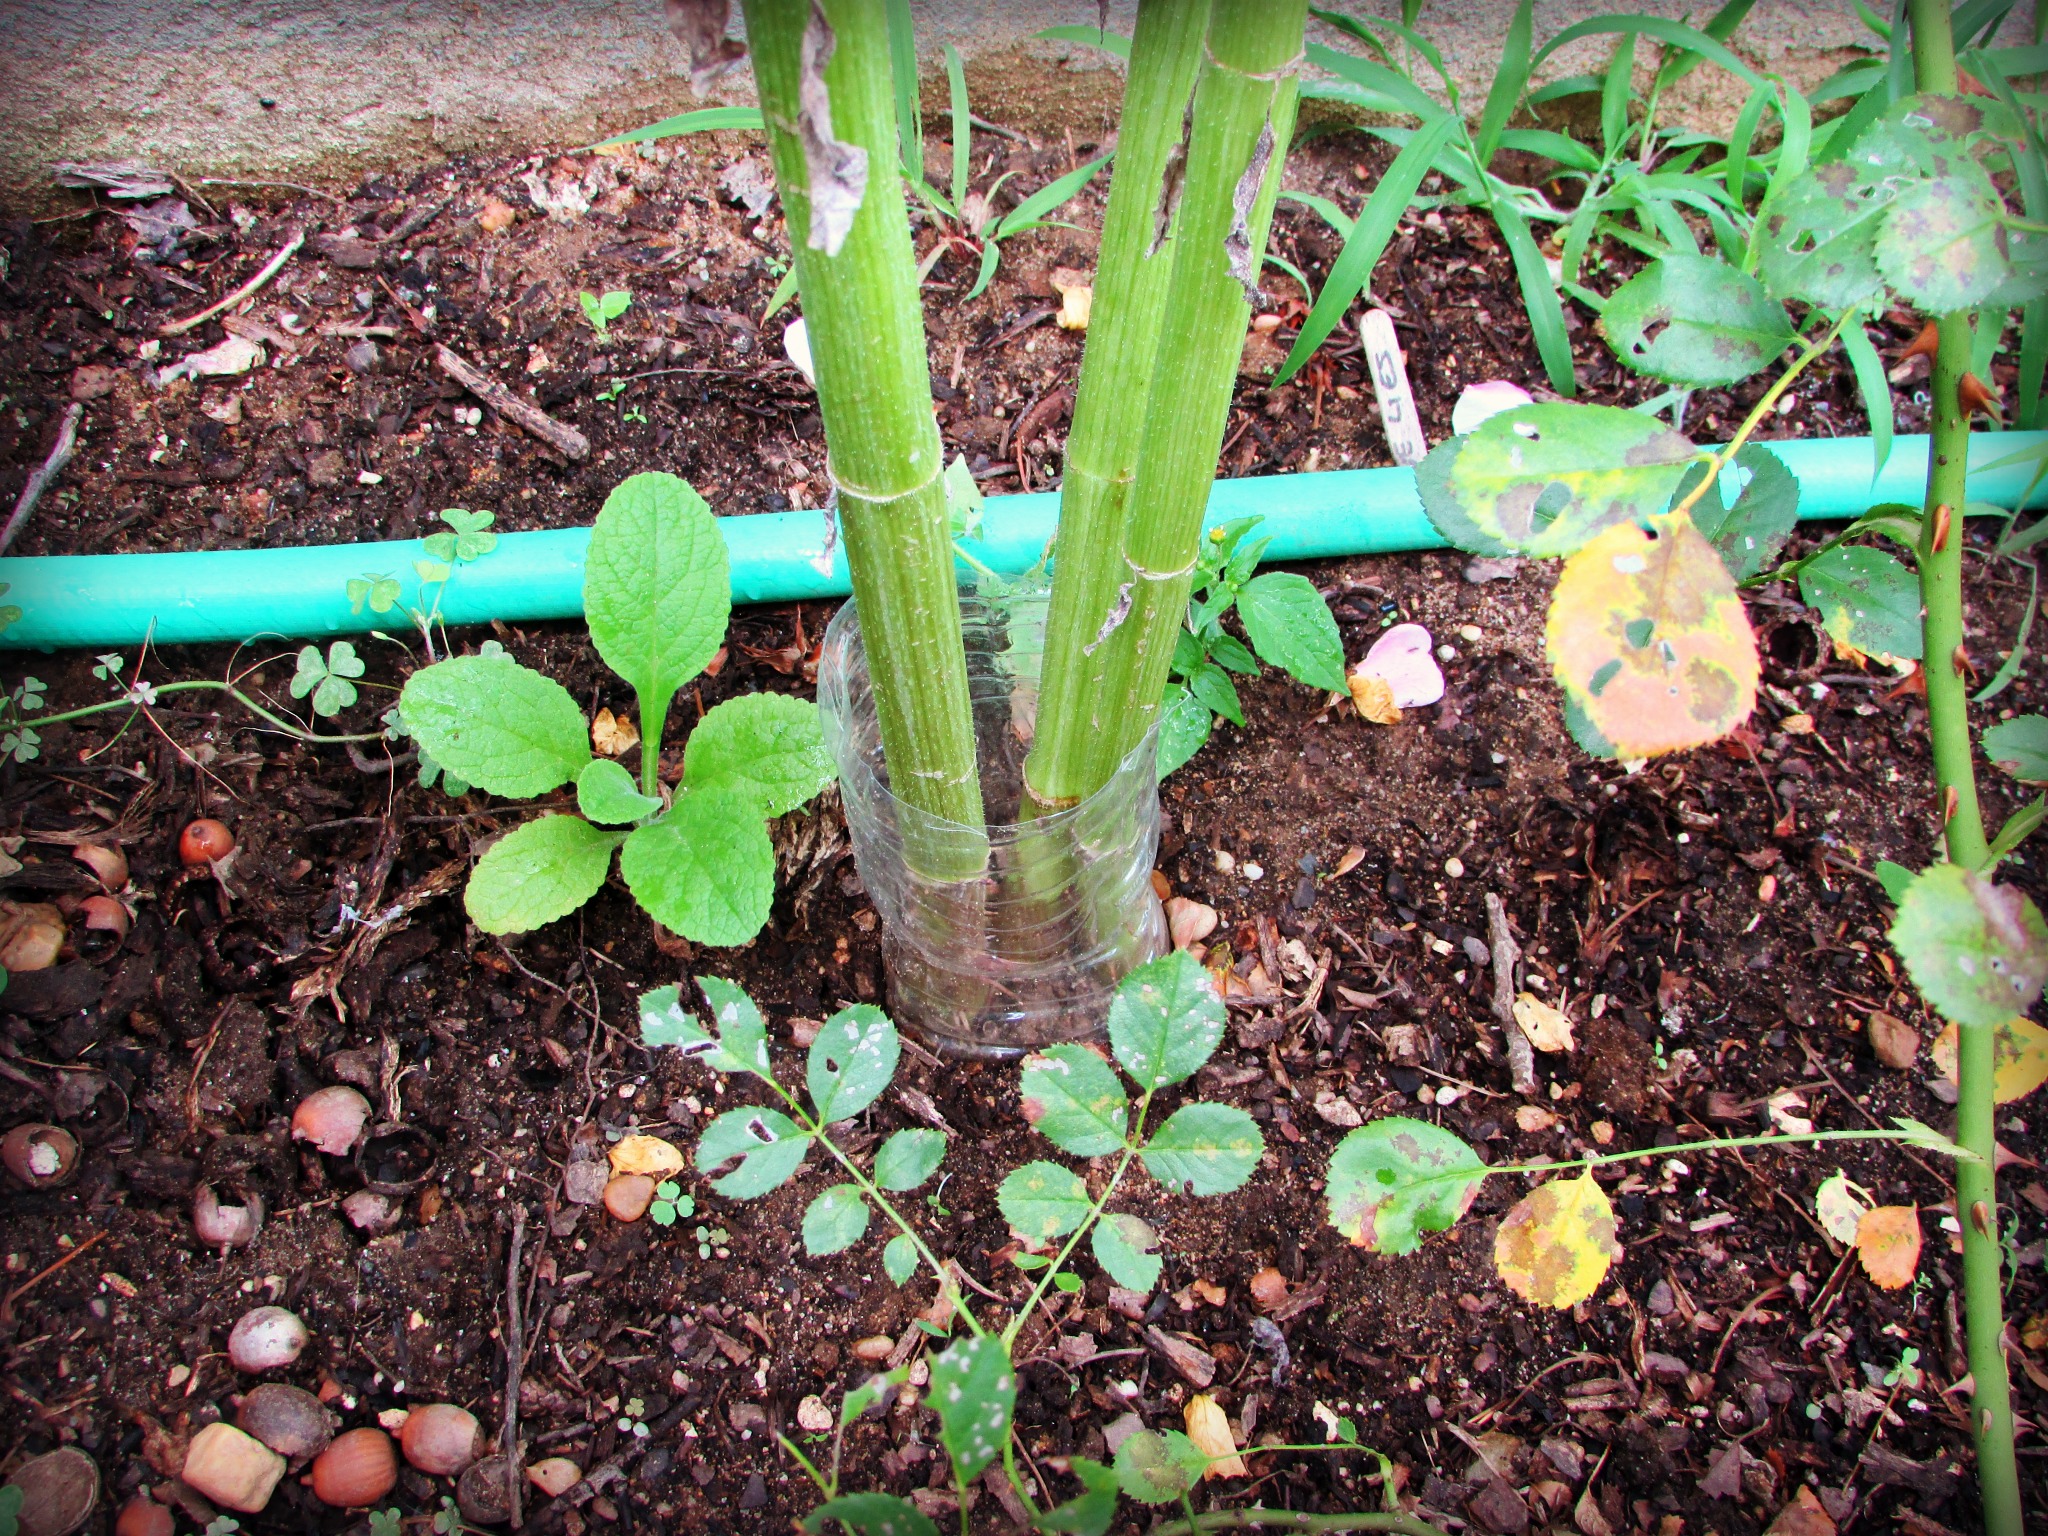
I owe my success in growing sunflowers this year to empty water bottles. After the sprouts broke through the soil I placed a bottomless water bottle, with the top cut away, around the shoot. In a few gardens, as the sunflower grew, I added another bottle for more protection. (Bunnies are very good at standing up on their hind legs to reach the top of a tender plant.) If you live in an area that stays warm through November, there is still time to plant a crop of sunflowers.
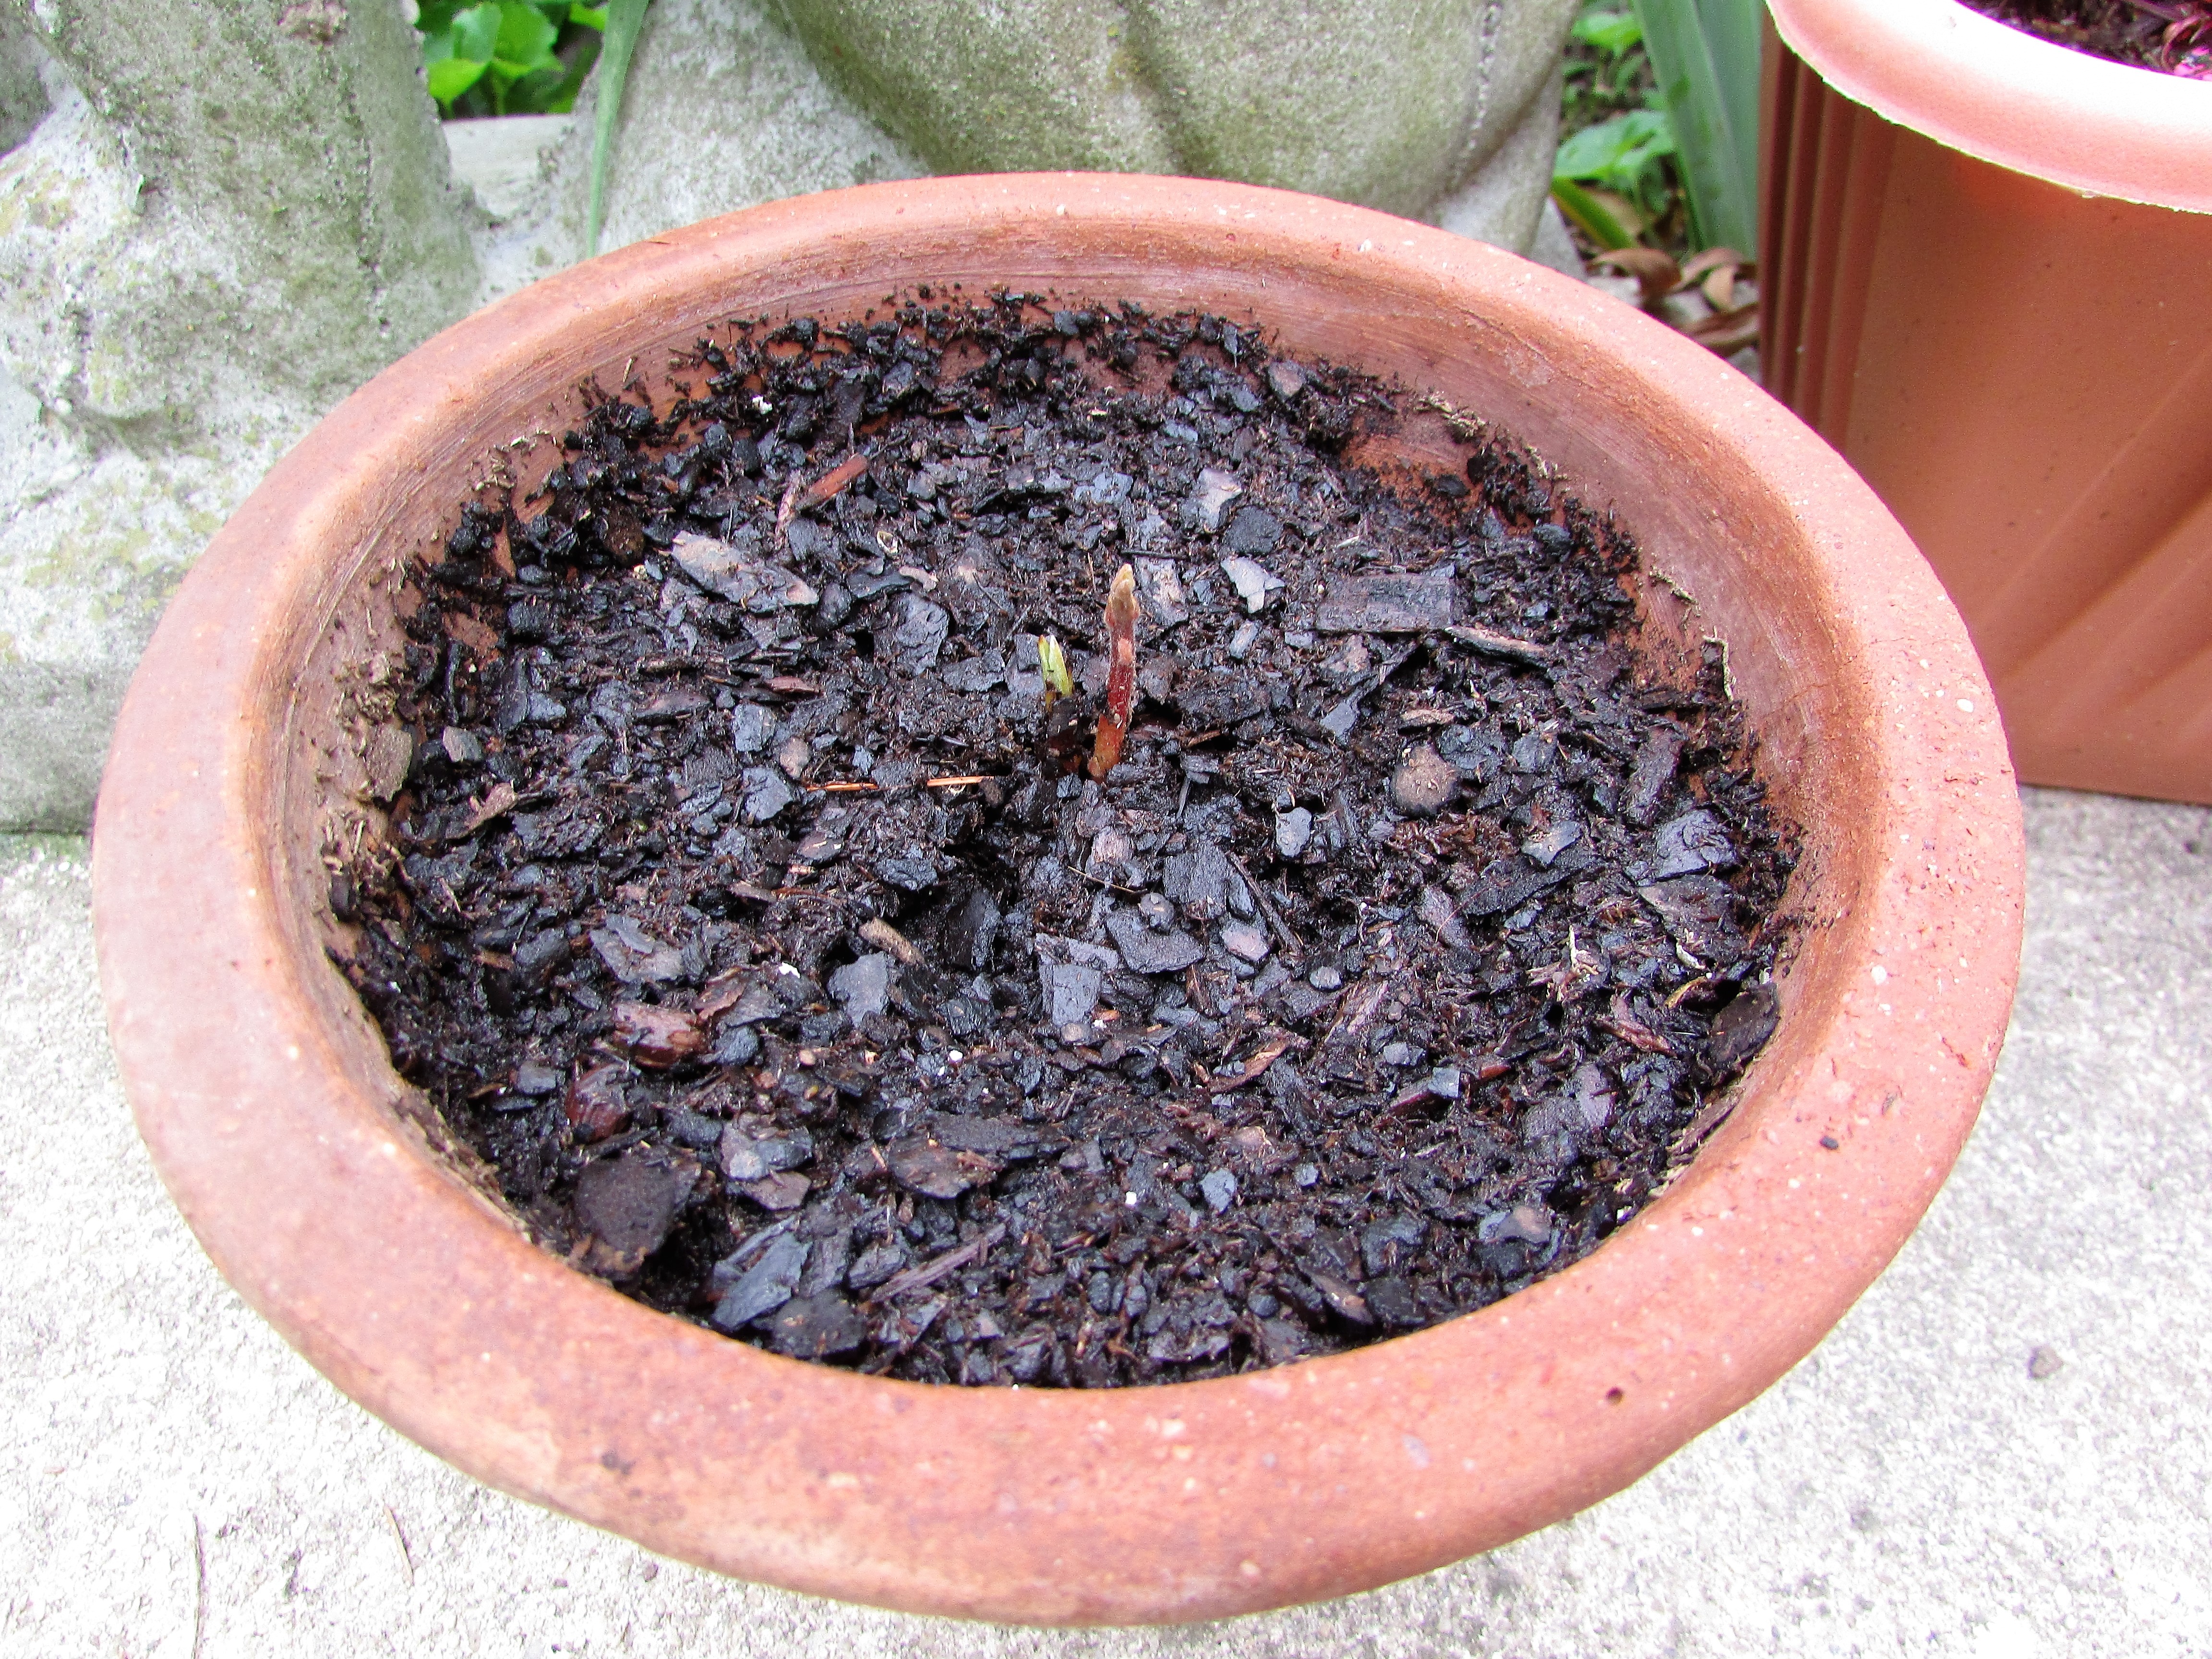
In late February I posted on planting an AVOCADO pit yet again. Several times I have been tempted to throw the dirt away and grow something else in the pot, but I’ve stopped myself. Now I’m glad to say the pit has sprouted into not just one, but two small stalks. I’ll continue to update as it grows.
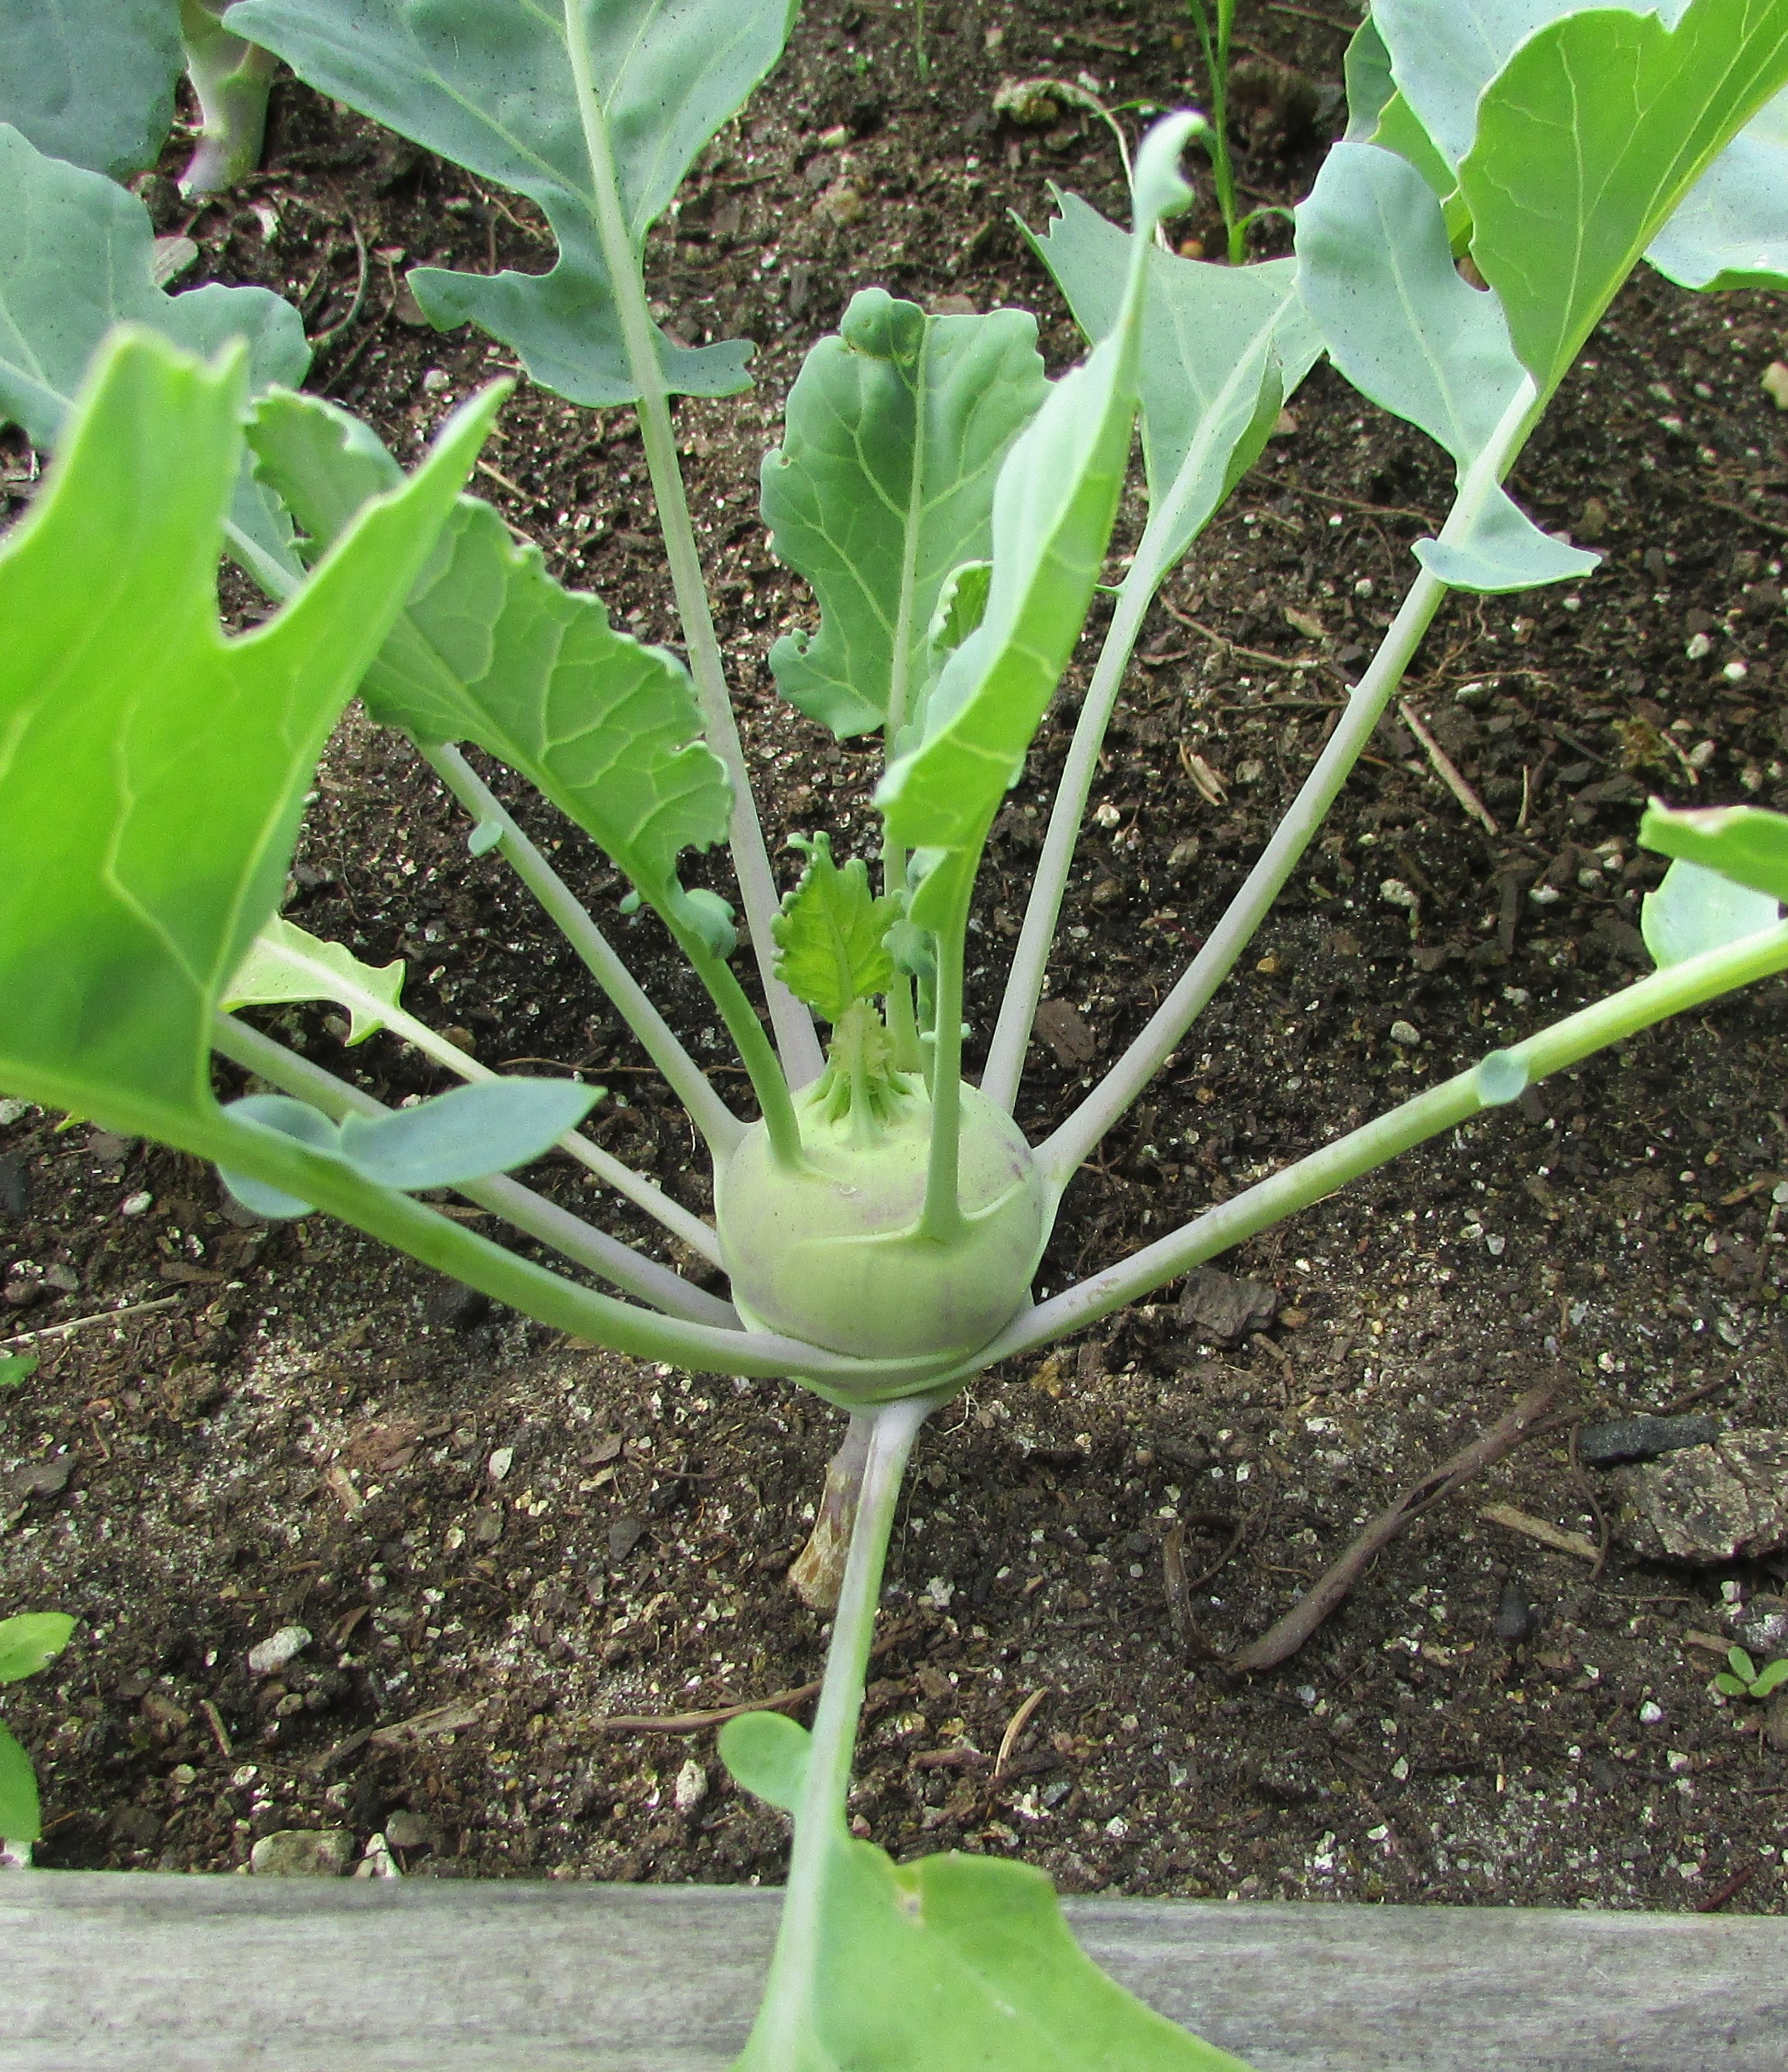
Kohlrabi! Who knew it was so easy to grow? I’ve seen it on seed racks year after year and never tried it. This year I remedied that by planting a free packet someone gave me. I’m excited by the plants that are growing now. I’ve read kohlrabi tastes like a mix of cabbage and broccoli, and can be eaten cooked or raw. It is also recommended as a good addition to soup puree. Kohlrabi leaves can be cooked like mustard greens.
“Browallia earns its nicknames of amethyst flower and sapphire flower for the richness of its small blue flowers, which pop out like jewels against the bright green of its foliage. A tidy mounding plant, it’s great in containers or planted as edging in a neat row at the front of the border.” ~ Better Homes and Gardens
I planted a beautiful browallia plant in a rustic pot this year. It’s thriving in a spot that receives strong morning sunlight. I love the beautiful amethyst shade of its petals.
I’ve also experimented with pressing browallia flowers and have found the best way to process them is to use the standard method of pressing in an older book. Place the flowers between the pages, weight the book down, let it sit for about a week, then remove the flowers and store between acid free paper. When I attempted to flash-dry the petals in the microwave, which works perfectly for the Johnny-Jump-Up Violas in the photograph with them, the flowers lost all their color and dried to an unusable tan shade.
At first glance I was entranced. The flowers resemble a bottlebrush, and are a lovely pinkish hue tinged with magenta tips. The plant is called Ptilotus exaltatus and is native to Australia. Its nickname is Joey. Since my husband was called Joey as a child, this plant was a must-have for me.
Another plus is Ptilotus exaltatus is drought resistant. I planted it in a spot that is very dry and hot. I have high hopes. I debated whether to plant in the ground or keep ‘Joey’ in a pot to bring inside in the Autumn, but when researching found that seeds are available to grow this plant. If I can’t propagate it, I will try to grow from seed next year.
The plant is loaded with new buds; I can’t wait to see it fully blooming and ablaze in the sunshine.
I planted several roses in April of this year. I replaced the cottage garden annuals that grew in the long border with a half dozen rose bushes in hopes that the labor intensive area would become easier to maintain. I chose varieties that promised fragrance, and I haven’t been disappointed. Heirloom, Fragrant Cloud and Singing the Blues are definitely roses with a beautiful scent. (These roses are available from local retail stores and through Star Roses)
Singing the Blues
I enjoy cutting ready to burst buds from the bushes to enjoy indoors. Adding a few sprigs of foliage is a perfect foil for the beauty of the bloom.
Fragrant Cloud
I use ivy and variegated vinca vine growing along the borders of my yard. These plants work well with flowers in arrangements. I also have an abundance of sprouts growing from our original trumpet vine. The trumpet vine sends out long-reaching roots, the roots send up dozens, if not hundreds, of sprouts, each one capable of growing into another gigantic trumpet vine. I use them in floral arrangements, but they are not long lasting, and wilt quickly. The smaller leaves of the trumpet vine press well and look pretty in my greeting card designs, but would I ever plant a trumpet vine again? Absolutely NOT!
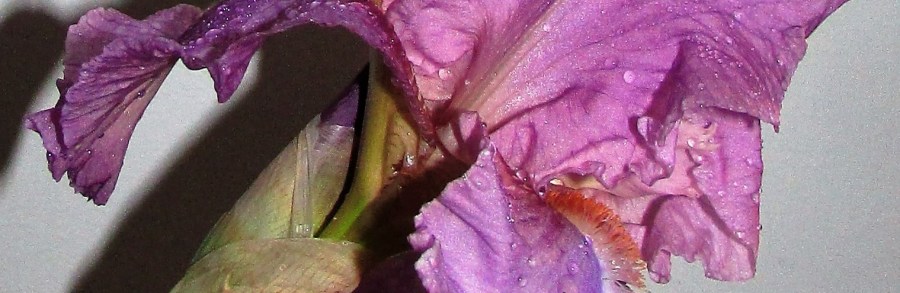
My favorite iris plants are blooming. Because my area of the country is swamped in daily rain showers at this time, I decided to bring these beauties inside to enjoy in a vase. The colors, frills and fragrance of iris plants make them a good choice for indoor bouquets. Be prepared for complete enchantment when their fragrance fills the air. I can’t remember the name of this variety, but the scent is a mixture of grape-notes and soft florals.
A vase with weight on the bottom is the best choice for displaying iris.
“Now every field is clothed with grass, and every tree with leaves; now the woods put forth their blossoms, and the year assumes its gay attire.” ~Virgil
Color Your World – 120 Days of Crayola has been a blog challenge I’ve enjoyed. I’ve participated through the 120 days at least a dozen or more times, and am very grateful to Jennifer Nichole Wells for her great idea. My last entry for this challenge will end on what I consider one of the prettiest colors in the world…yellow-green.
Black Seeded Simpson Lettuce
Yellow-green is the a color of renewal for me. It is the color of Springtime and new growth. Yellow-green blends harmoniously with almost every other color in the rainbow. It is a favorite of mine to use in my pressed flower greeting cards. Here are a few instances of yellow-green growing in my garden.
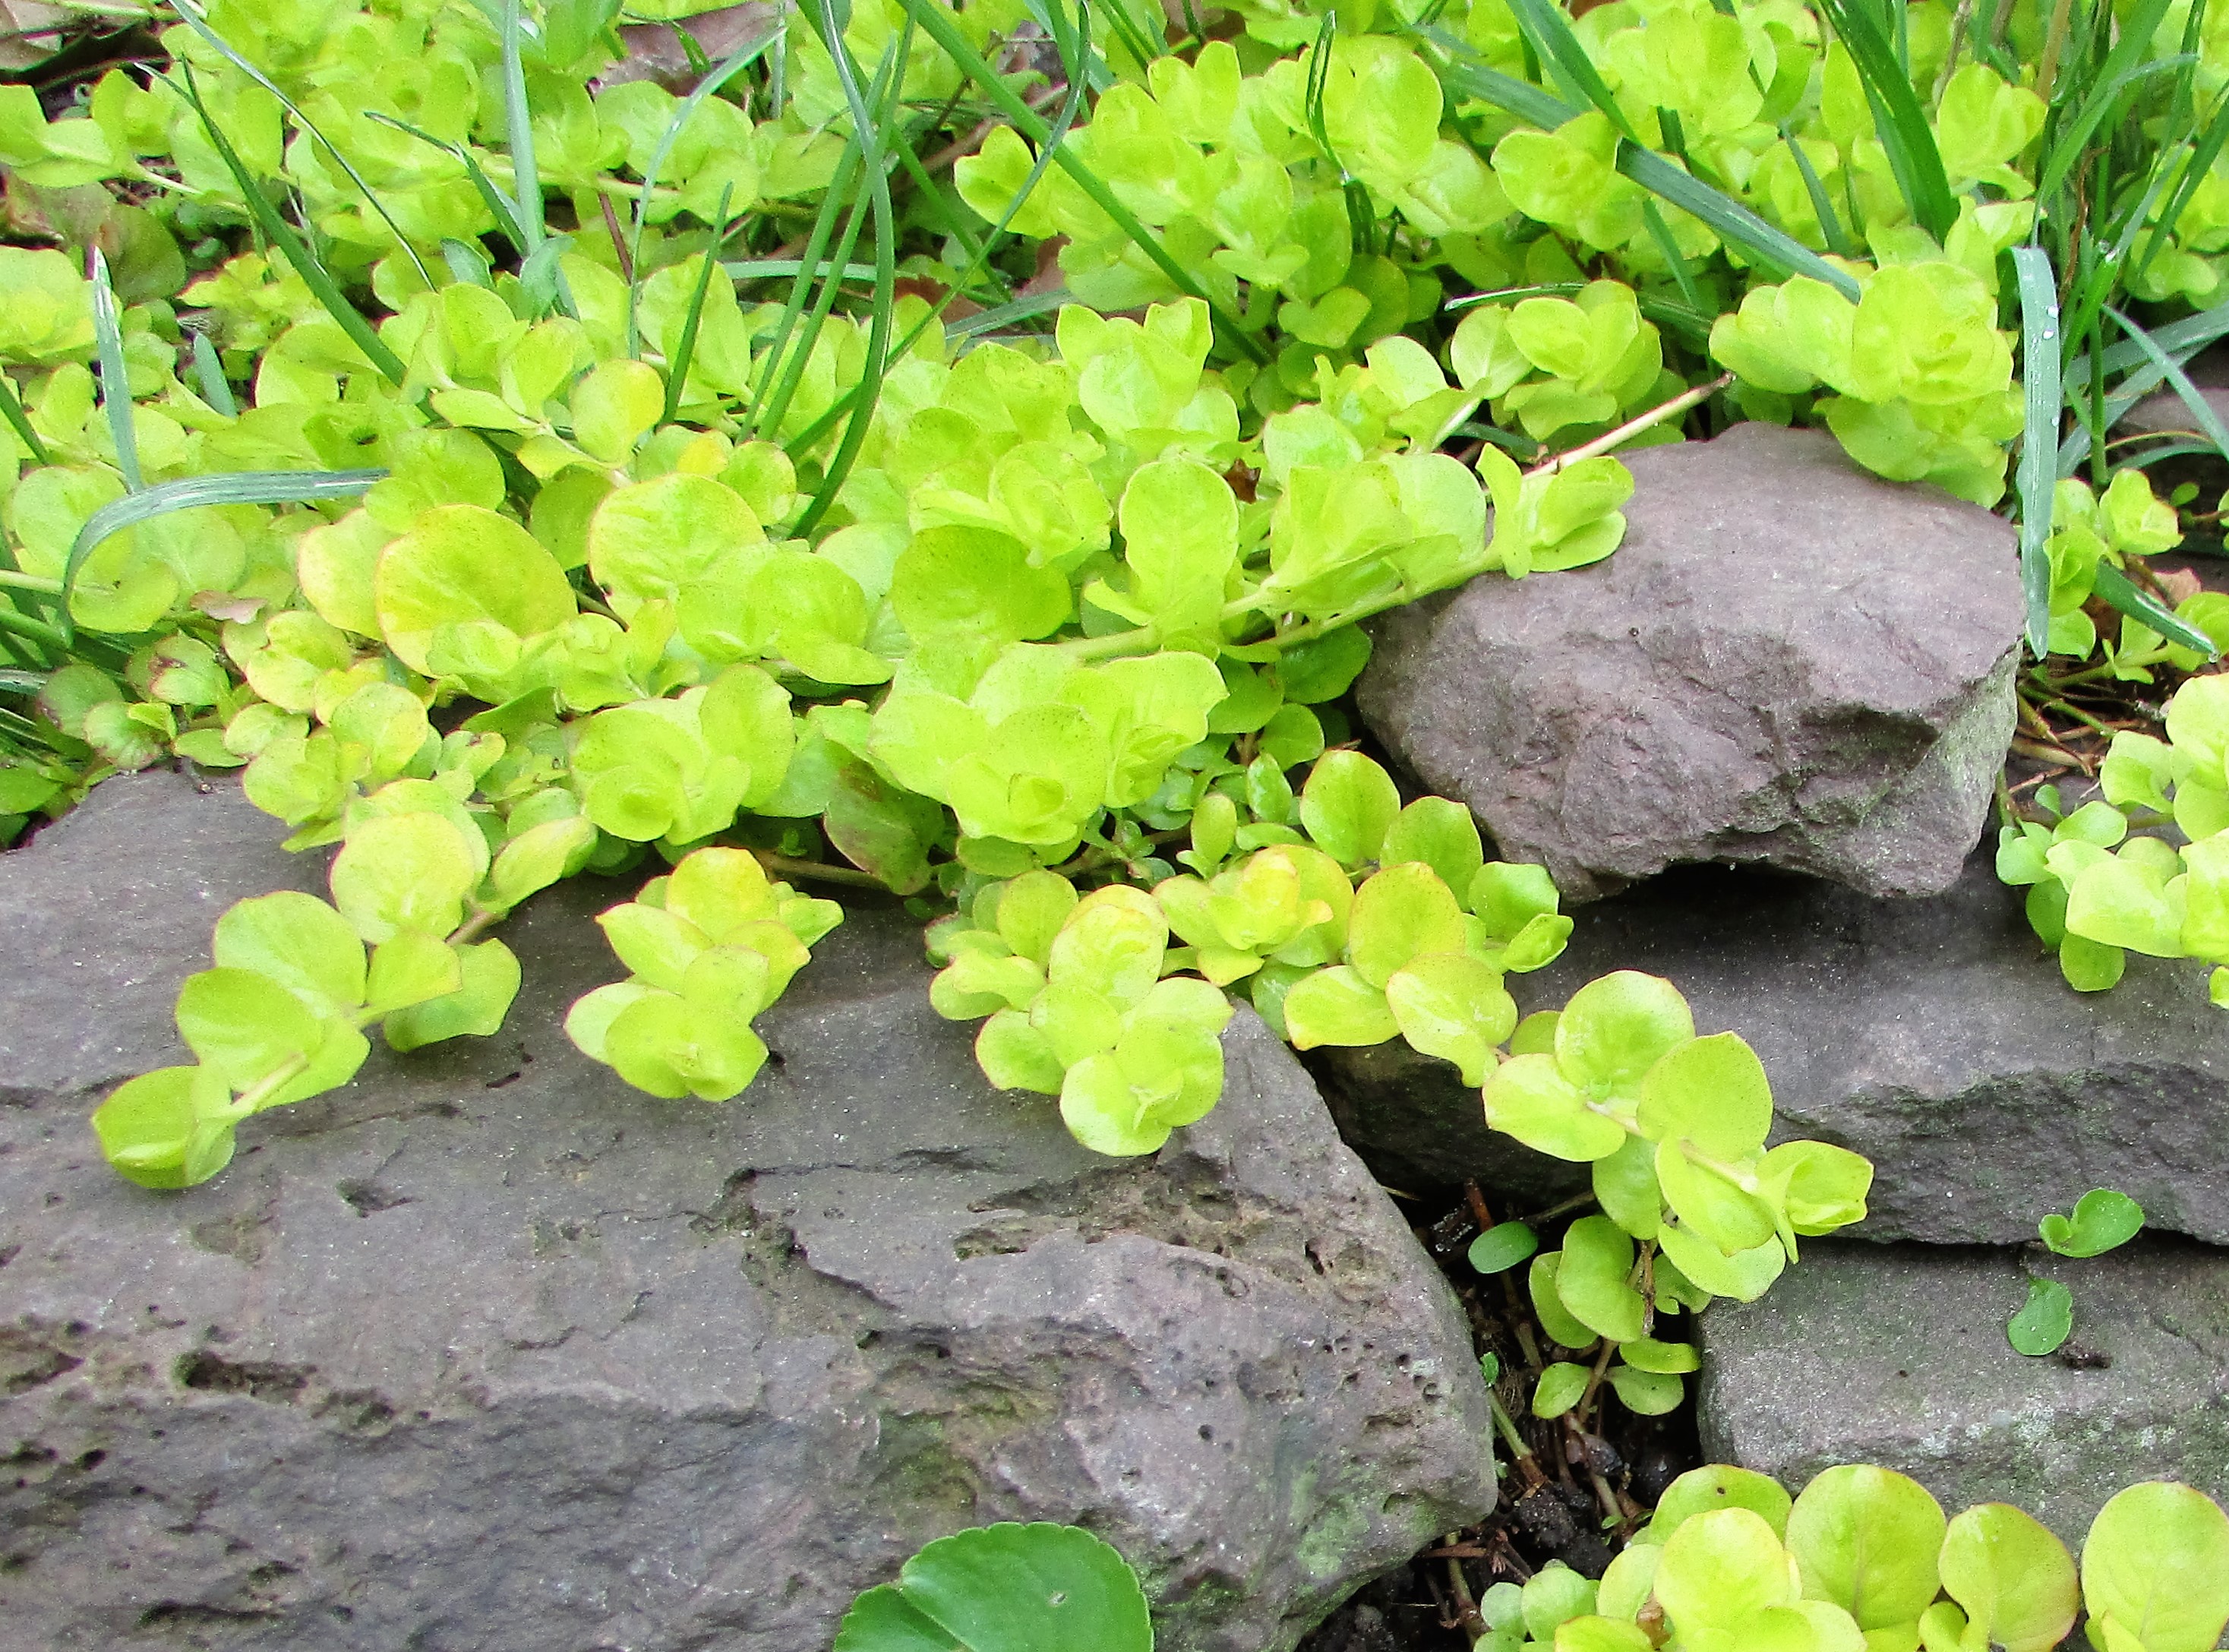
Creeping Jenny
“April prepares her green traffic light and the world thinks Go.”~Christopher Morley
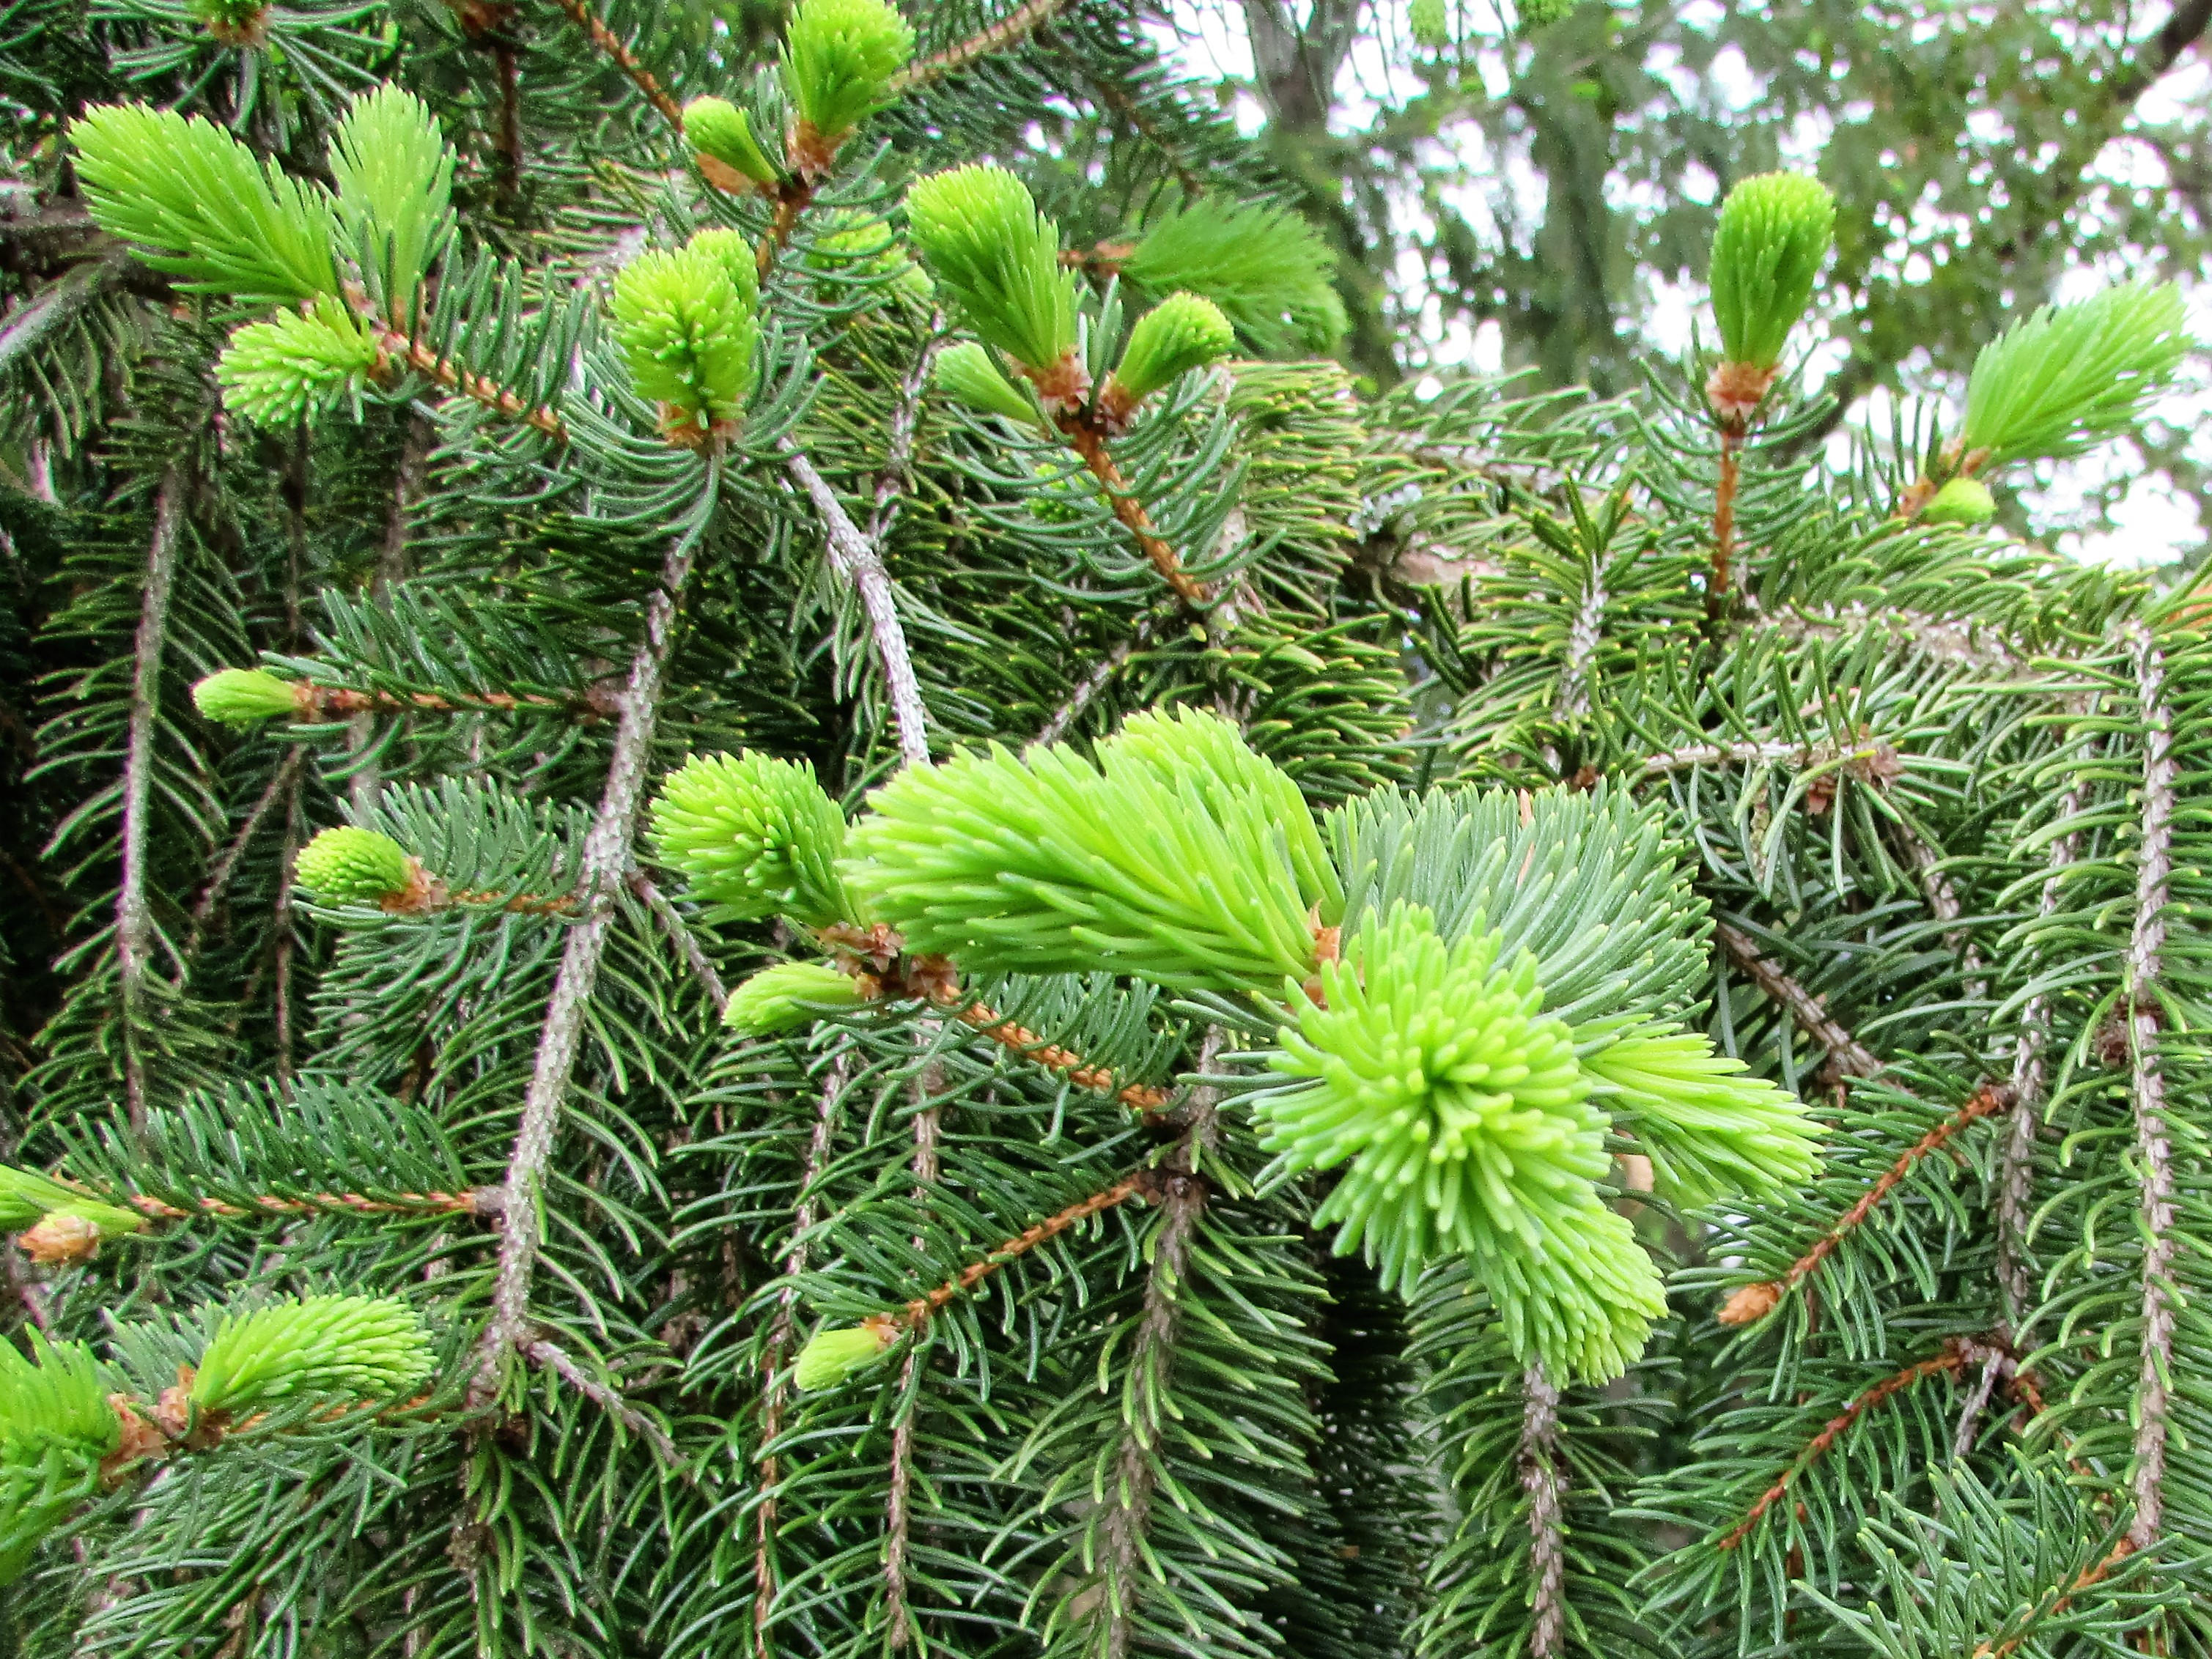
New growth on pine trees
“Spring shows what God can do with a drab and dirty world.” ~Virgil A. Kraft
Spring-cleaning my blog has yielded a few posts that should be bumped back toward the front of the blog. Here’s a good one for this time of year, preventing/treating damp-off disease.
The fluffy white substance on the surface of the potting soil is a seed sprouter’s nightmare. Damping Off is lethal to newly sprouted seedlings. Since I am trying to be as organic as possible this year, I wanted a remedy that would not break my resolve so early in the season. I searched the web and found some odd fixes: lemon jello, ground up moss sprinkled on soil, cinnamon & sand. There were also two remedies I decided were the most logical for me to use. One idea was weak mixture of hydrogen peroxide and water, and the other was a weak solution of chamomile tea. I opted for the chamomile tea.
I went to my local grocery store and picked up a box of tea with ingredients of chamomile alone. There were many other mixes, some with lemon, which probably would also work, but I was taking no chances. When I arrived home I boiled water, steeped one bag in two cups, and let it cool down. I used an old hair spray bottle to treat the affected area. These bottles produce small droplets. A bottle with a heavier spray might beat the small seedlings into the soil, killing them even quicker than the damp-off disease.
Twelve hours later there is no sign of the damp off disease on the soil. To read more check out this forum on Gardenweb. Gardenweb Damping-Off Forum Responses.
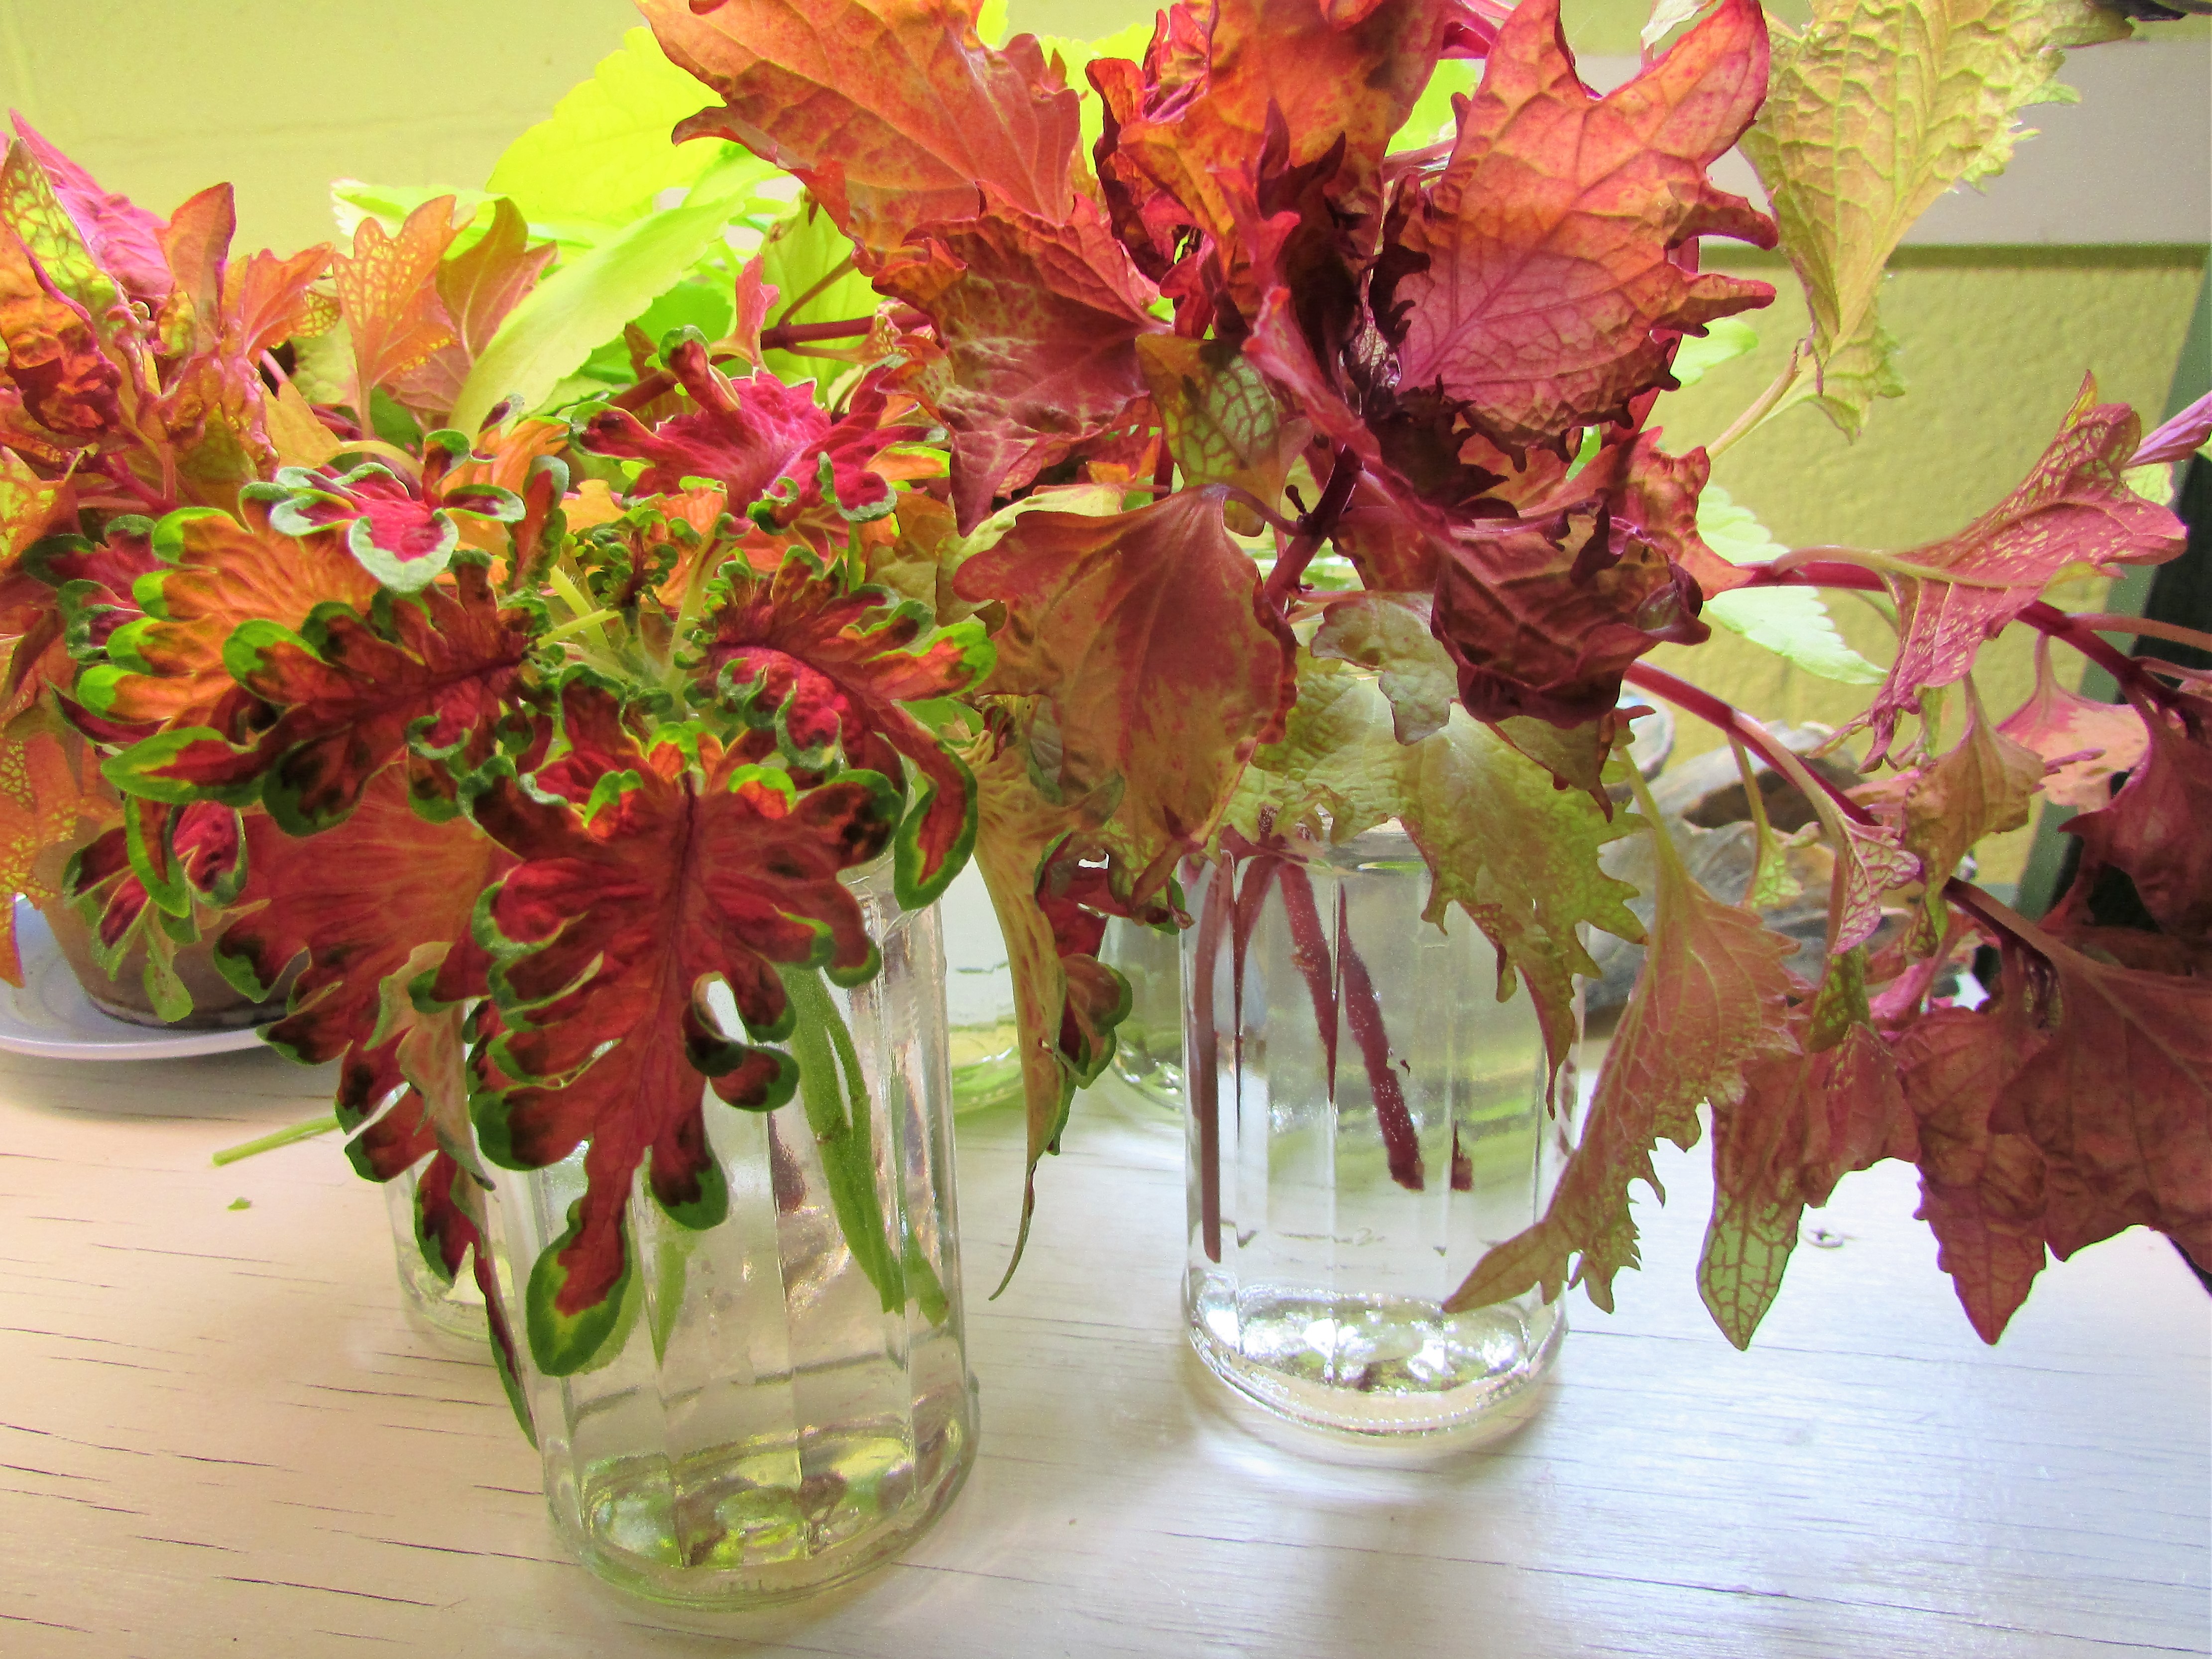
Coleus update: Almost all of my initial coleus plantings have four leaves. It’s time to begin potting them up into individual cups. I use Solo brand 3 oz cups. the seedlings are potted up in Miracle Gro organic potting soil as the growing medium. The coleus are already beginning to show amazing colors. This time of year is very exciting as I watch my sprouts and seedlings develop.
The day is dreary. A perfect moment in time to do a little indoor gardening in preparation for the growing season. The coleus cuttings I took from my outdoor plants in the Autumn have thrived. Now, it is time to take cuttings from these indoor plants, continuing the cycle of growing coleus indoors and out each year.
I took several cuttings of the longest plant branches. An important next step is the removal of leaves that will be below the water line.
My recycled jelly jars are the perfect size for rooting coleus cuttings. Direct sunlight is not a good idea with clear jars, but green glass is supposed to be good for rooting in direct sunlight. I placed my cuttings under a grow light, but any soft, indirect lighting will work. Within four weeks I should have dozens of roots growing from the stem. At that point I will place the coleus in potting soil and grow on in the house for a few more weeks, until the danger for frost is completely gone. Coleus will not survive a heavy frost.
I’m getting a later start than usual with my winter sowing. Instead of planting just cold-hardy varieties this year, I’m going to try a bit of everything, even my tomatoes and eggplant seeds. Here’s a repost of one of my favorite methods for growing seeds without taking up too much room in the house. If you have any plastic milk cartons or other large clear/translucent plastic containers, give winter sowing a try. Happy Gardening!
Winter Sowing is an easy way to start your own transplants.
Winter Sowing is the process of planting hardy and half-hardy seeds in clear or translucent containers. The containers are sealed with duct tape and placed outdoors in the winter weather. This method of sowing seeds has been attributed to Trudi Davidoff.
Over the next week or two I hope to Winter Sow more of my perennial seeds, and later in the season some of my vegetables, annuals and herbs. A good source of information and discussion about Winter Sowing can be found on the Gardenweb Winter Sowing Forum.
“STEPS FOR WINTER SOWING (My own technique, might differ slightly from how others winter sow.)
1. Poke holes in the bottom of your container with a sharp tool or a hot screw driver. A soldering iron works too, but most folks don’t have one.
2. Cut the container in half, leaving a small tab to keep the two halves connected.
3. Add an inch of potting soil, add about two inches of seed starting mixture to top of soil. Moisten all, let water run out the bottom. Plant seeds. Label the outside of the container with permanent marker. You might need to go back over the labeling before planting time. Even a permanent marker fades in the sunshine.
4. Tape two halves together with duct tape.
5. Place outdoors in a sunny spot. DO NOT KEEP CAP ON TOP. The top needs to be left open for moisture.
6. Check periodically for sufficient moisture.
7. When temperatures warm up, open container in the daytime. Be very careful to check daily that the soil is moist after opening. Soil and seedlings dry out quickly.”
PART II
I’ve added to my cache of winter sown containers. The warm springlike weather of the past weeks helped many seeds sprout. As they are HHA (Half Hardy Annuals) and cold tolerant vegetables, I’m not worried about the possible onset of colder temperatures through the next weeks. The plastic containers work as mini-greenhouses and protect the seedlings from frost. The cold will strengthen them and keep them from becoming leggy and outgrowing their containers. I’ve had a lot of fun with this project. I also set aside a portion of each type of seed so that in the event that some of the containers fail I will have a back-up.
A view of some of the sprouts inside their containers. The above photos show my recycled orange juice bottles. These mini-greenhouses are light in weight. To windproof them I wedge them in among the heavier milk jugs. (I don’t use small containers anymore, they dry out too quickly. I try to use gallon-sized or larger containers.)
A bird’s-eye-view through the top of a milk jug. The seedlings inside are asters.
Two of my mini-greenhouses had indications of the dirt drying out. I placed these inside a plastic shoebox filled with water, a perfect fit, and let them soak up a little moisture through the drainage holes in the bottom. This worked and within a half hour they were watered.
PART III
Poppies! I LOVE poppies, but I have some problems with poppies too. Number one on my list of loves is the way poppies develop big, luscious looking pods. When the pods begin to widen and split to reveal the color of the flower inside, honestly, I must admit I run out into the yard several times a day to see if the silken petals have opened. There is something magical in the wispy crown in the center of each flower too. Often there will be a splotch or two of contrasting color at the base of each petal. The foliage of many poppy plants glows in beautiful bluish green tones. Yes…I LOVE poppies.
One of the major drawbacks of poppies, at least in my opinion, is how hard it is to grow them from seed. For years I followed the advice on the back of the packets and on the pages of reliable gardening books and sowed them directly in the ground. This NEVER worked for me. Heavy spring rains ALWAYS washed my poppy seeds away before they could sprout. If they did grow, the delicate small seedlings would be beat into the ground by that same rain. The “experts” say poppies don’t transplant well. I agree if they are grown in the house, but I have found a way to get a head start on poppies and that method is winter sowing.
I am also including a post that shows the results of my winter sown poppies: Poppies
If you want to grow poppies this year, and have a milk carton or two on hand, give winter-sowing a try. It only takes a few minutes to create a miniature greenhouse to place outside in the sunshine. Happy Gardening!
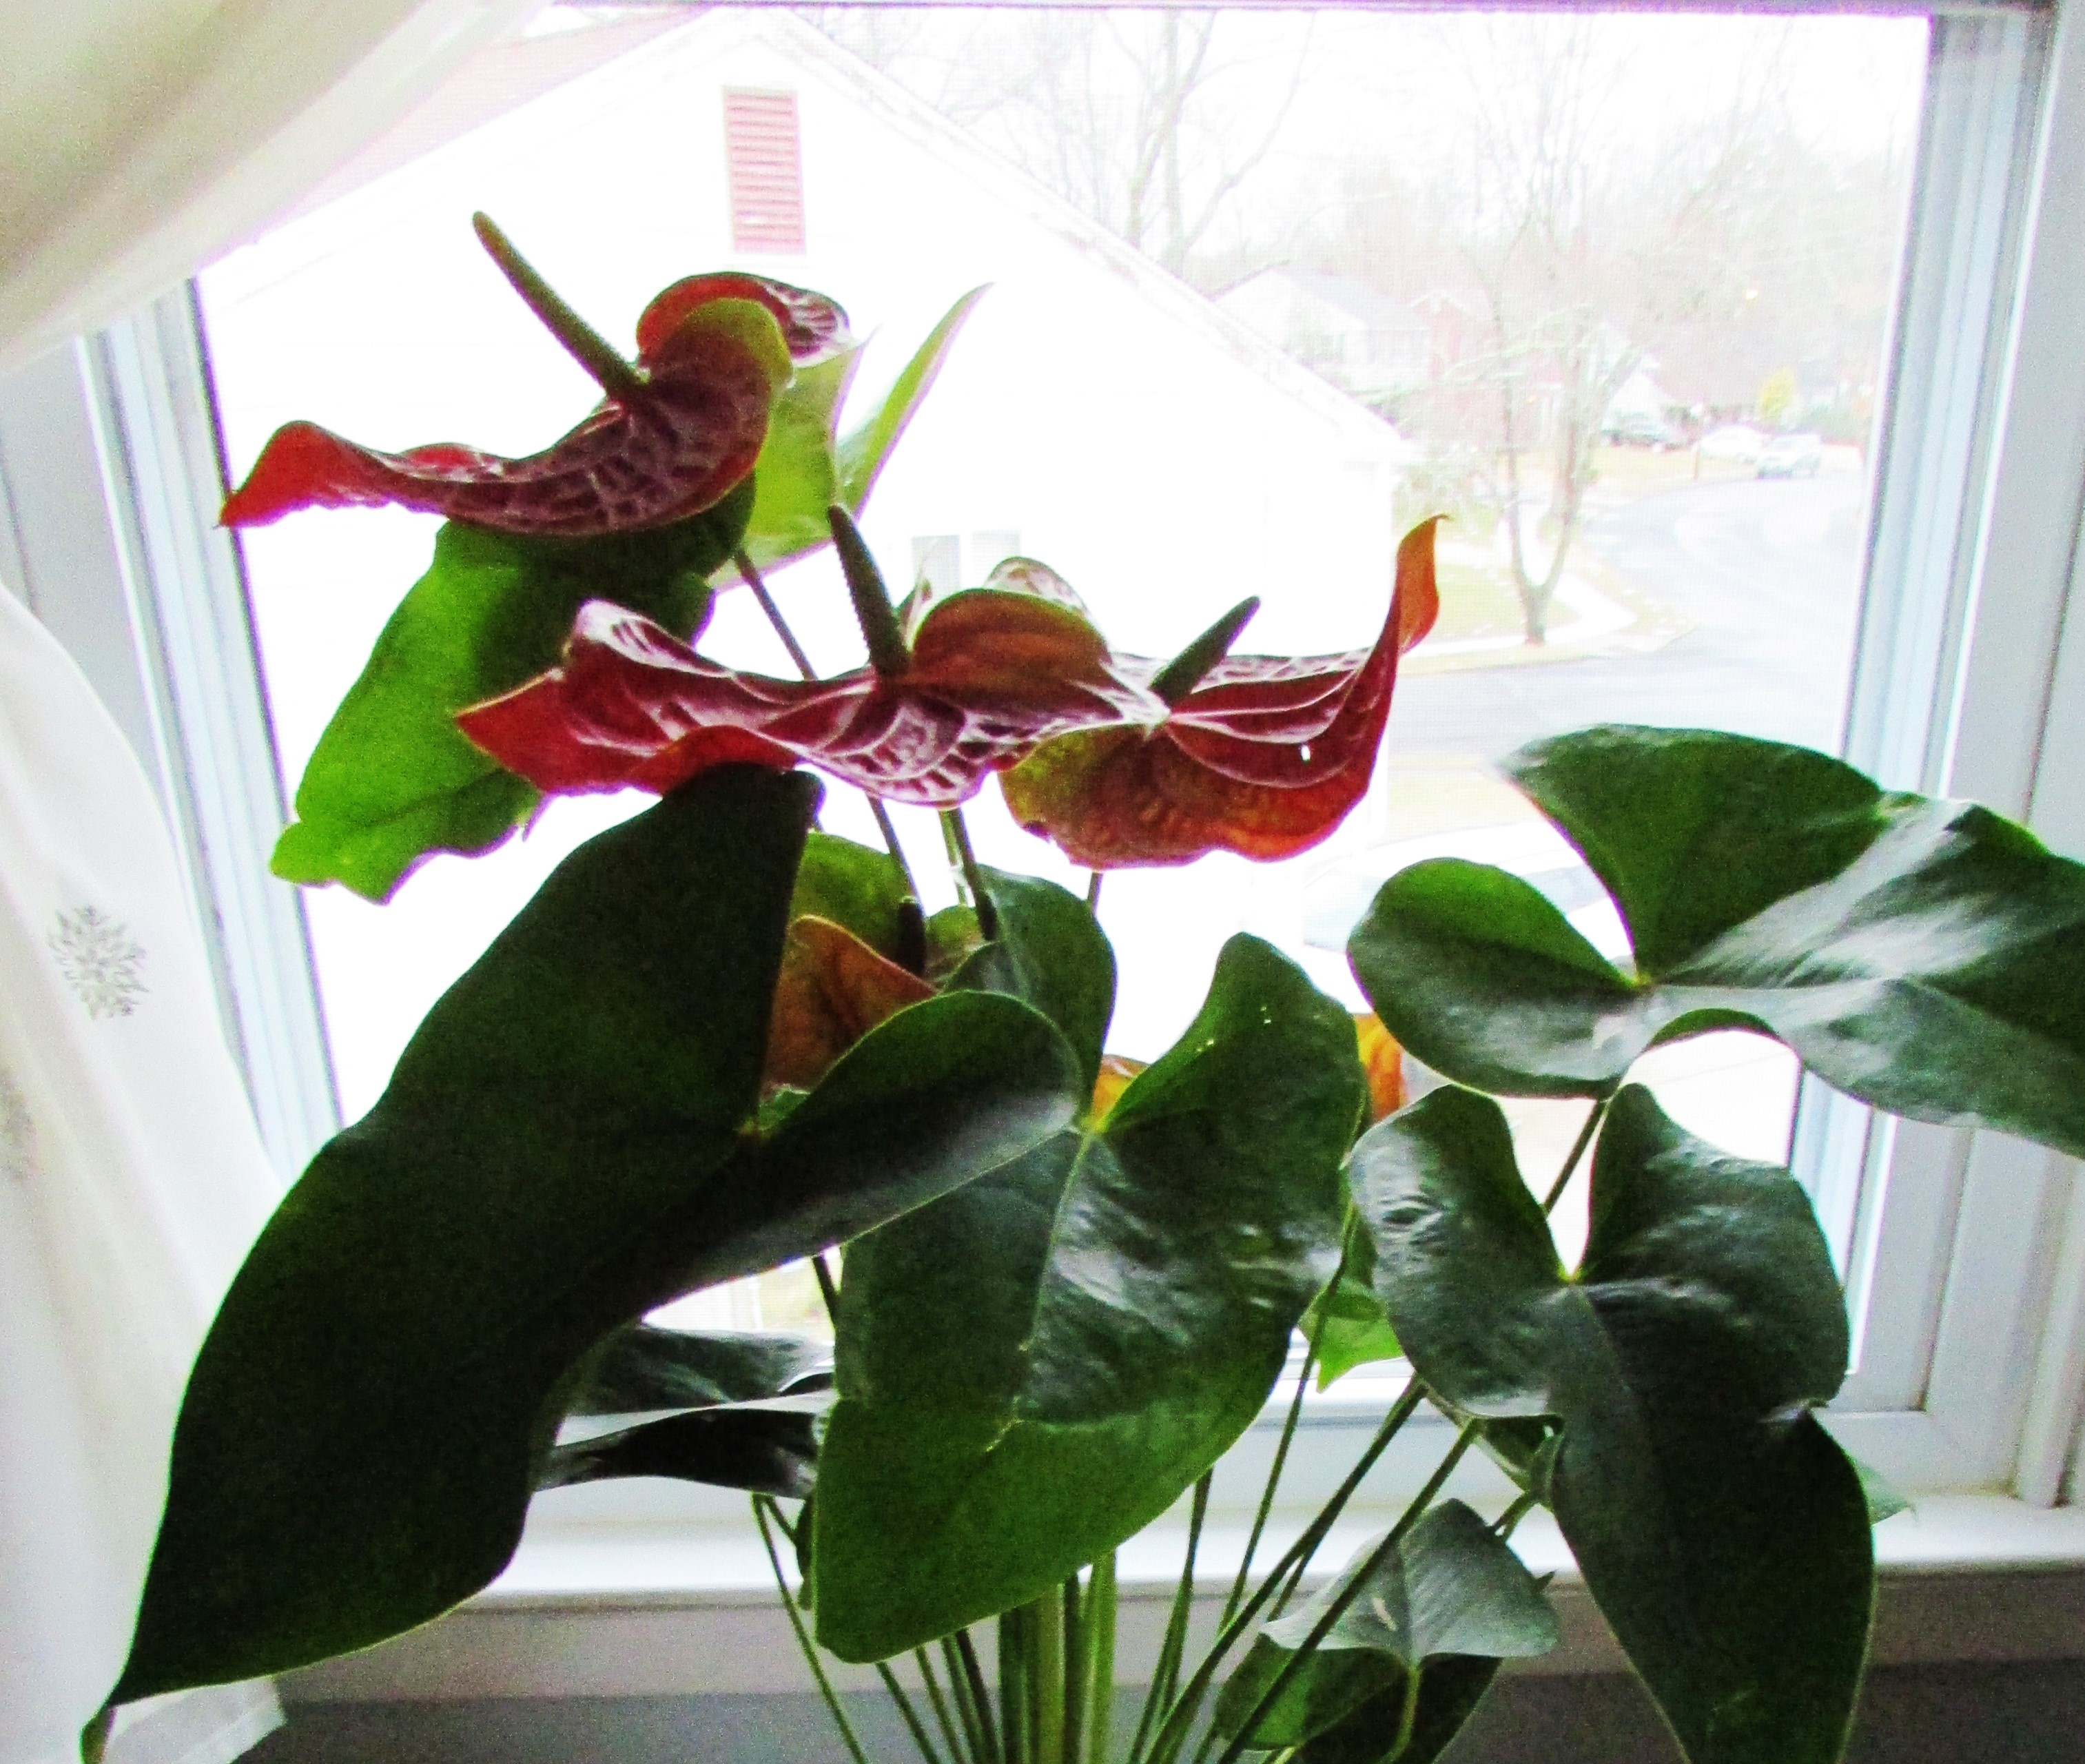
Winter Joy is standing beneath this enormous display of anthuriums. The basket of tropical blooms is hanging from the ceiling of the Longwood Gardens Conservatory in Kennett Square, Pennsylvania. In the midst of winter, what a blessing it is to have this lovely garden within an hour’s drive of my home.
An extra dose of winter joy awaited me as I browsed in the visitor center gift shop. The same anthuriums, probably grown in overabundance for the display, were on sale for a fantastic price…$6.50 for an 18 inch plant covered in bloom. JOY!
Wild Garden Cress is a very hardy plant…or as some would say…a weed. This beautiful specimen, regardless of the frigid temperatures, is growing between the rocks bordering my front gardens. Garden Cress is a plant with fortitude. No matter what the conditions I can usually find sprigs of it in my yard.
Wild Garden Cress is an edible weed. A terrific article with good information can be found at The Potager Page.
A synonym of fortitude is courage. I think this amazing little plant has plenty of courage.
I love Salada’s Lemon Lively green tea blend. A little honey and a teabag in boiling water bring me a few moments of peace.
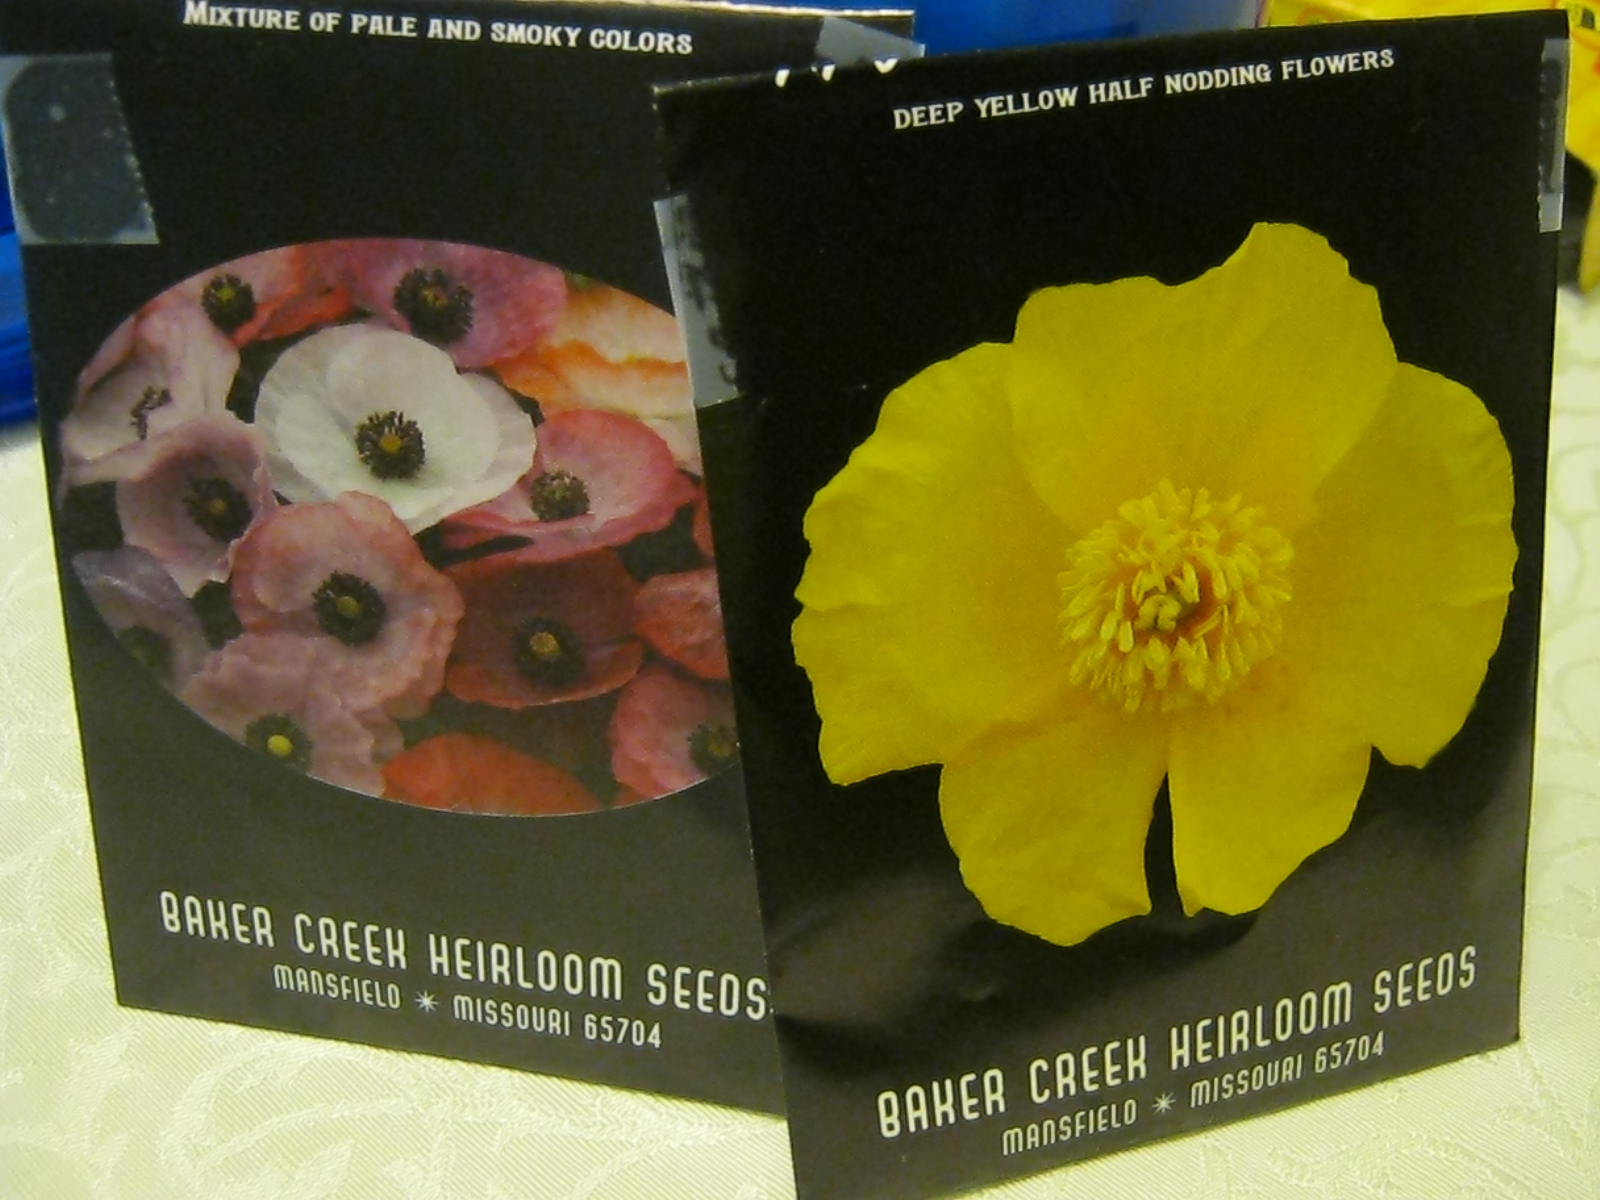
I also use the tea packets to share seeds with relatives and friends. Early this morning I was at my desk, wrapping some new varieties from Baker Creek Heirloom Seeds in foil and inserting them in tea packets, to give to my sister later today.
I love products that have packaging that can be recycled. At this time of year I save salad containers and other clear plastics to use as miniature greenhouses for seed starting. Gardening is expensive and it helps to find good ways to cut corners by recycling. Happy Gardening…Spring is on its way. Color Your World – 120 Days of Crayola – Fern Green on Salada Package
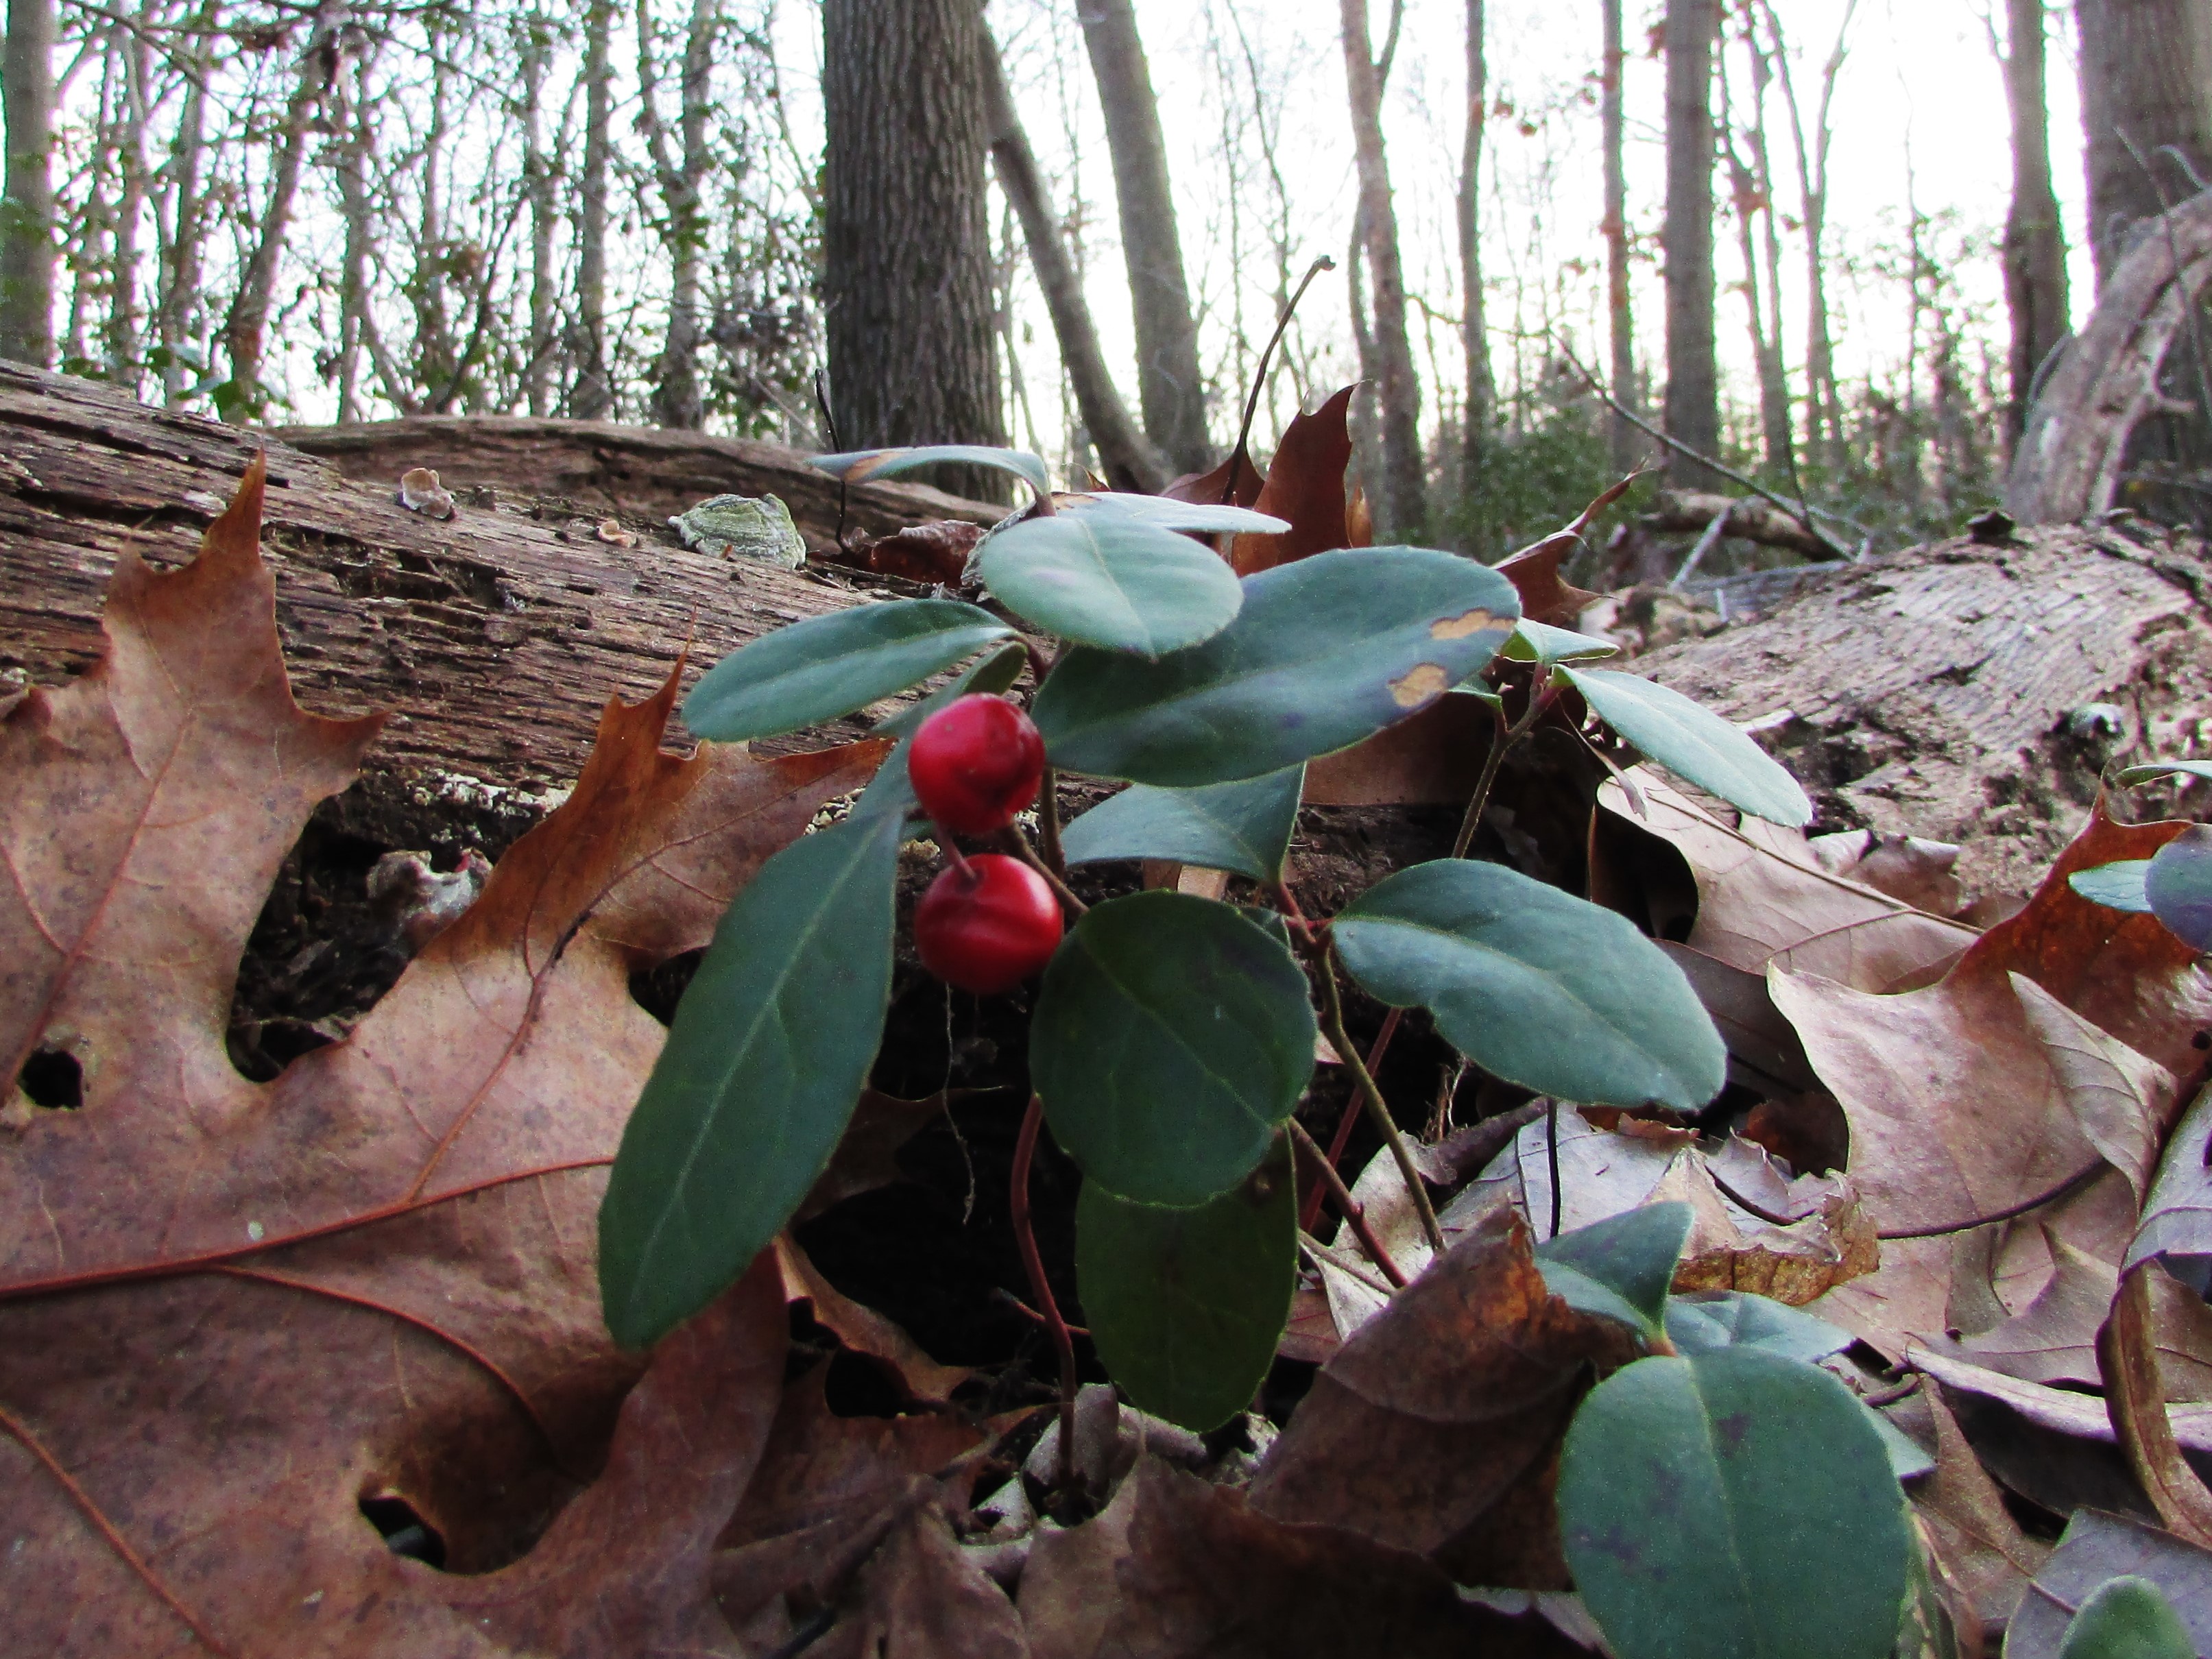
While walking through the woods Saturday afternoon, I came upon a patch of vibrantly green wintergreen plants adorned with red berries. The diminutive plant adds a nice touch of green amid the greys and browns of the forest floor. Wintergreen can be identified by its easily recognized fragrance. The minty flavor of wintergreen is popular in gum and candy.
“Wintergreen berries, from Gaultheria procumbens, are used medicinally. Native Americans brewed a tea from the leaves to alleviate rheumatic symptoms, headache, fever, sore throat, and various aches and pains. These therapeutic effects likely arose because the primary metabolite of methyl salicylate is salicylic acid, a proven NSAID that is also the metabolite of acetylsalicylic acid, commonly known as aspirin. During the American Revolution, wintergreen leaves were used as a substitute for tea, which was scarce”. ~ Wikipedia
* Care must be taken in the use of wintergreen. Taken improperly, or in large doses, the plant is toxic.
“IMPORTANCE TO LIVESTOCK AND WILDLIFE : Wintergreen is not taken in large quantities by any species of wildlife, but the regularity of its use enhances its importance. Its fruit persists through the winter and it is one of the few sources of green leaves in winter. White-tailed deer browse wintergreen throughout its range, and in some localities it is an important winter food. Other animals that eat wintergreen are wild turkey, sharp-tailed grouse, northern bobwhite, ring-necked pheasant, black bear, white-footed mouse, and red fox. Wintergreen is a favorite food of the eastern chipmunk, and the leaves are a minor winter food of the gray squirrel in Virginia.”
~ US Dept. of Agriculture
I love cooking with fresh herbs. I have several on my windowsill at the ready for use in my favorite recipes.
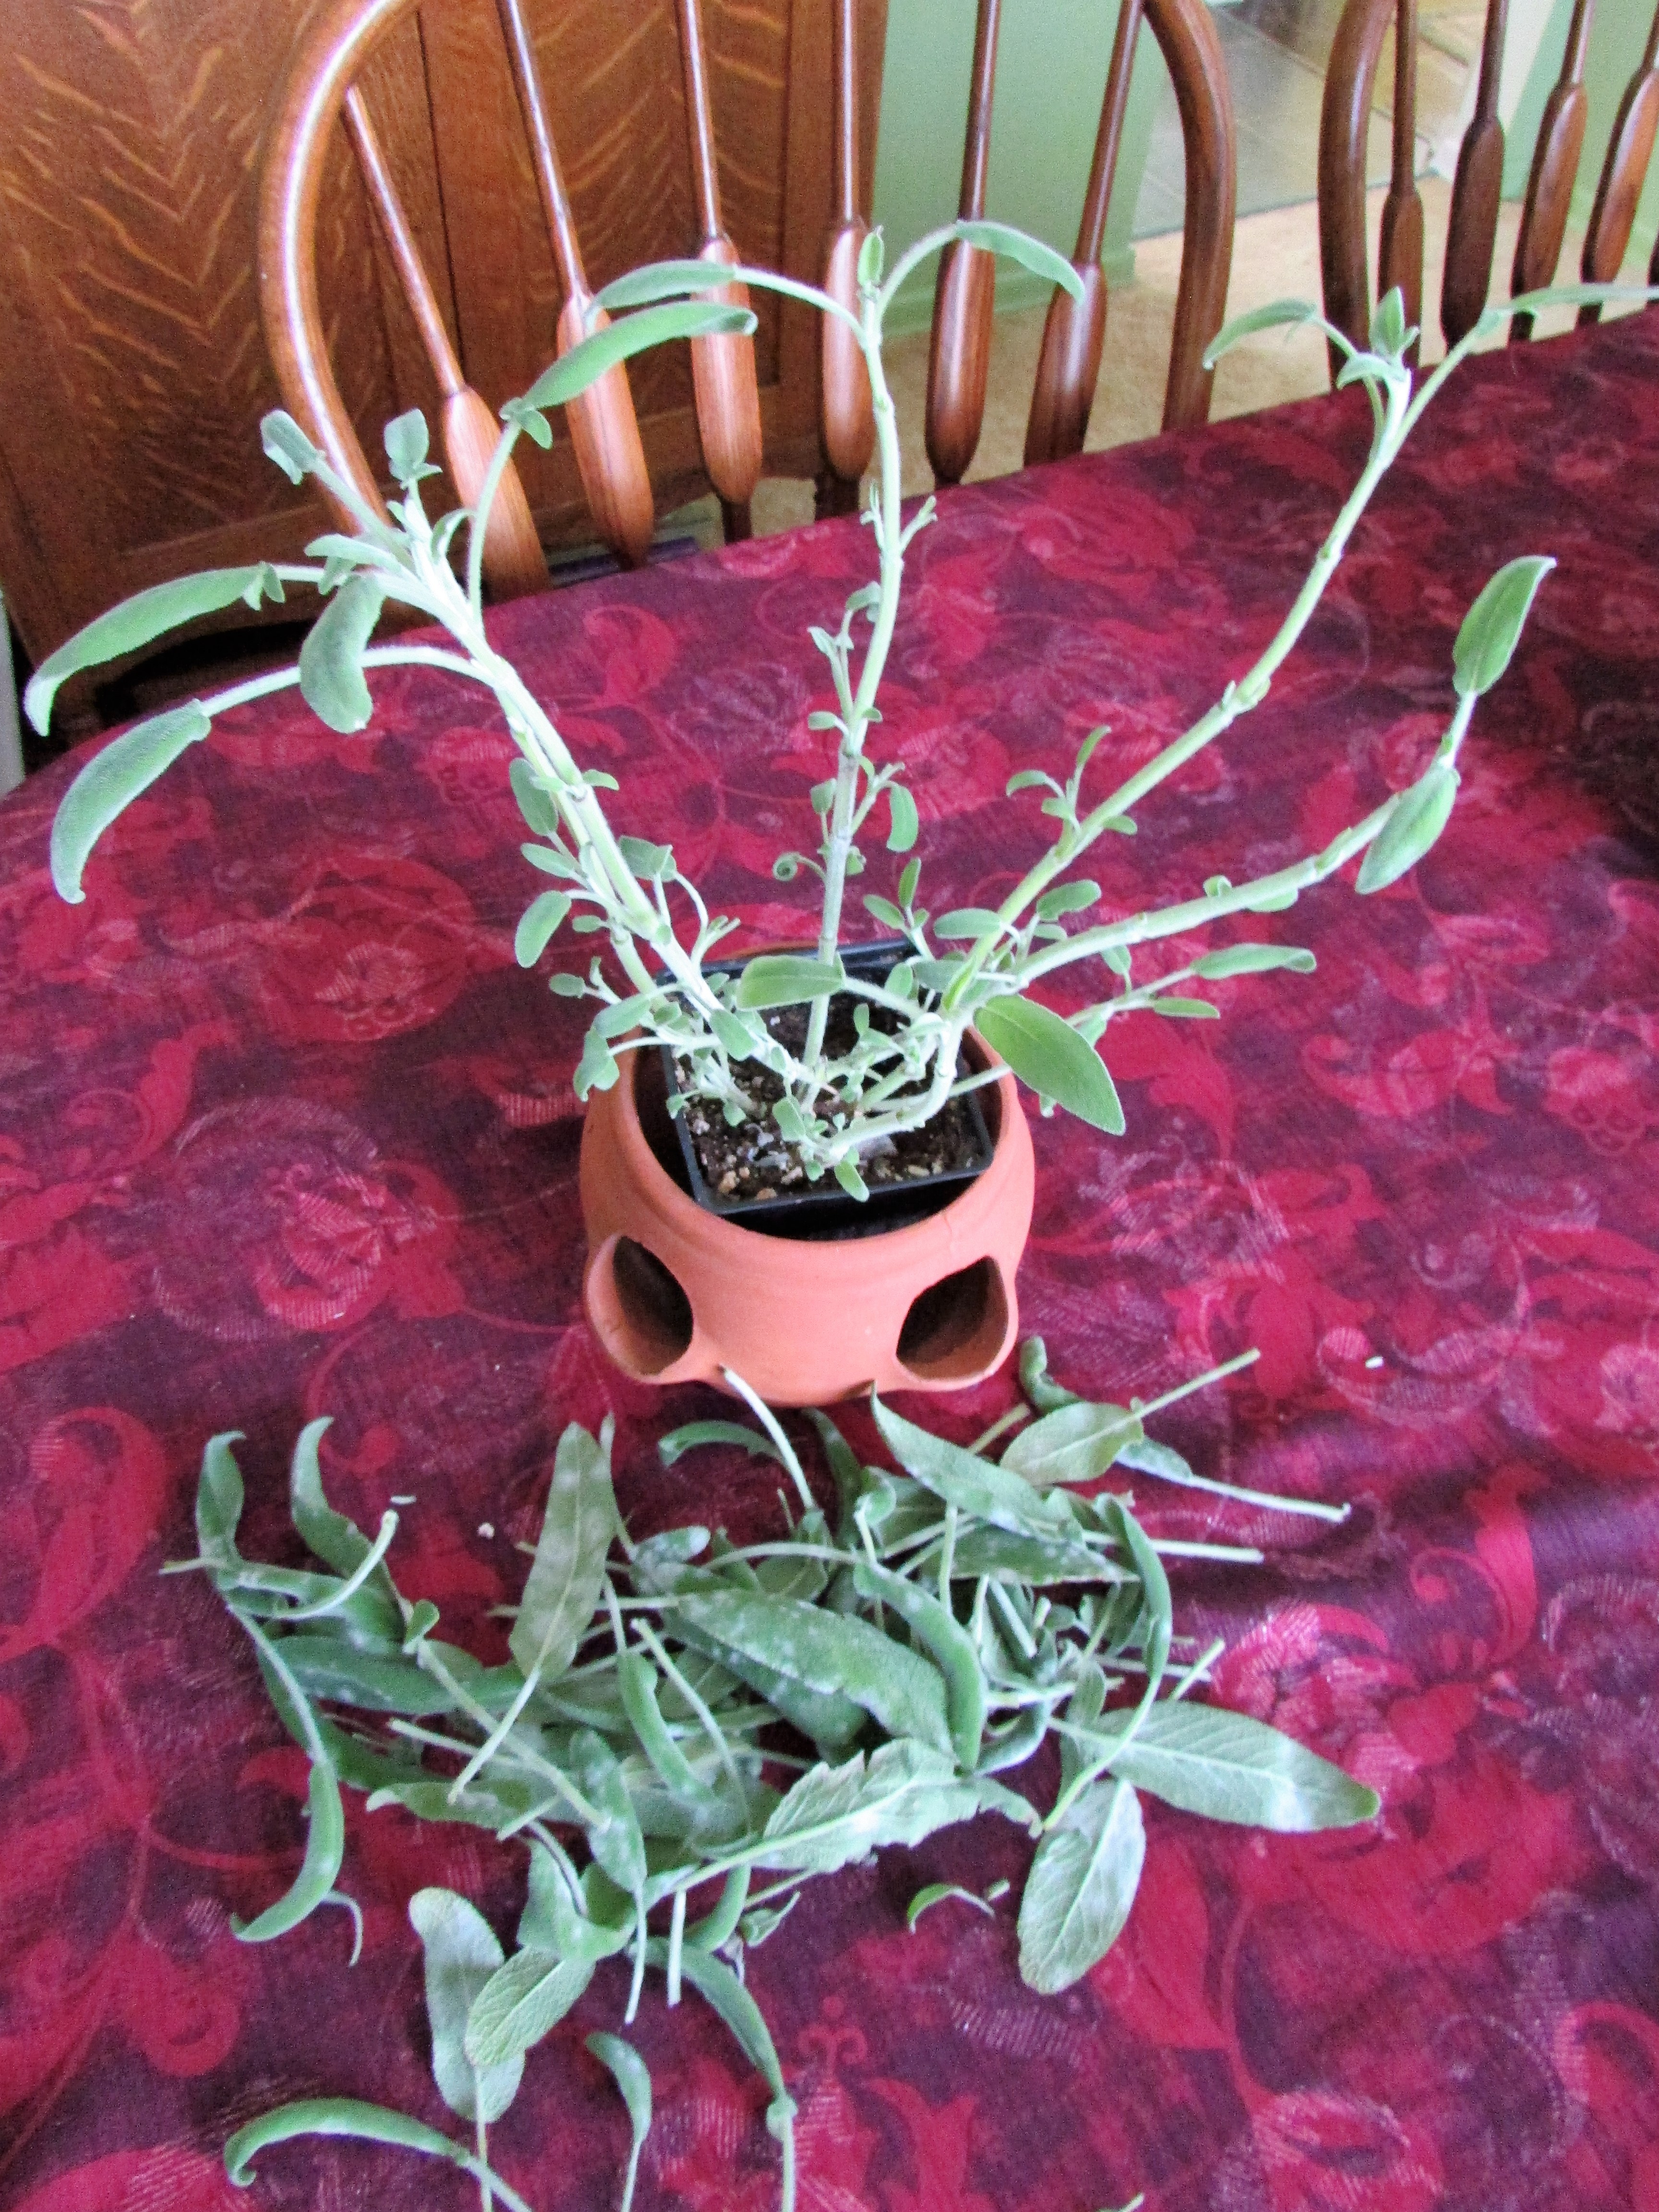
Recently, I was shocked to find my sage plant covered with powdery mildew. How did this happen so fast? While researching, I read mildew is spread by water. Oh no! In an attempt to keep the plant spider mite free I had sprayed with water. I should have used a solution of chamomile tea, a natural fungicide, when I sprayed the sage.
The affected leaves could not be saved. Drastic measures needed to be taken.
I plucked away all the spotted leaves and discarded them, leaving what I hope are mildew-free leaves. I will check the plant daily, and if I find the same problem I will try a spray of chamomile. Placing the sage alongside a rotary fan will help with quicker drying time. If the plant is still diseased I will be forced to discard it and try again. In the meantime, I must remember to keep it in “plant quarantine.”
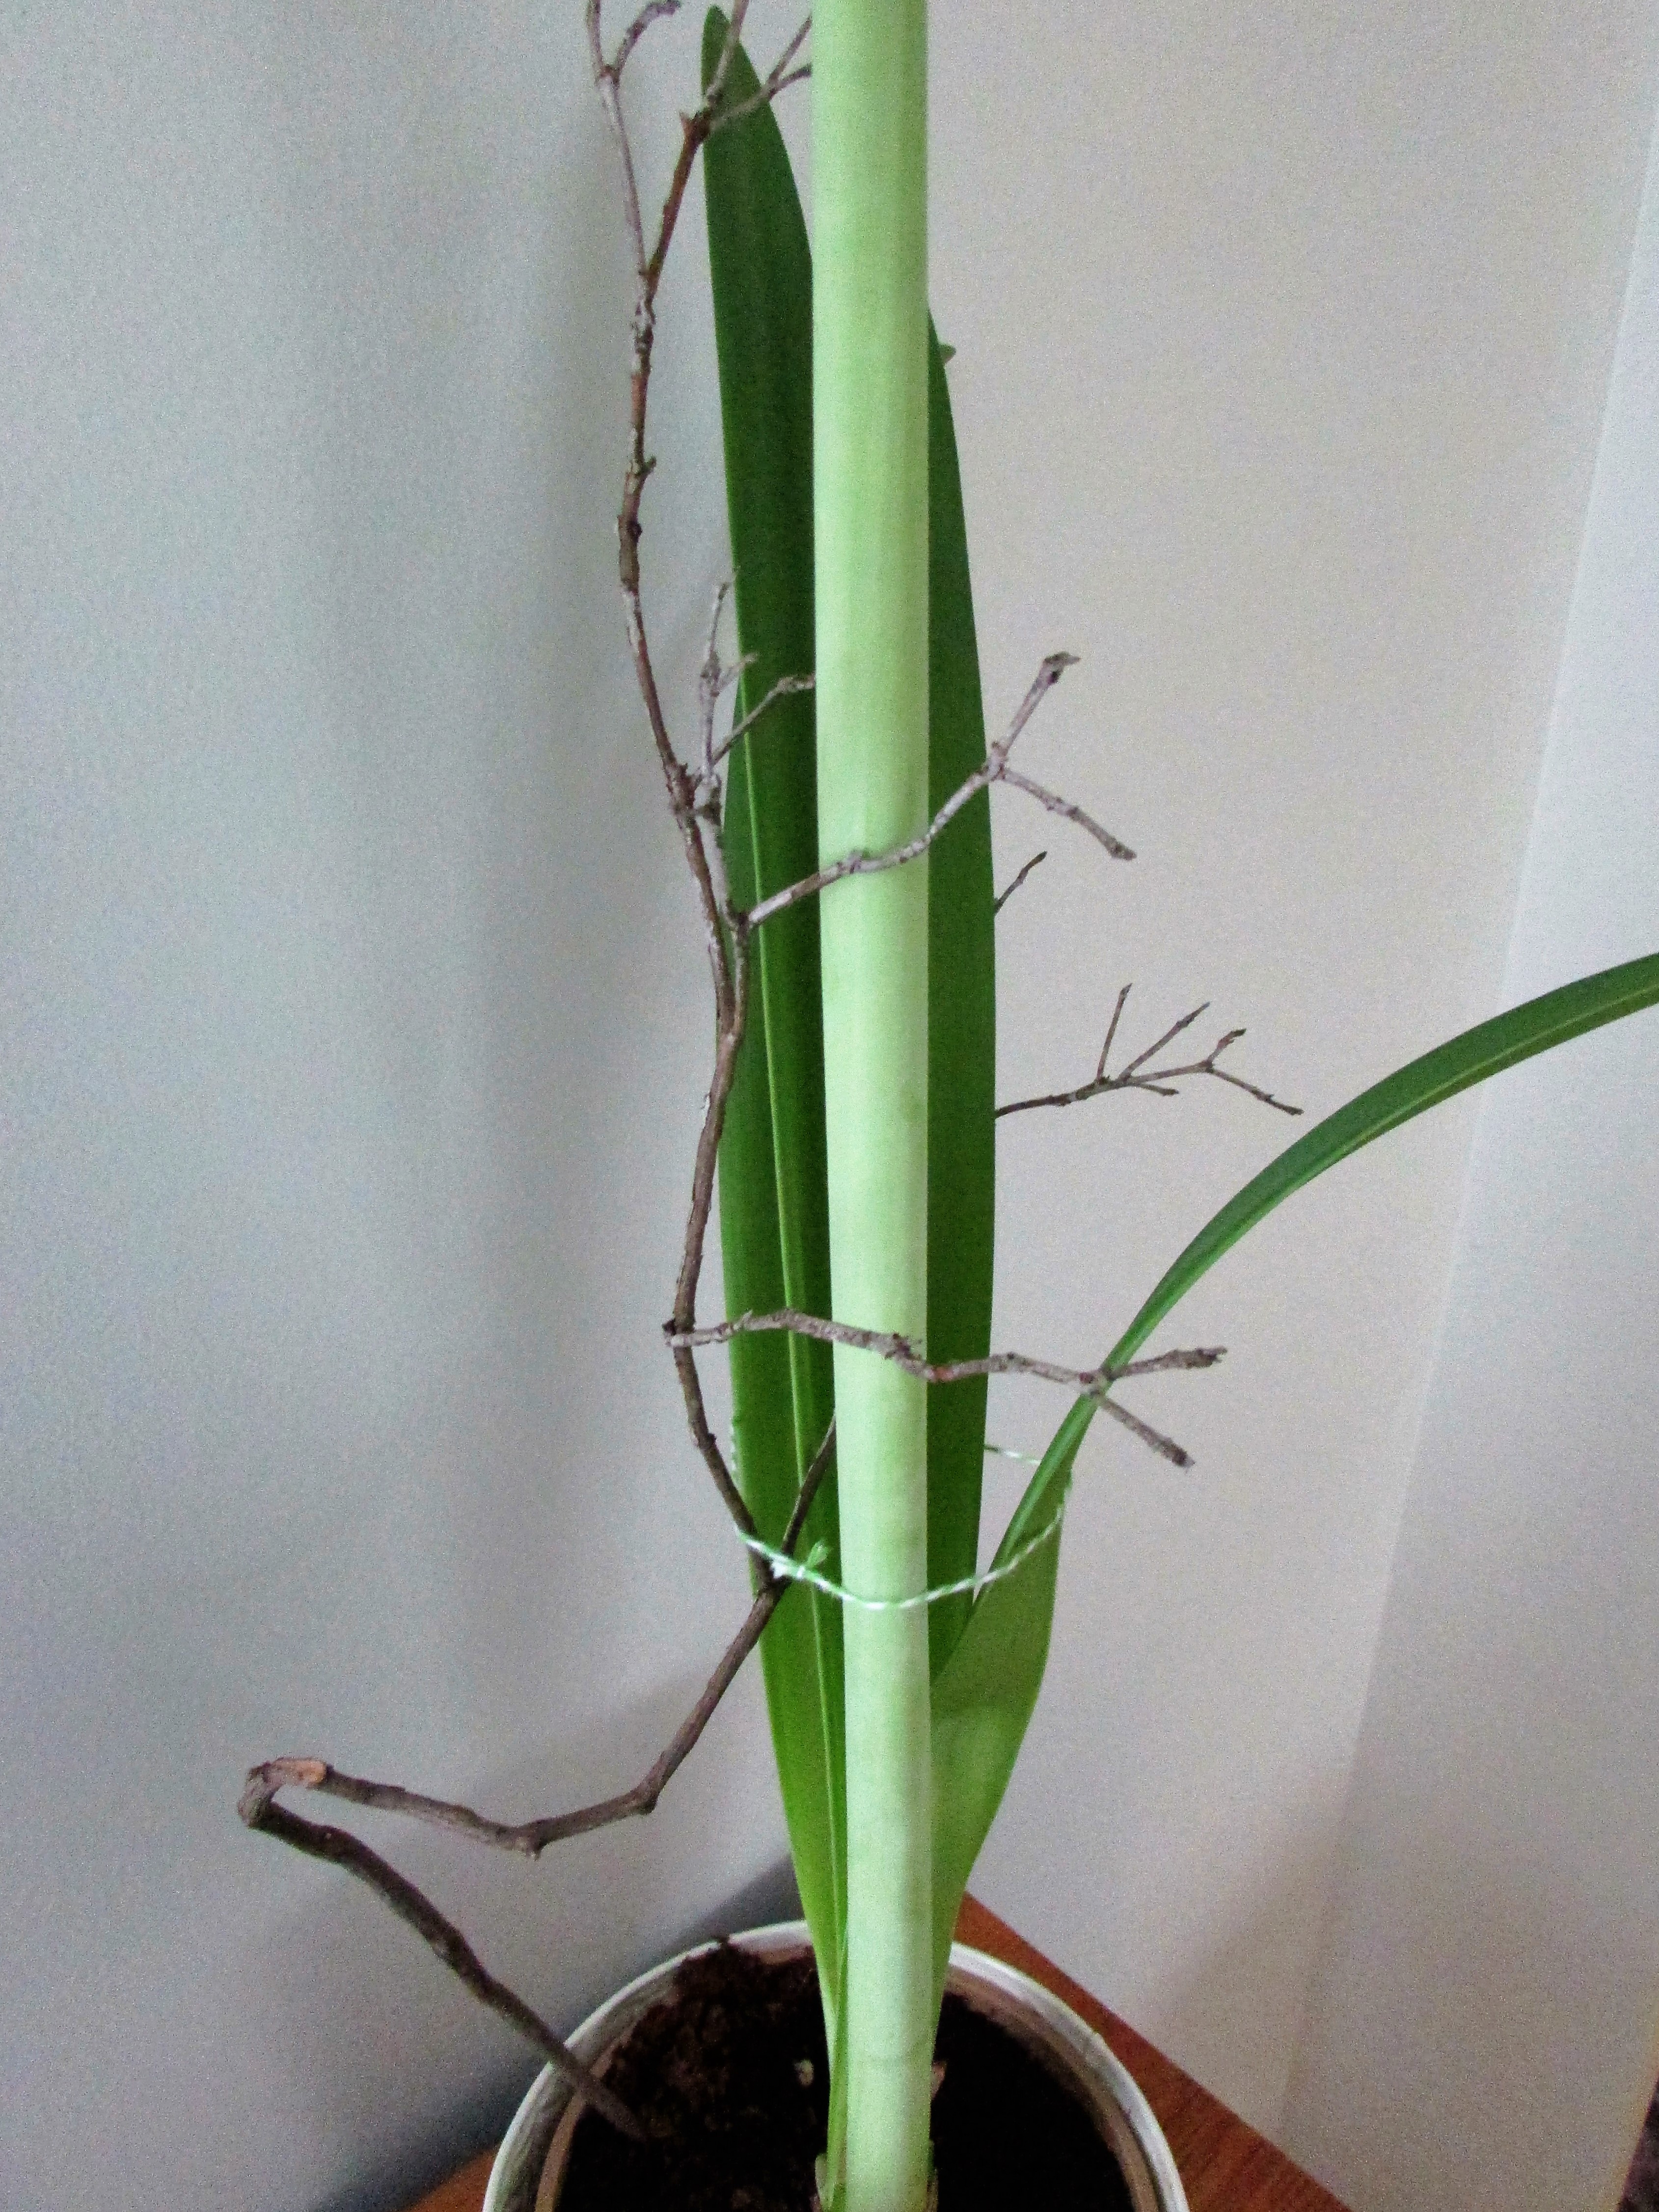
My amaryllis has opened, displaying white petals blushed with pink. Before the plant bloomed, the heaviness of the buds caused the stem to lean precariously to the right. A quick walk in the woods yielded a dead branch from a laurel bush. I prefer to use natural support for my houseplants. The curvy twig was the perfect helping hand for my amaryllis stem, and gives an artsy/woodsy feel to the flower display.
My Thanksgiving cactus (Schlumbergera) is beginning to bloom right on time.
Blossoms and buds cover the tips of the cactus. I summered this plant outdoors on the porch until early Autumn when I brought it indoors. Placed in a window of my cool basement, I kept the plant fairly dry, watering lightly. The cactus is upstairs now showing off its beautiful flowers.
There are plenty of buds in varying sizes, a promise of blooms through Thanksgiving Day.
I found a terrific site with good information on identifying Thanksgiving/Christmas cactus and how to grow and bring them into bloom: Caring for Holiday Cactus
Yesterday was the perfect day for a bit of sunshine in the way of garden catalogs. I found a copy of the Pinetree Garden Seeds Catalog in my mailbox, and in my virtual mailbox I received notification of the new edition of the Baker Creek Heirloom Seed Catalog. Both of these favorites were a high point in a rather cloudy day.
The arrival of these catalogs prompted me to pull out last year’s garden journal. I use a spiral notebook for my garden notes. I appreciate having the option of pulling out a page I’m disappointed with, and I also like the low price. (50 cents to $5.00) I’ve tried fancier, and more expensive journals, but prefer an inexpensive spiral with an interesting print as a cover, or as in the case of this year’s notebook, an intense garden green.
I tape plant tags, glue down used seed packets, and make notes to myself on these pages. Perhaps tonight I will read through each entry and highlight the plants that were successful, or write a big, “NO!“beside the disappointments I don’t want to repeat.
Even though gardening might be a low priority on your to-do list now that Autumn is waning, it is the perfect time begin dreaming and planning for the 2016 growing season.